· Medcera fusion is a free electronic health record (EHR) system which has nodes for physicians, health insurers, labs, imaging centers, pharmacists, and patients.
· It is a transition from patient’s paper chatting to digital version.
· It is a pioneering integrated EHR system which means that once a patient has his/her record in one hospital, that record is available in all approved clinics, at the same time, under the highest patient privacy rights and digital security. The patient can lock that data, releasing it to only clinics/physicians it wants through Medcera Practice Access Management.
· Fusion makes it easier for physicians to have access to medical histories of patients as they administer care.
· Fusion improves productivity, advance patient outcomes and accelerate medical innovations.
· It Streamlines administrative tasks and enhances billing efficiency.
· Medcera fusion is fast, user friendly, intuitive, flexible and interoperatable.
· It comes with tack benefits of templates, dictation, multimodal input, bank level security and lots more.
· Click on this link to open fusion portal https://fusion.medcera.com
2.1 Login
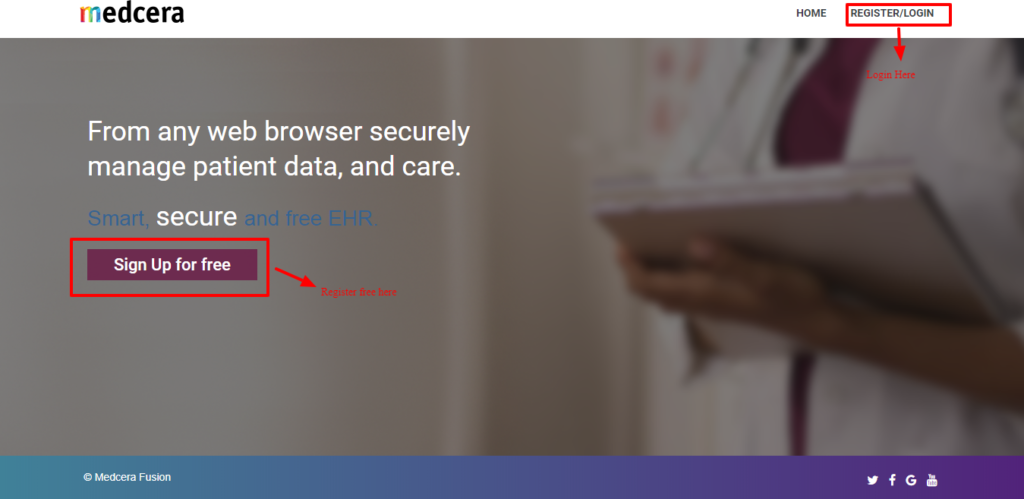
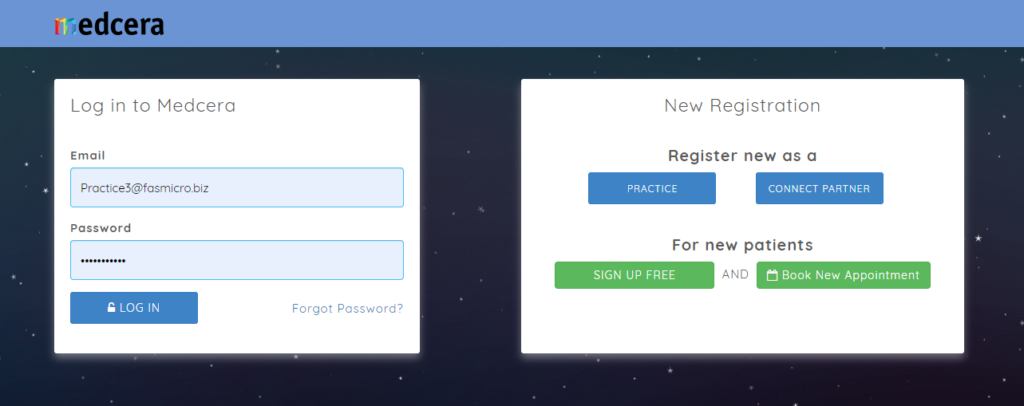
- Open fusion portal by clicking on this link https://fusion.medcera.com/
- It will show the page below:
2.2 Registration
- Click on “Register/Login”button to register or to login.
- Once user clicks on the “Register/Login”button, shows the screenshot below.

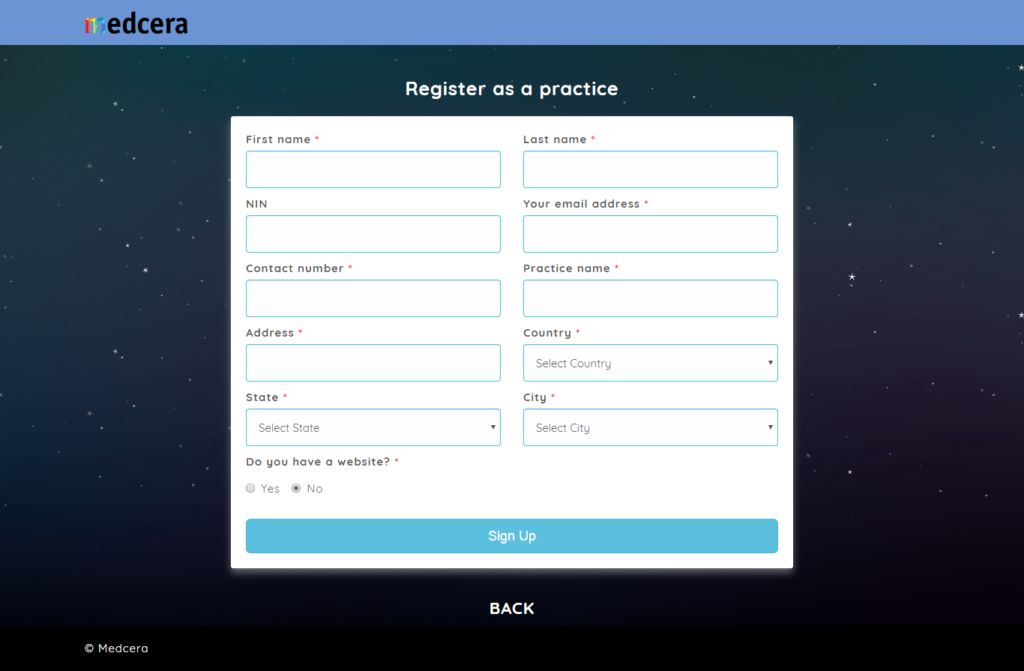
- If you are a new user, click on register as a “Practice or Connect Partner” and for new patient, click on “Sign up free”
- Fill out the mandatory fields as shown in the screenshot below:
- After successful registration, the message below props up.
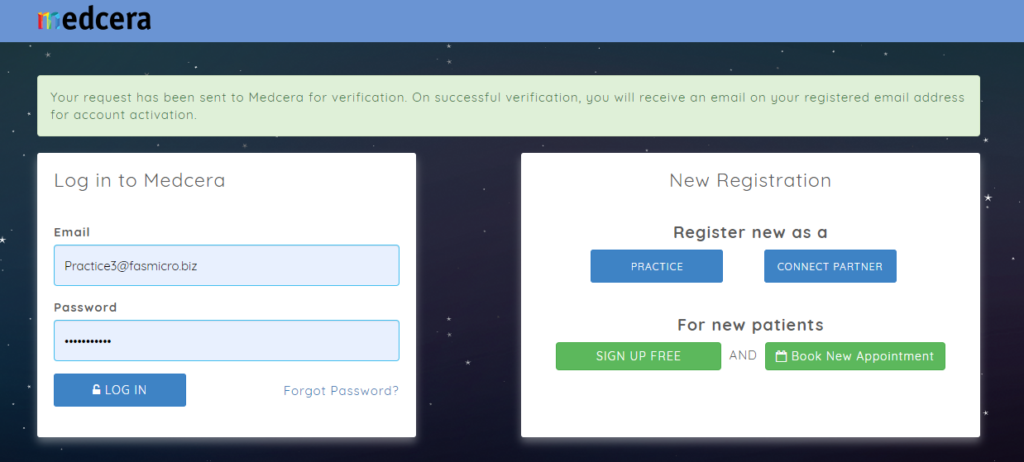
- An email will be sent to the registered email address.

- In order to activate your account you have to click on above shown URL.
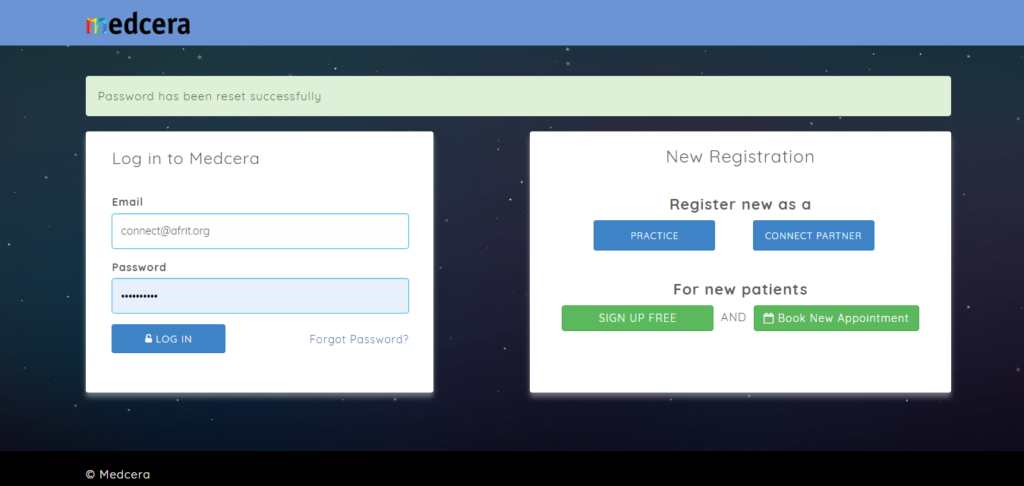
- Now reset your password, and confirm your password.

- On successful password setting your account will be activated and you will able to see below screen.
2.3 Log In
Once after account activation, you will able to log in from https://login.medcera.com/
- On successful login, the user will be redirected to Medcera Fusion dashboard.
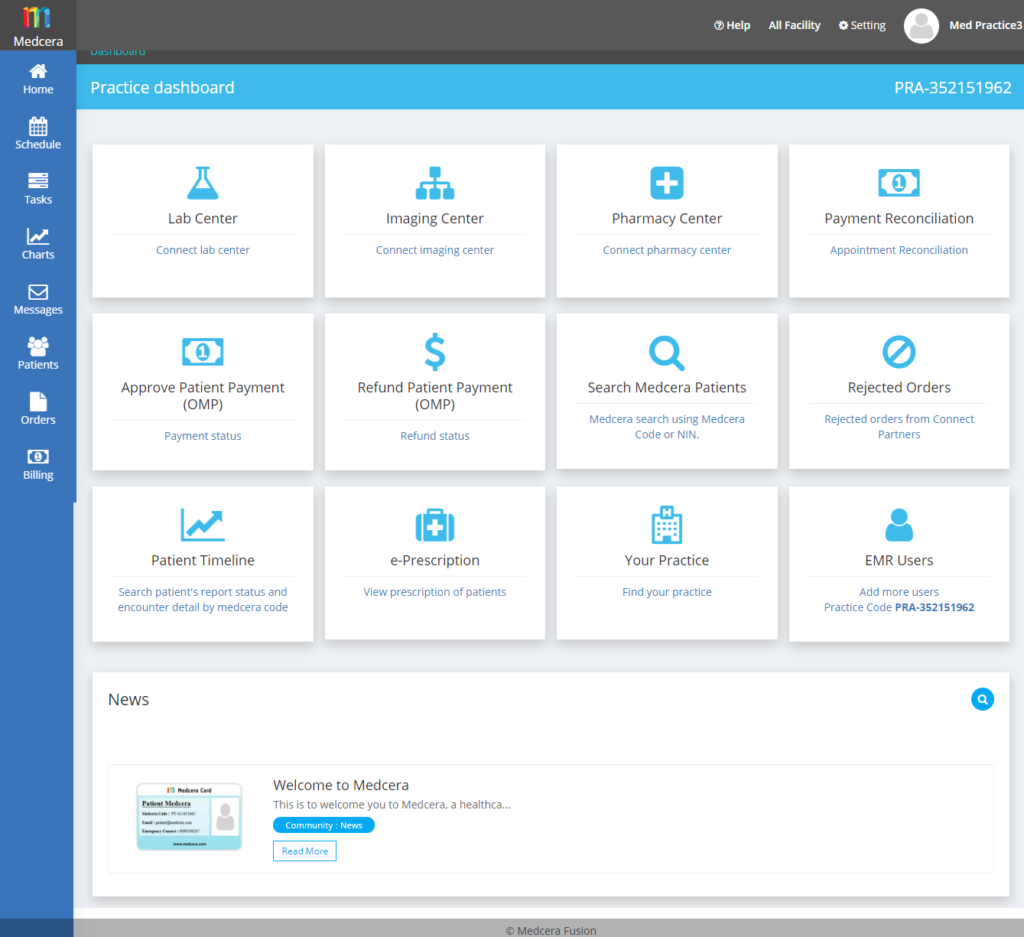
- On the top right corner of the dashboard, you can see “Med3 Hospital “as the practice or main hospital while “Tim hospital” is a branch of the main hospital
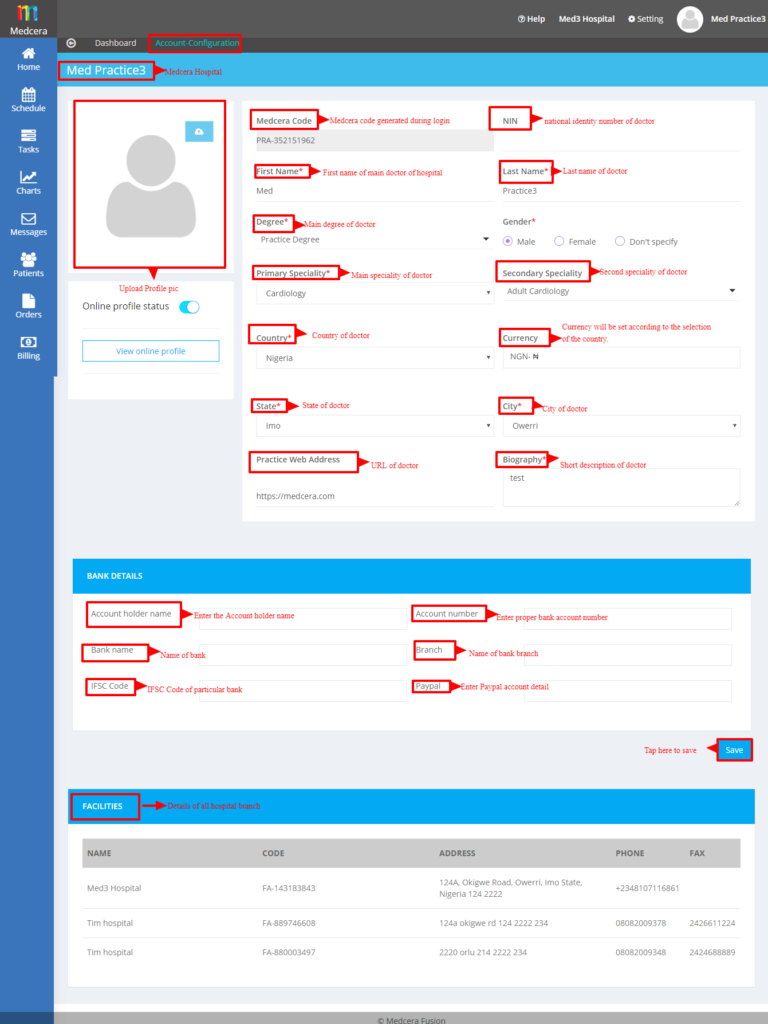
- User logging for the first time, will have to fill their additional personal details clicking on “Account Configuration” in the side bar menu. For this, you can click on the top right corner on your dashboard. Here will see basic details with registered Name and given Medcera Code (i.e. generated default while creating an account e.g. PT-*********).
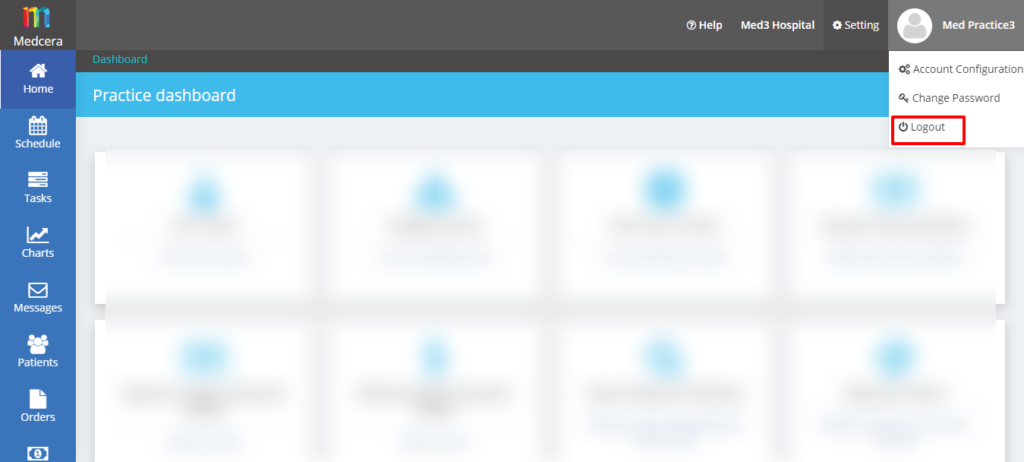
- By clicking on a drop-down menu from a profile, you will able to see below three options:
-
- Account Configuration
- Change Password
- Logout
-
- Click on “Account Configuration” from the drop down.

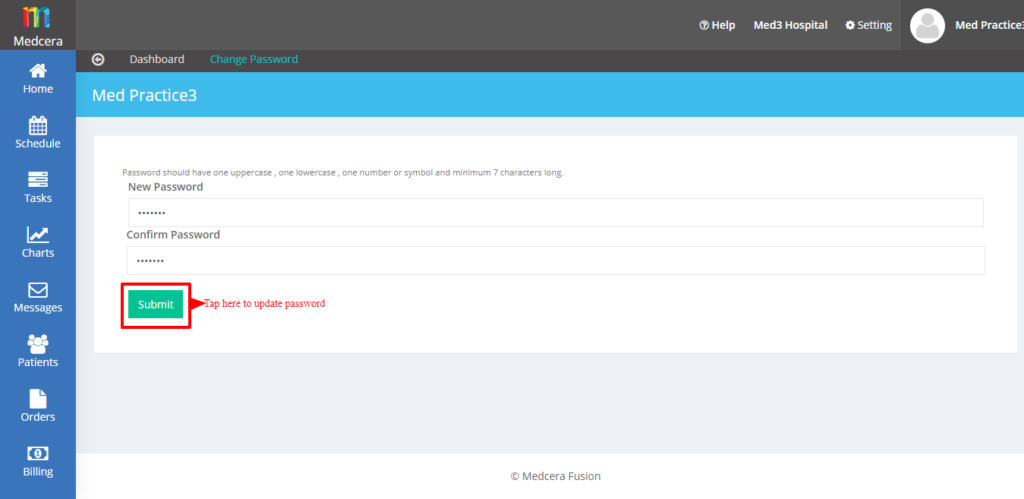
- You can change/reset the password by clicking ‘Change Password’under the profile tab. Enter a new password, confirm the password and submit by clicking the ‘Submit’ button as shown below:

- By Clicking ‘Log Out’ from drop-down menu Partner can log out from the account as shown below:
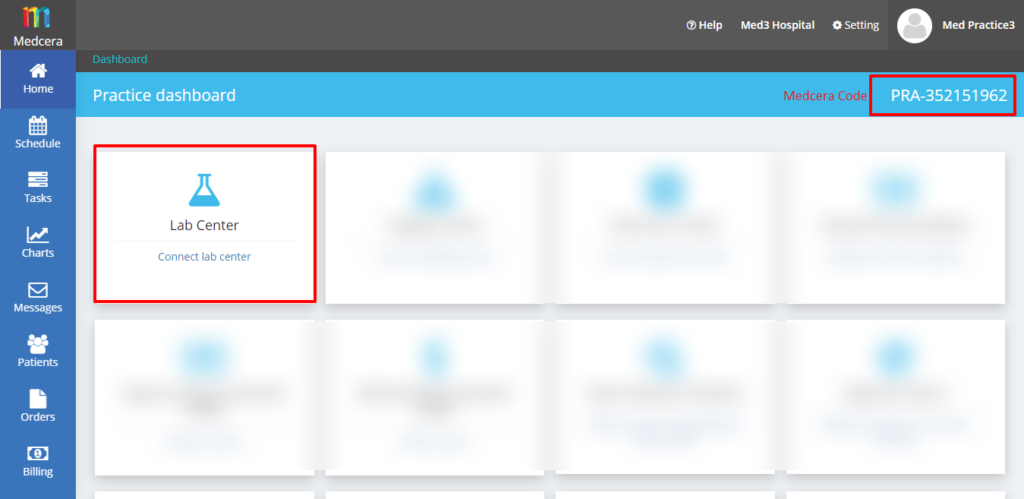
- In the dashboard as shown in the above screen, “Lab Center” shows the list of all Labs that are connected to Medcera.
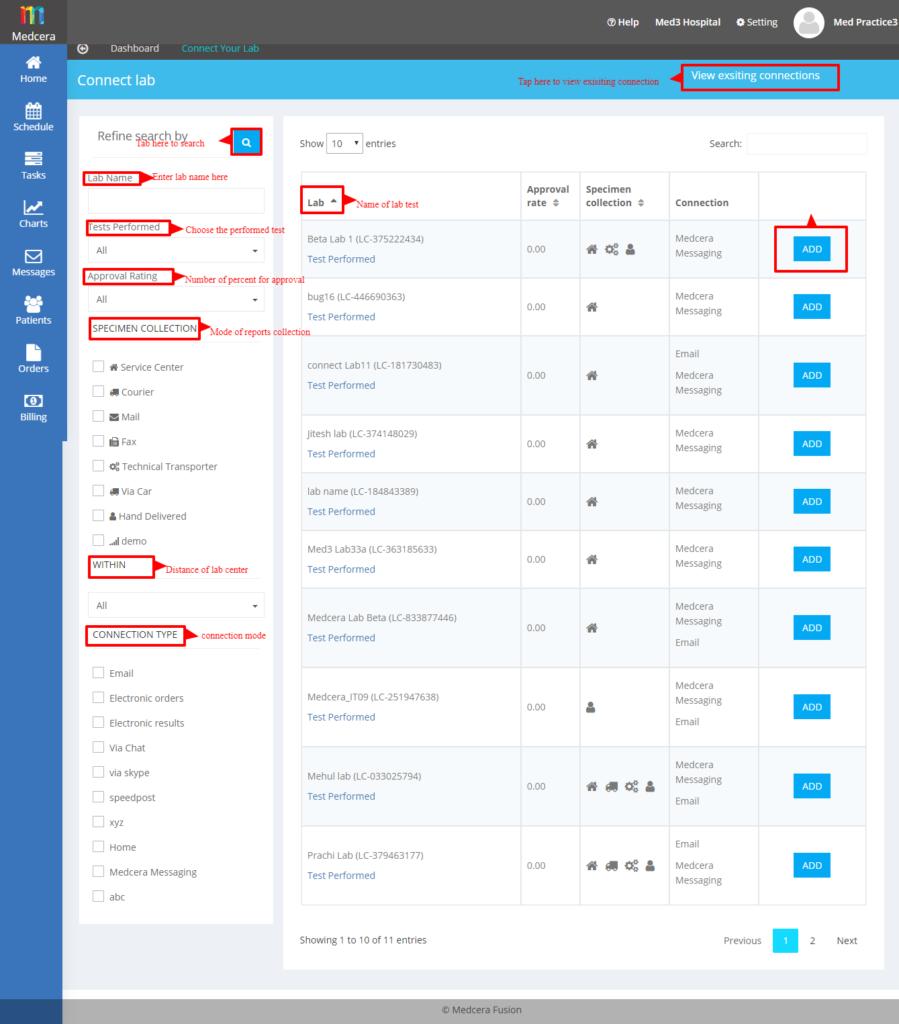
- Click on “Connect Lab Center” button under the Lab Center tab and search for your preferred lab in Medcera using lab name.
- Select specimen collection mode and connection type.
- Click on “ADD” button as shown in the above screen.
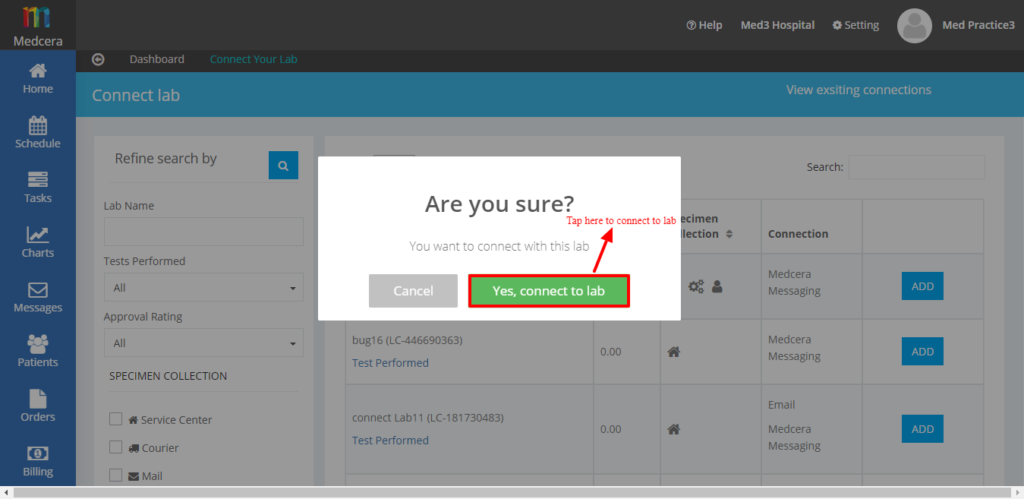
- Click on “Yes, Connect to Lab Center” in the dialog box to add new lab.
- User can disconnect their practice from existing lab center by clicking “Disconnect” button.
- Click on “View Existing Connections” button to view existing lab connected to a practice as seen below.

- A click on “Connect to more labs” button will redirect user to the page “Connect your labs”
- User can disconnect their practice from existing lab by clicking “Disconnect” button. See screenshot below.

- In the dashboard as shown in the above screen, “Imaging Center” shows the list of all Labs that are connected to Medcera.
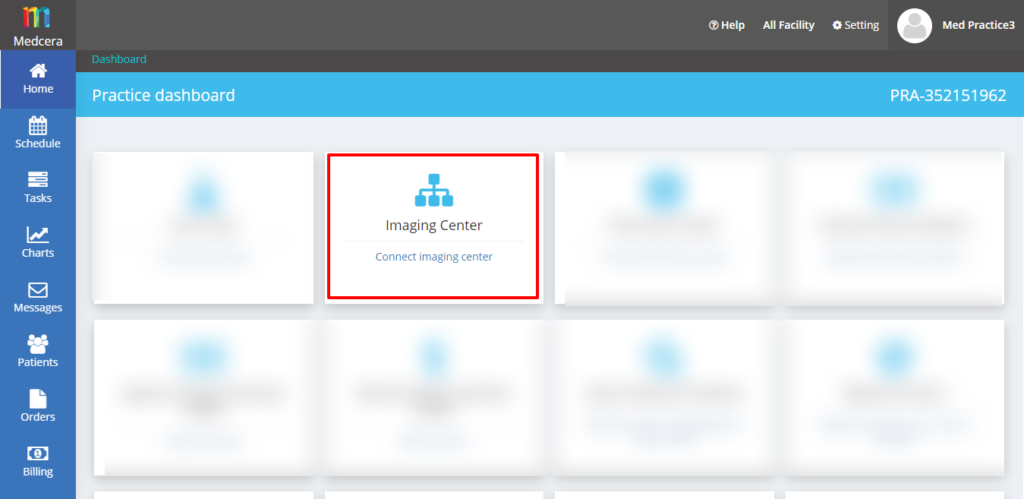
- The dashboard shows the list of all imaging centers in Medcera.
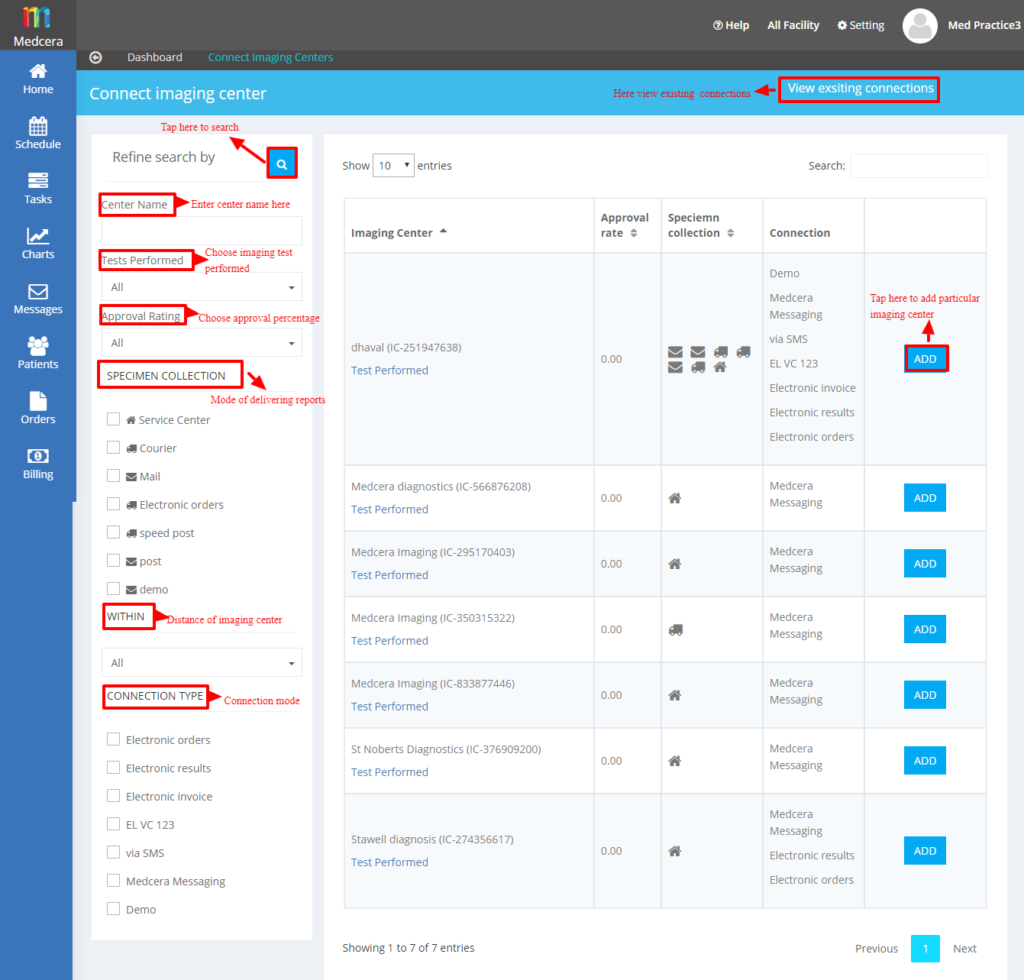
- Click on “Connect Imaging Center” button under the Imaging Center tab and search for your preferred Imaging in Medcera using Imaging name.
- Select specimen collection mode and connection type.
- Click on “ADD” button as shown in the above screen.
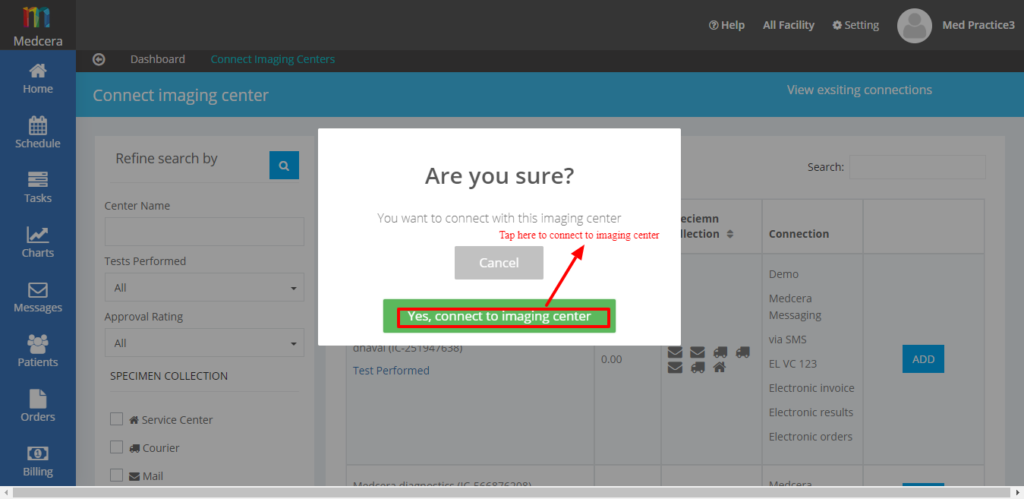
- Click on “Yes, Connect to Imaging Center” in the dialog box to add new lab.
- User can disconnect their practice from existing Imaging center by clicking “Disconnect” button.
- Click on “View Existing Connections” button to view existing Imaging center connected to a practice as seen below.
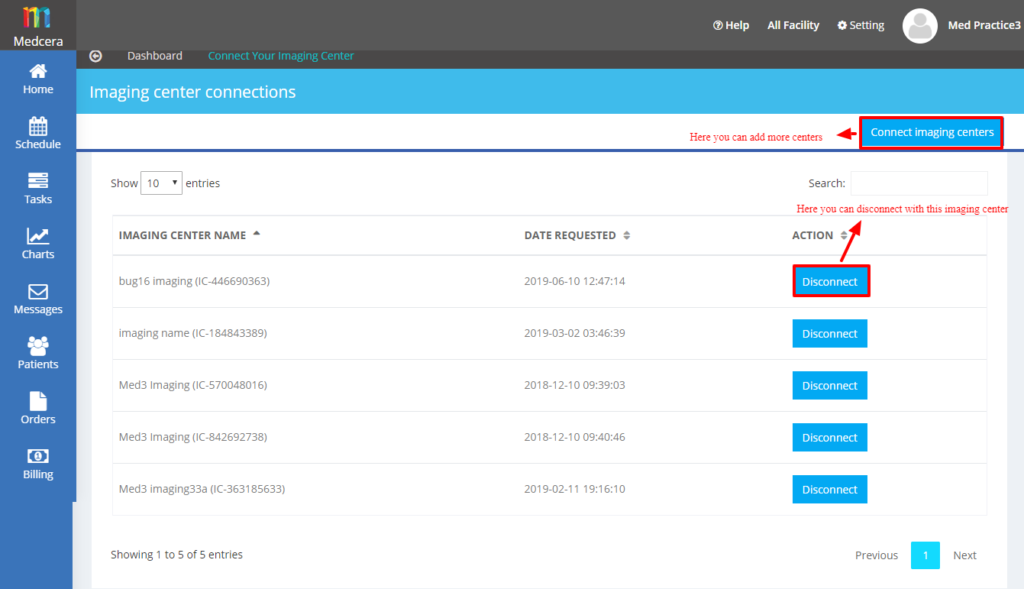
- A click on “Connect to more Imaging” button will redirect user to the page “Connect your Imaging”
- User can disconnect their practice from existing imaging by clicking “Disconnect” button. See screenshot below.
- In the dashboard you will see “Pharmacy Center” as shown below:
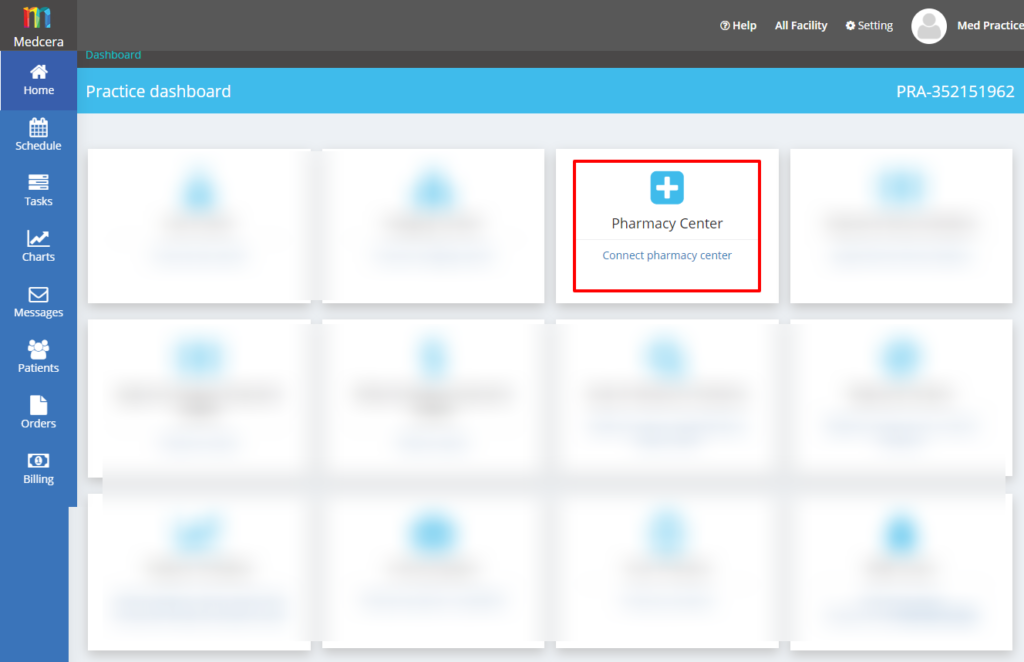
- This dashboard will showthe list of all Pharmacy centers in Medcera.
- This will help you to connect with this Pharmacycenters and connecting it will be shown in “View Existing Connections”
- After clicking on “ADD” button you will get below message
- After clicking on “View existing connections” you will able to see below screen:
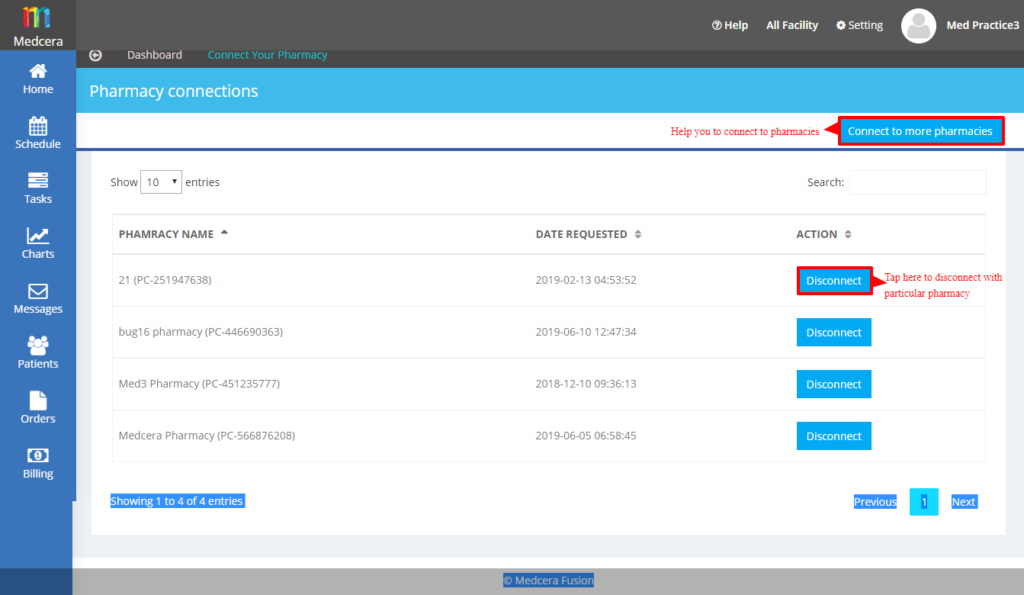
- If you click on “Connect to more pharmacies” button you will be redirected to the page “Connect your Pharmacy” page.
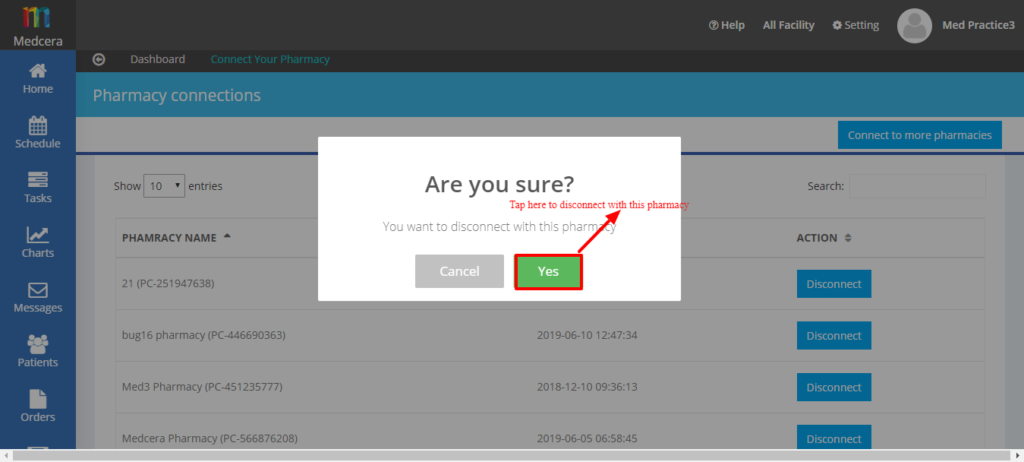
- Once you tap on button “Disconnect” you will get below message:
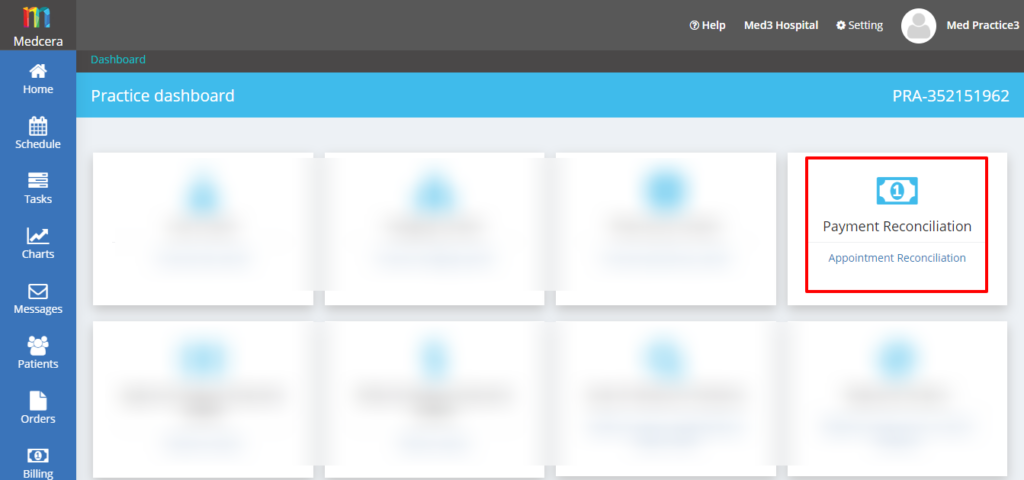
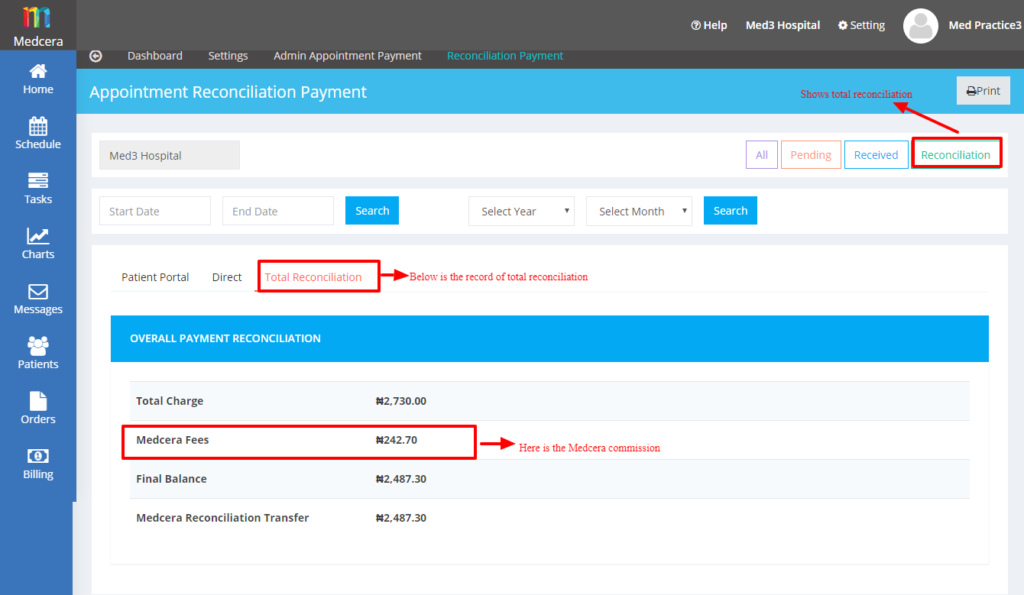
- In the dashboard you can see “Payment Reconciliation” ” which shows the appointment payment details of doctors.
- It is divided into two parts and by default you can see payment reconciliation of current month.
- Patient Portal: In this part, the appointment fees will have to be pay to the admin and after that admin will pay these fees to fusion.
- Note:Here the Patient Portal = IMP
- Direct Portal:Here in this part the appointment fees will have to be pay to the fusion as the patient pays fees directly to the fusion.
- Note: Here the Direct Portal = OMP
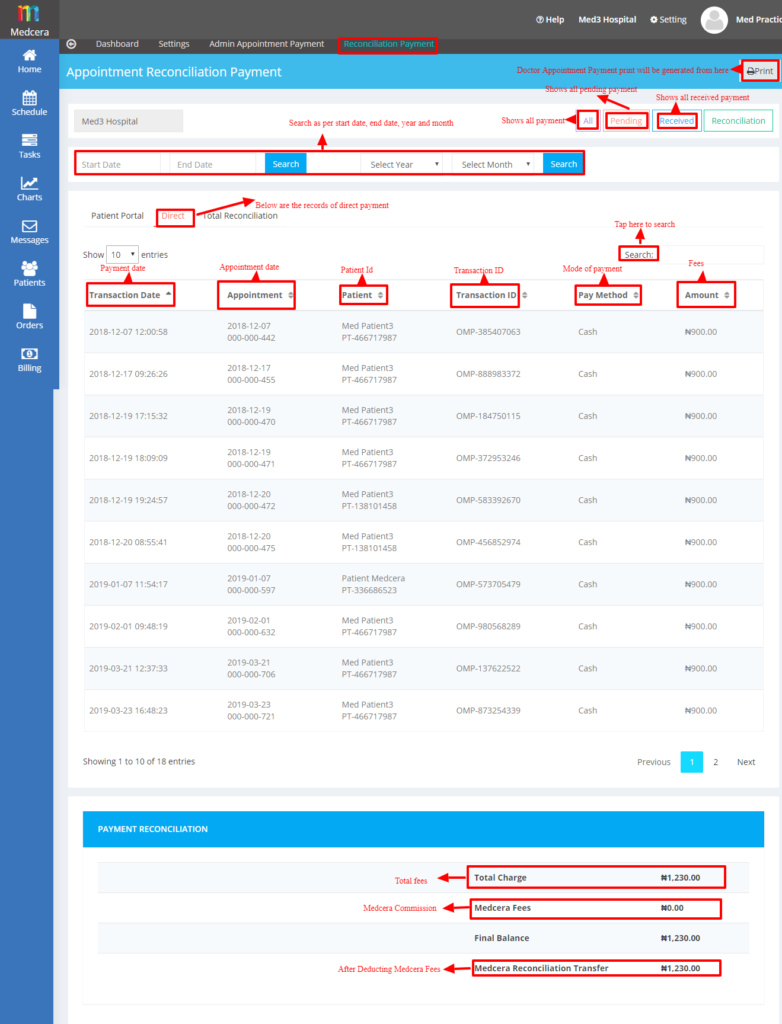
- Total Reconciliation (It is a total payment from all two parts i.e. Patient Portal, and Direct).
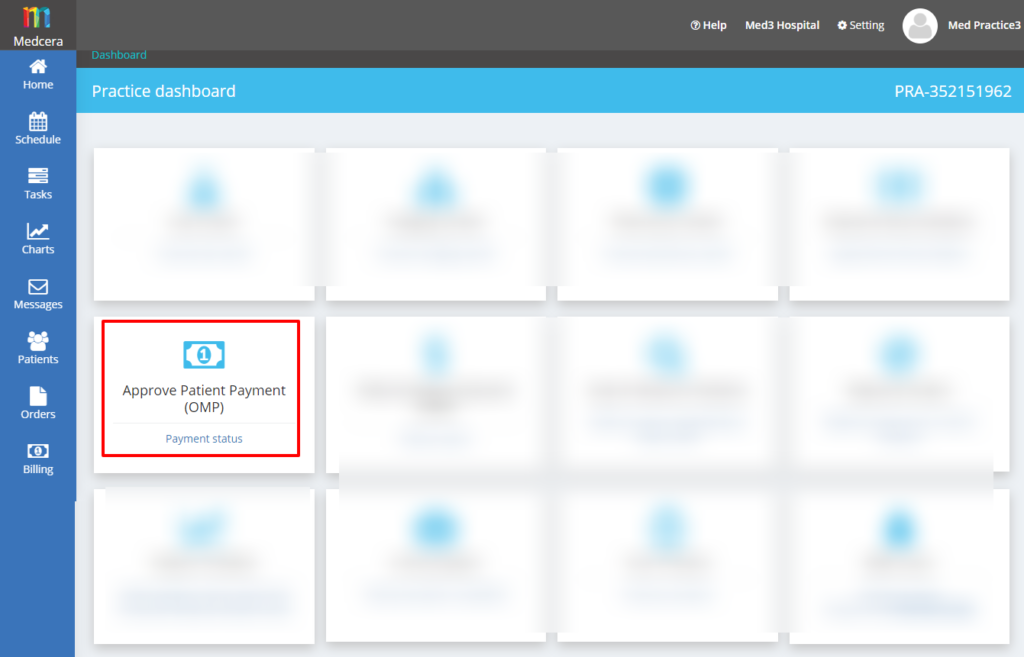
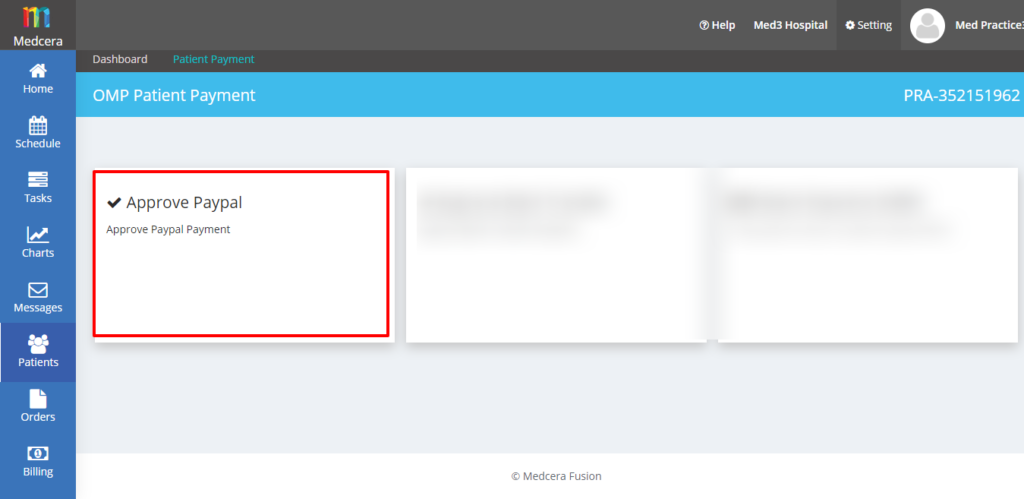
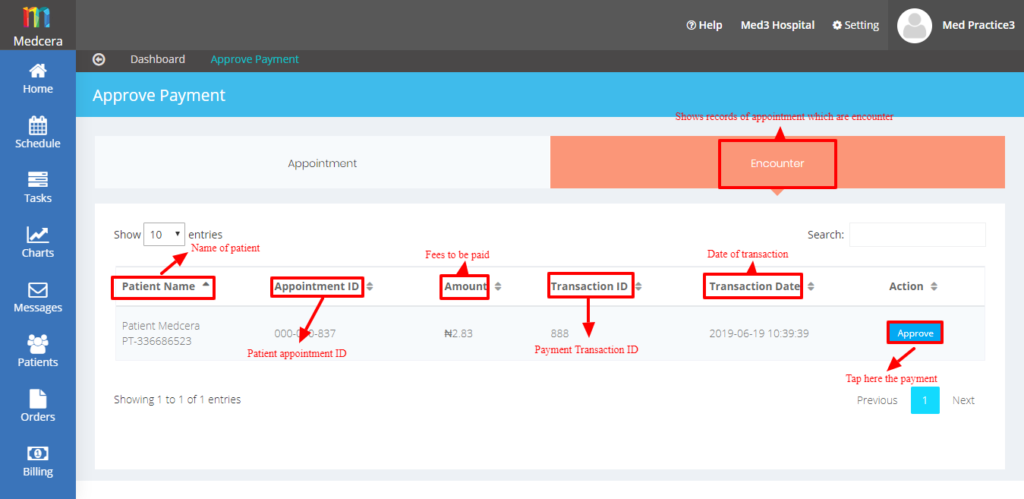
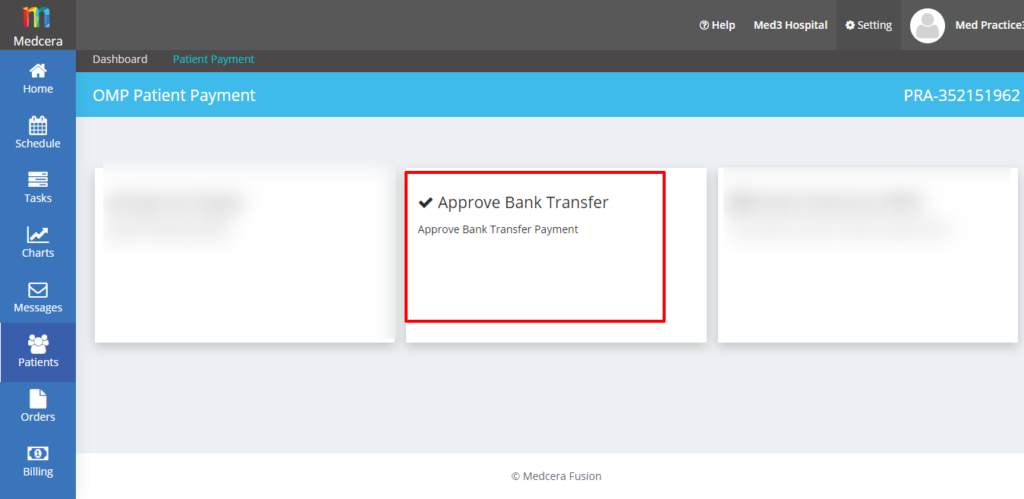
- ”Approve Patient Payment” has three sections: Approve Paypal, Approve Bank Transfer and Patient Payment (OMP)
- Approve PayPal: In this payment option, payment for fusion appointment or connect partner order goes directly to recipient.
- A click on payment takes patient to paypal.me (This link will be generated from Account Configuration)
- Click on the activation link in registered Email to activate your paypal accounted.
- Upon account activation, a transaction Id will be generated.
- Upload the ID into Upload Receipt in Patient Portal.
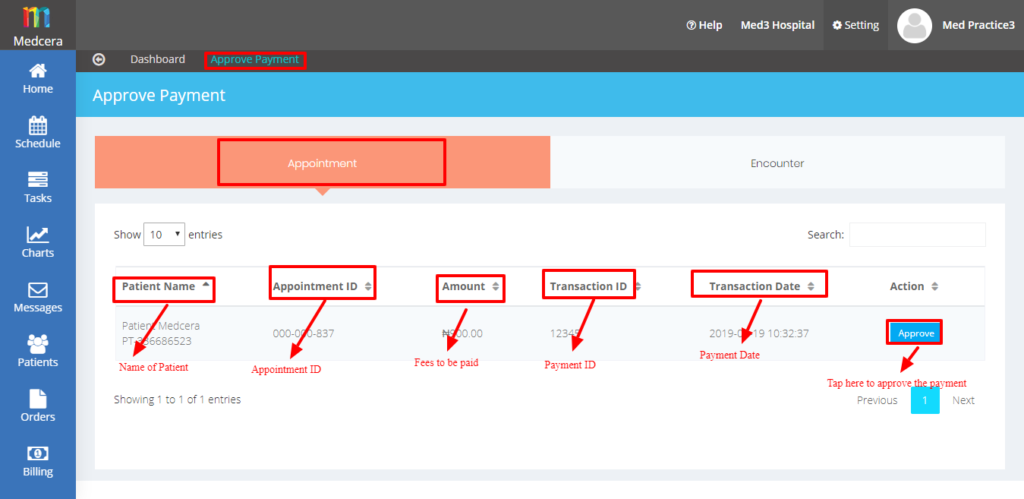
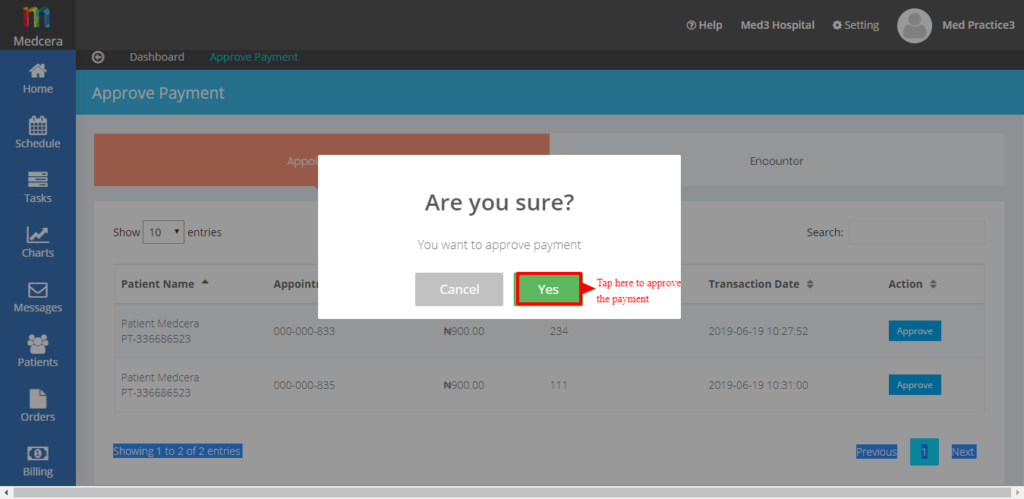
- Tap on “Approve” button to complete payment as shown below.
- Bank Transfer: In this payment option, patient pays through the bank. After payment, he/she will get a receipt from the bank to upload. Connect partner then confirms and approves the payment.
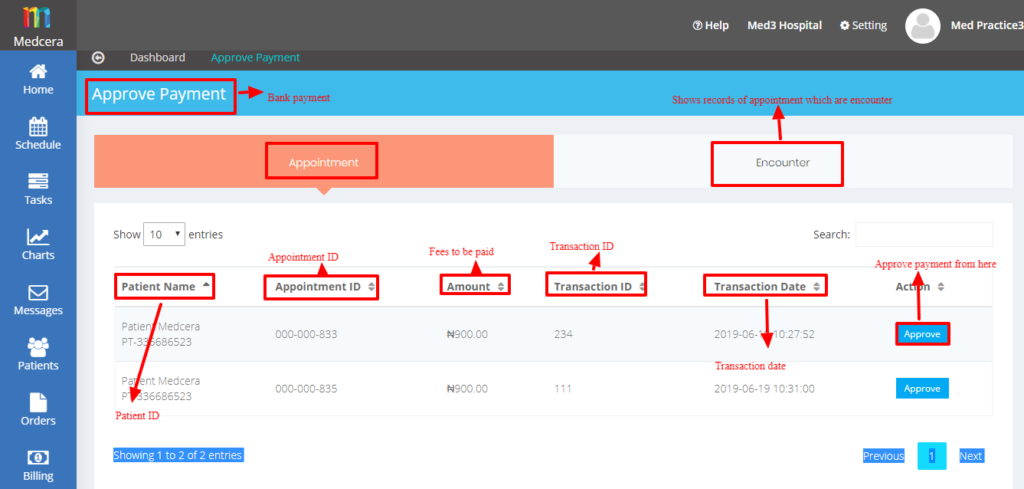
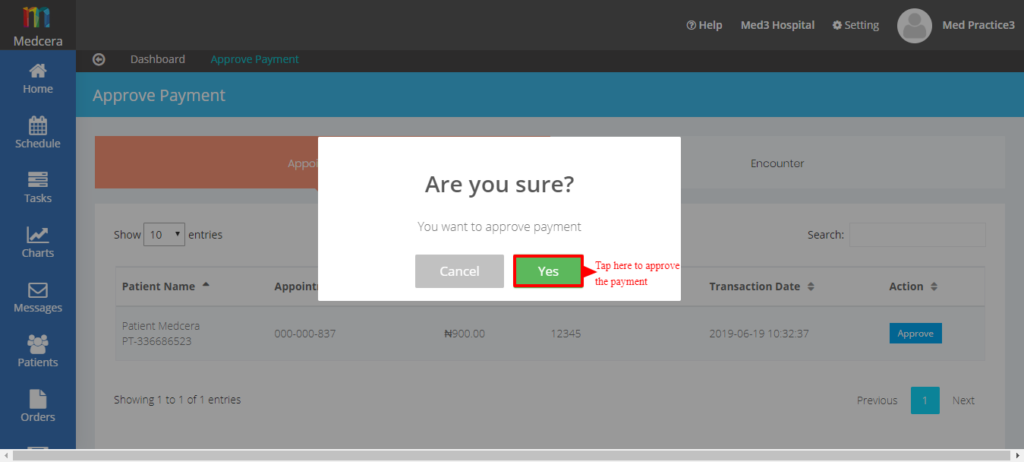
- Click on “Approve”button to complete payment:
- Patient Payment (OMP) This section will help you to view all the appointment status of patients
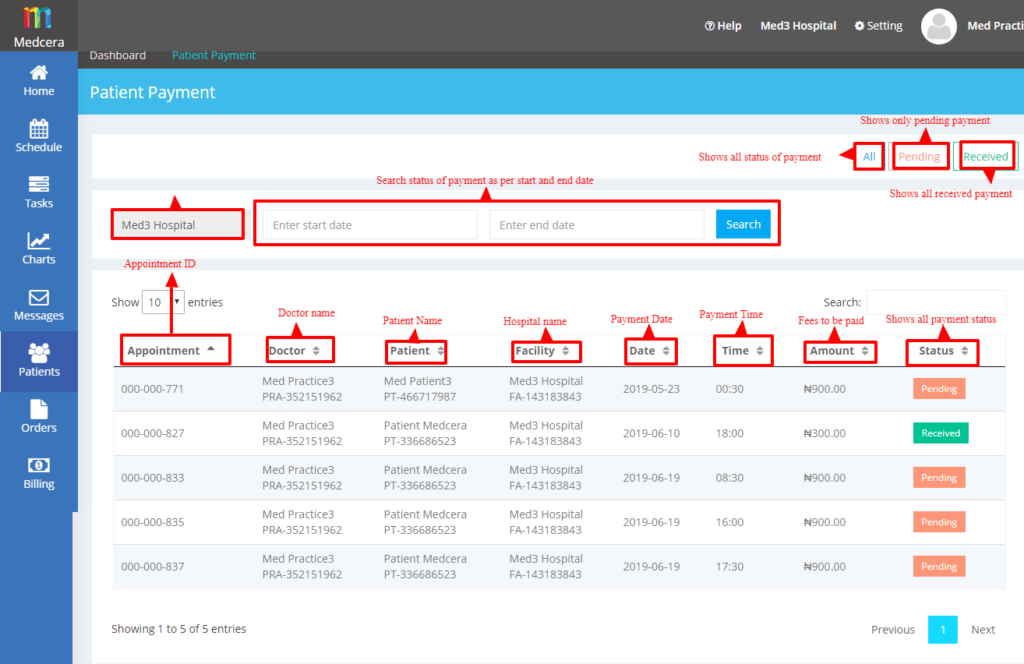
- Note that only current month record status will be shown.
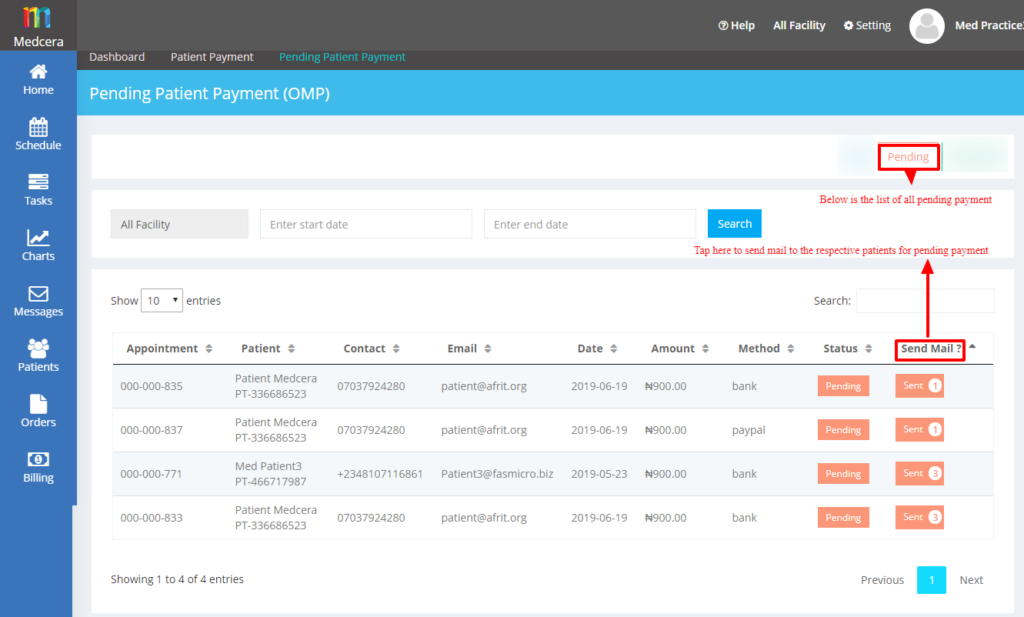
- Once you tap the “Sent” button, you will receive the message below:
“Mail has been successfully send to the respective patients for pending payment”
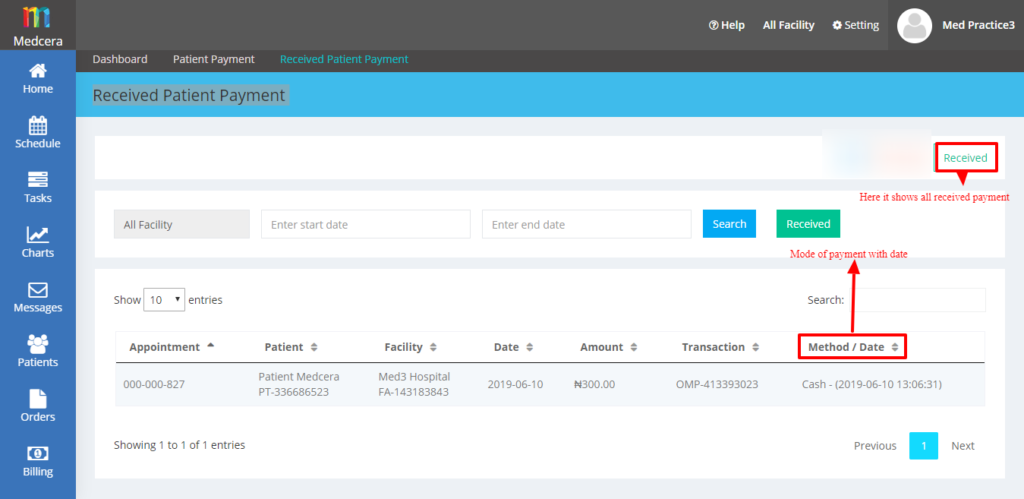
- Received Patient Payment will show the records of all received payment with mode of payment.
- The status of all refund payments can be viewed under this tab.

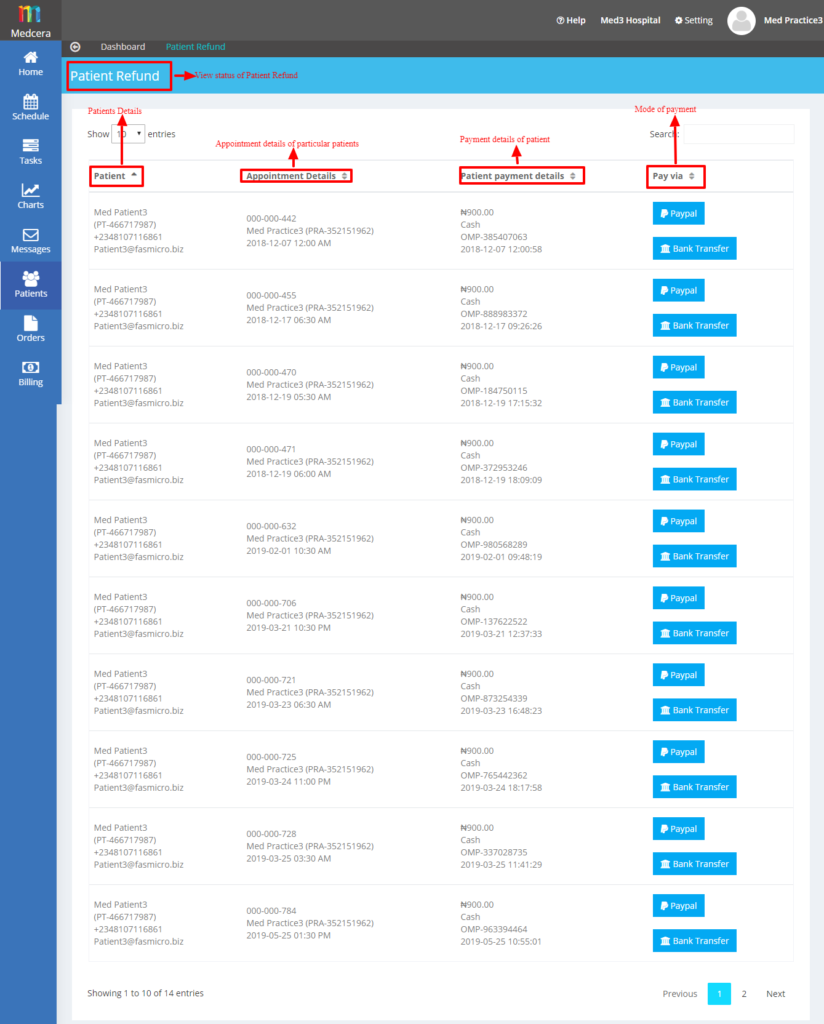
- Click on “PayPal” button to access PayPal link for a refund of the payment.
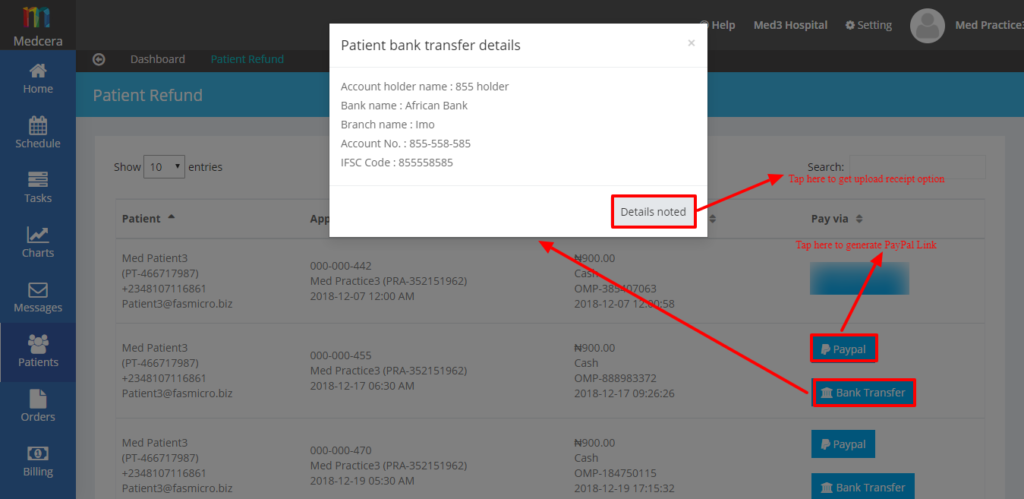
- Click on “Bank Transfer” button to access “Patient Bank Transfer Details” which have an option “Details Noted”.
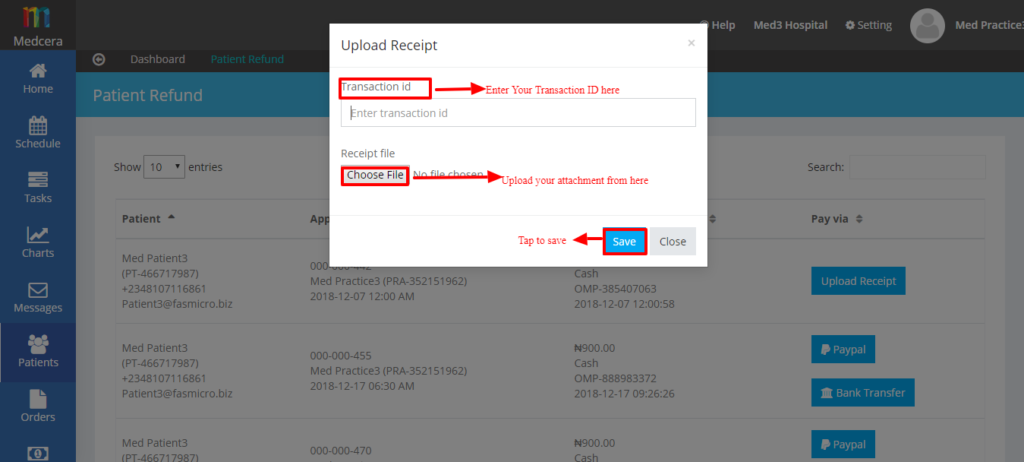
- Click “Details Noted” button to generate “Upload Receipt”. refer to the screenshot below for more details:
- Click on “Upload Receipt” button to complete the process a shown inthe screenshot below below.
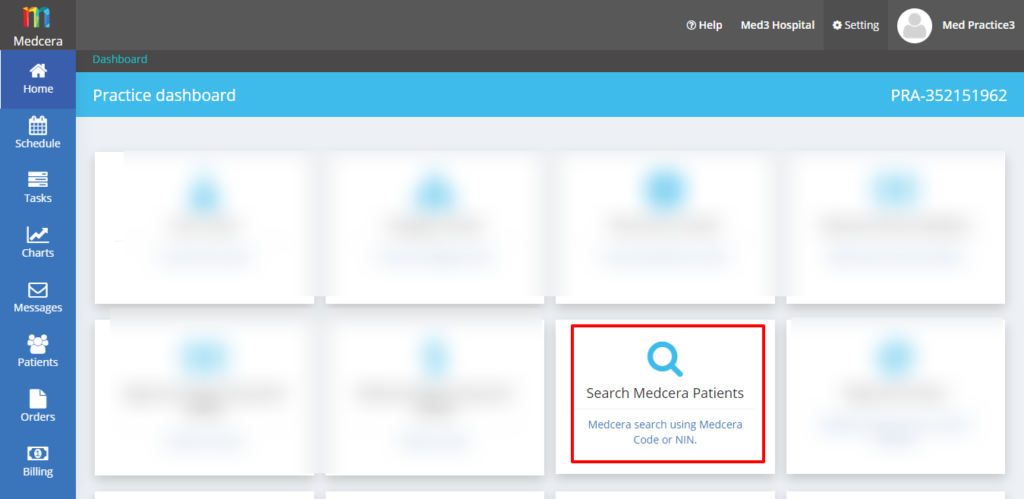
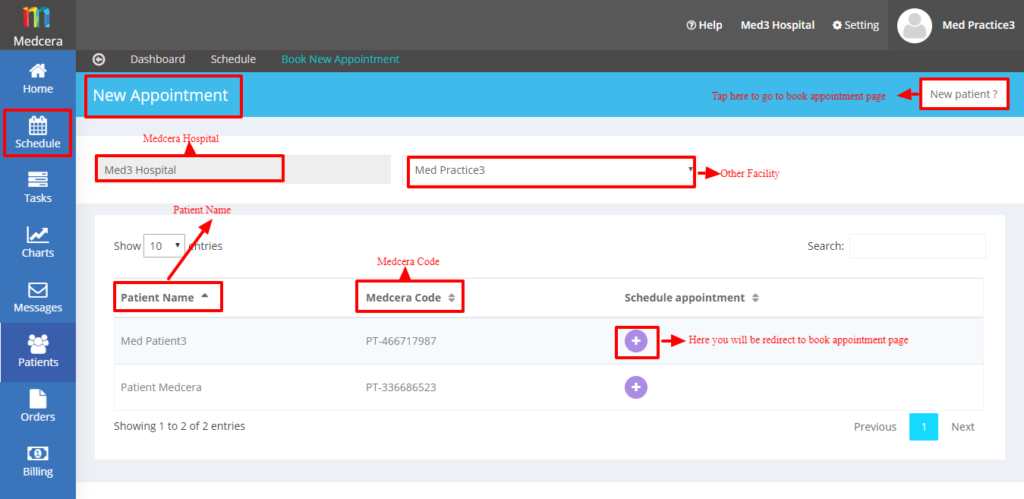
- Go to the dashboard and tap on “Search Medcera Patients” where you can search for patients using their Medcera Patient Code, Patient NIN, Patient Name, and Patient Birth date.
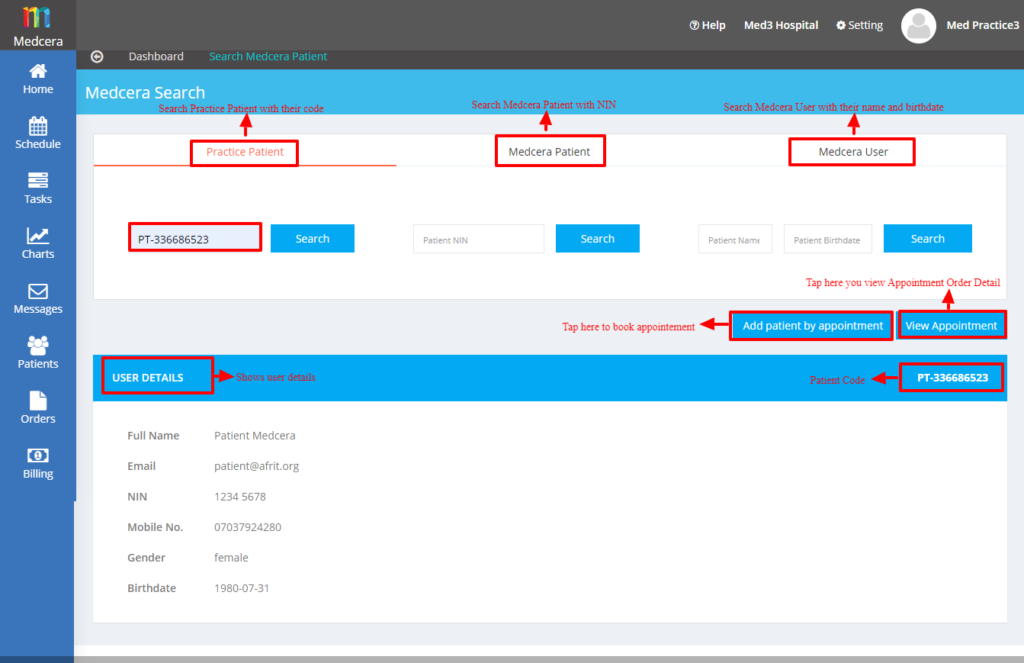
- Click on “Add Patient by Appointment” to be redirected to the “Book new appointment” page to book an appointment. See below screen:
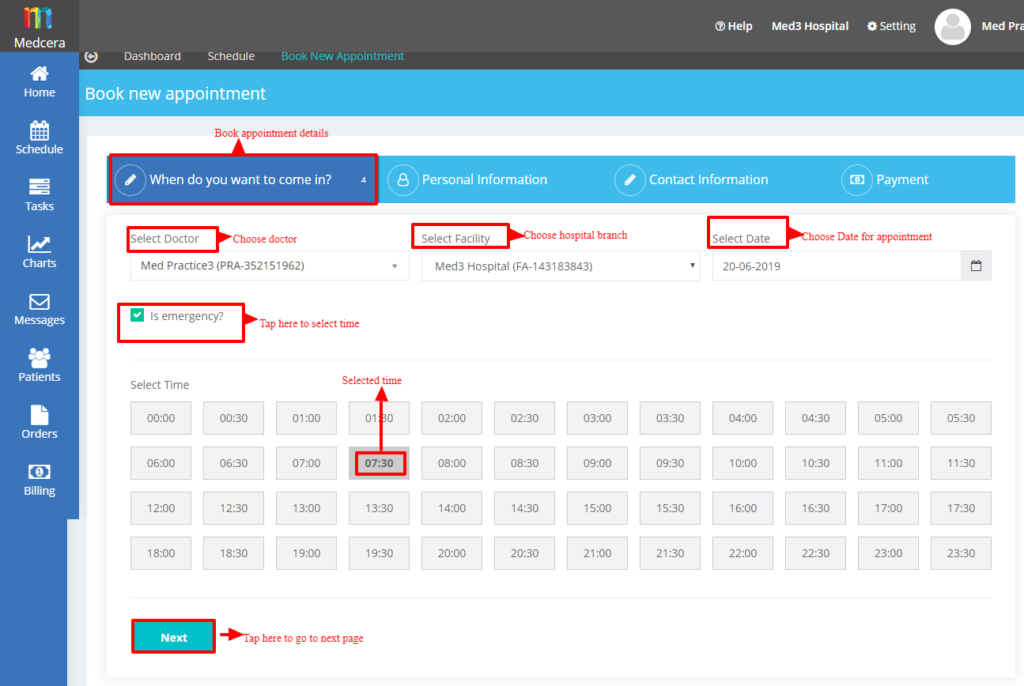
- Click on “Next” button and fill out the fields as shown below.
- Note that you must check emergency option to attend to patients who are not for future appointment.
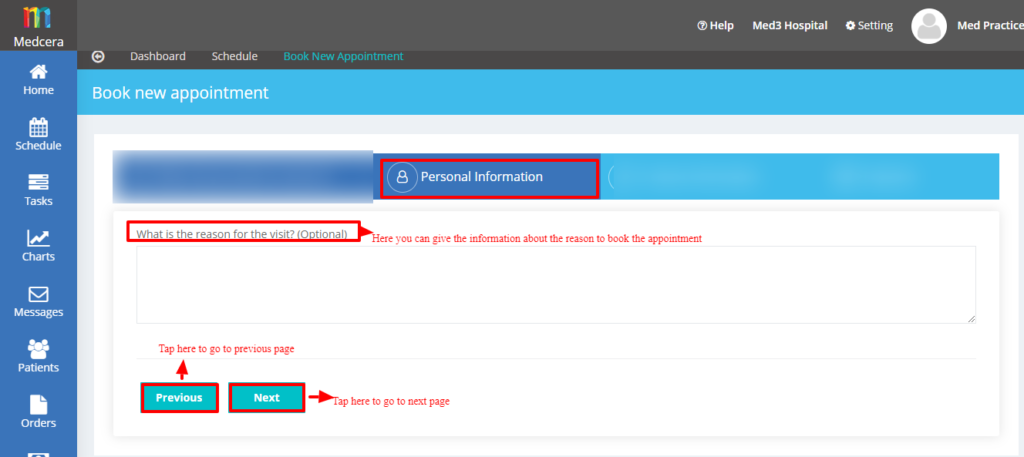
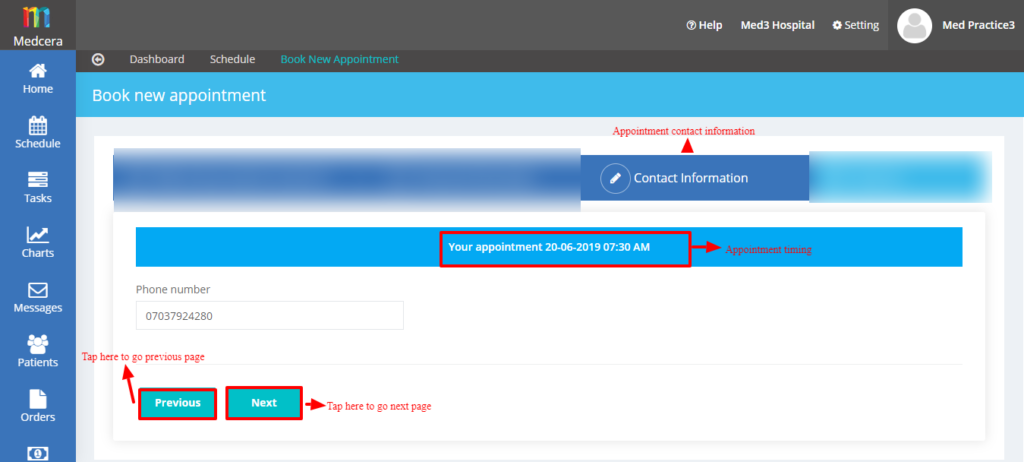
- Tap on “Next” button to move to the next stage as shown below.

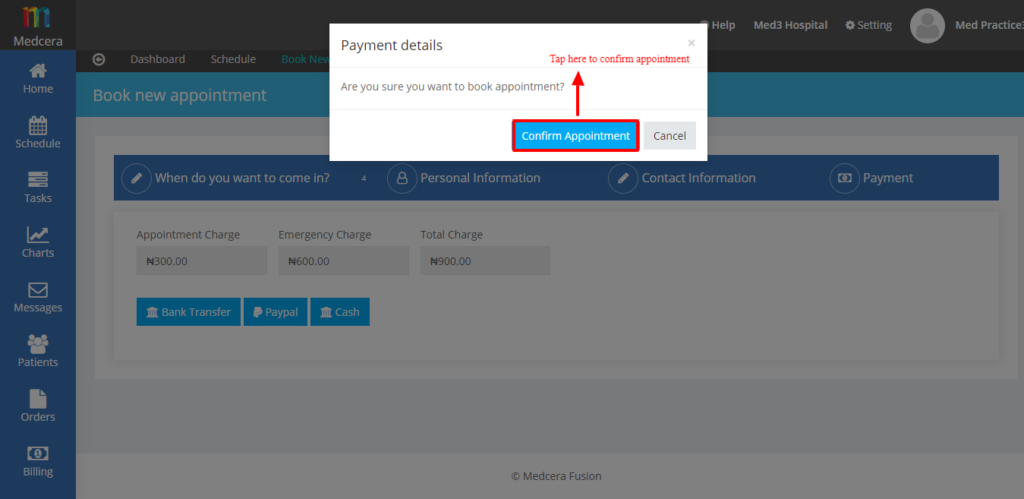
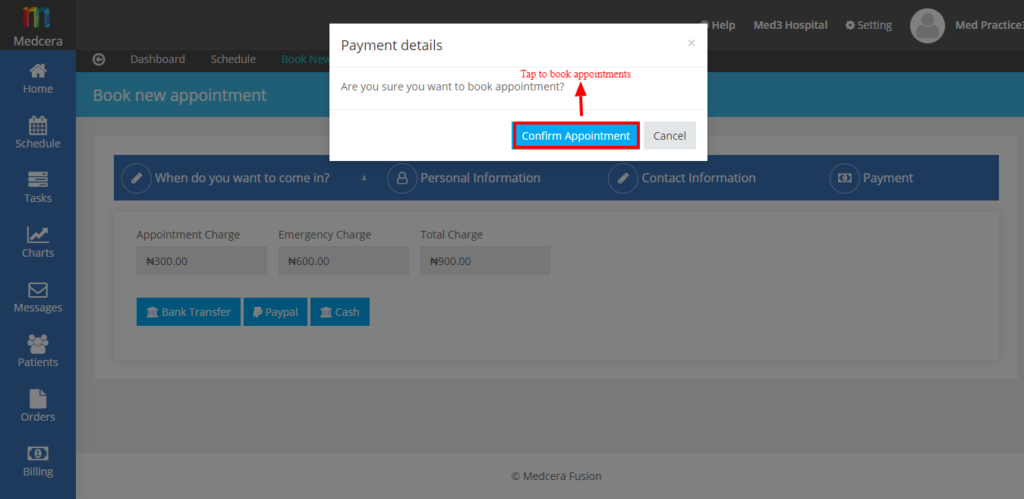
- Click on “Next” button to get to payment page as seen in the screen below:
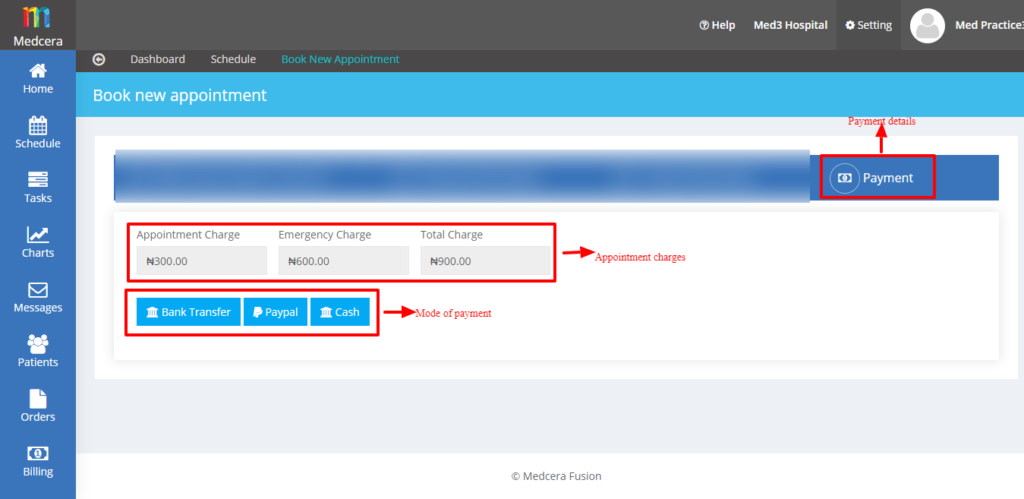
- Appointment charges + Emergency Charges= Total Charge
- When you tap on “Bank Transfer” button you will see below option:

- Once you Confirm Appointment, you will be directed to the “Schedule” page as shown below in screen.

- You will see “Schedule” section in more detail later.
- If you opt for “PayPal” payment method, the message below props up.
- If you opt for “Cash” payment method, the message below props up:
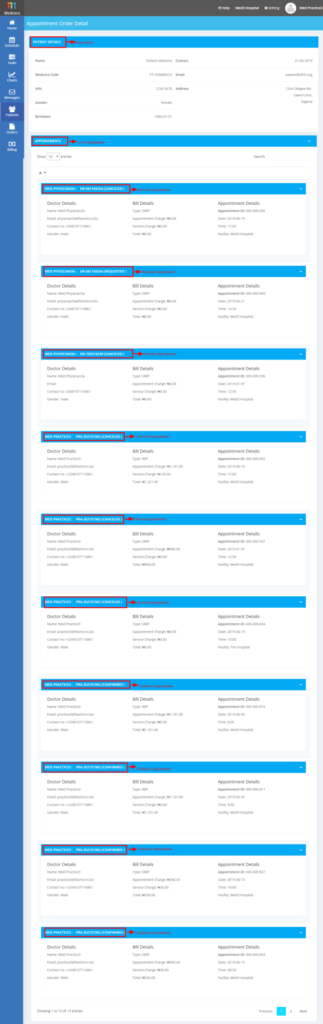
- Once you tap on “View Appointment” button, you will be redirected to the “Appointment Order Detail” page where you can view complete details of appointment order.
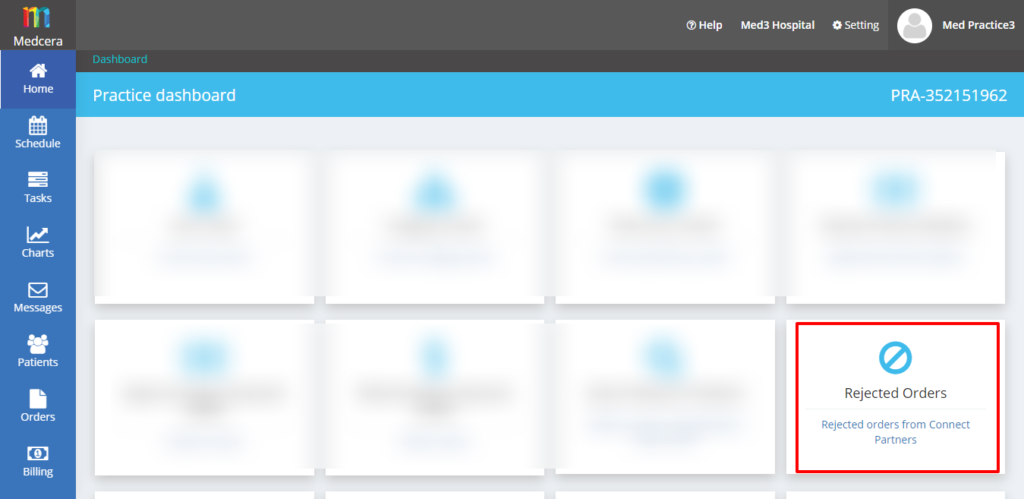
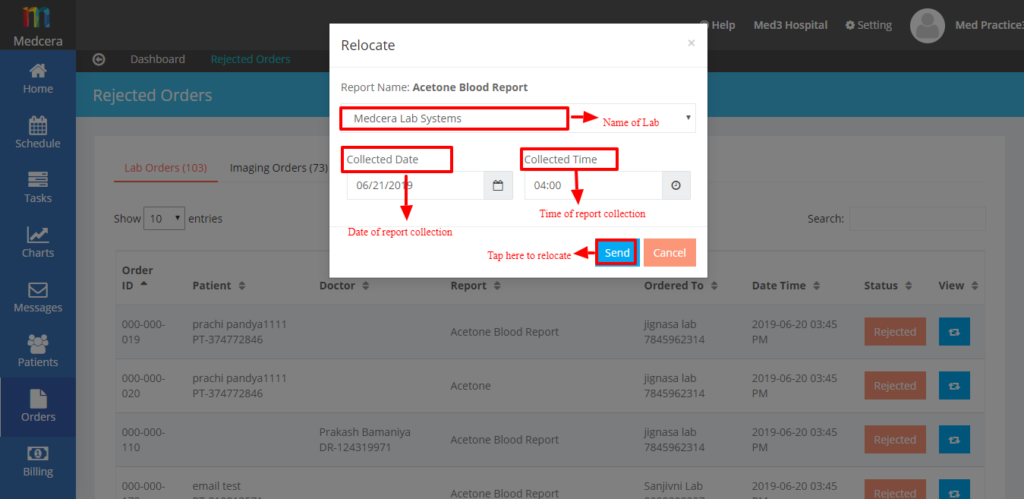
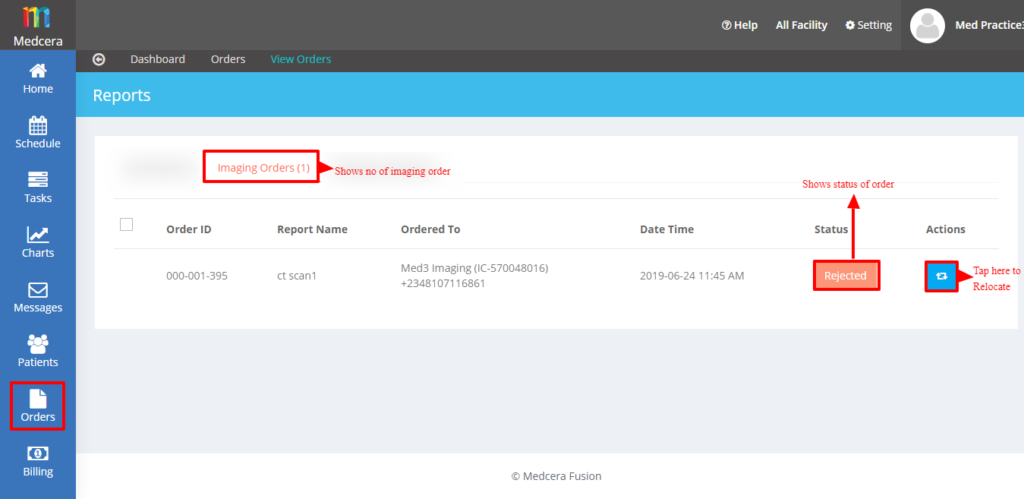
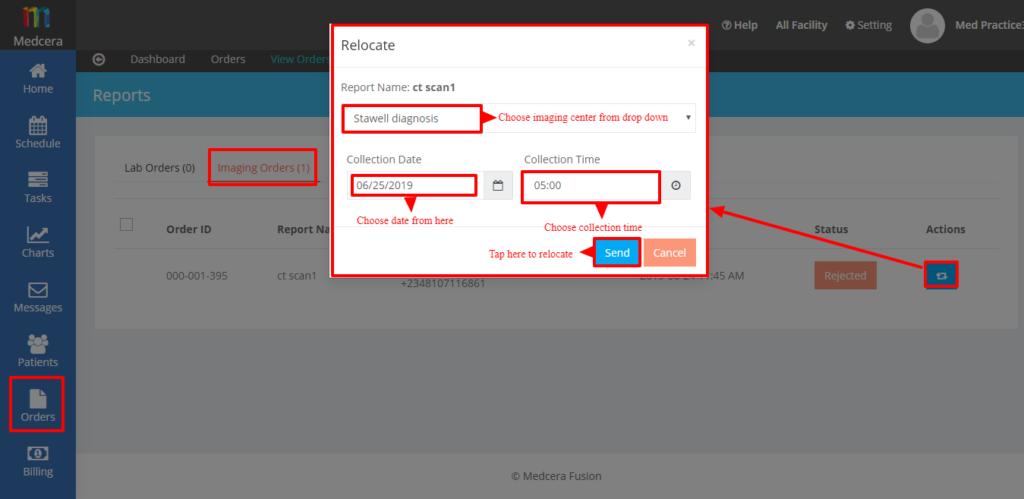
- Go to the dashboard and tap on “Rejected Orders” to view rejected orders from connect partners.

- Click on “Relocate” button to relocate order as shown below.
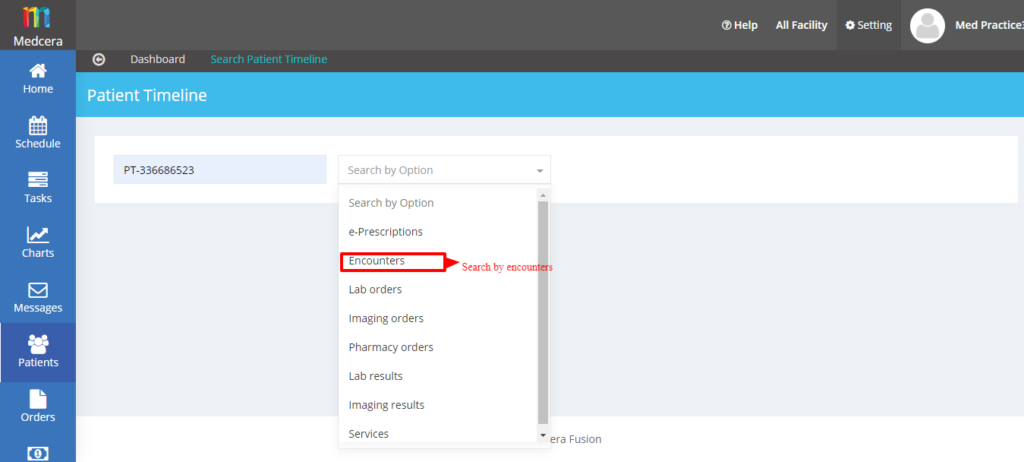
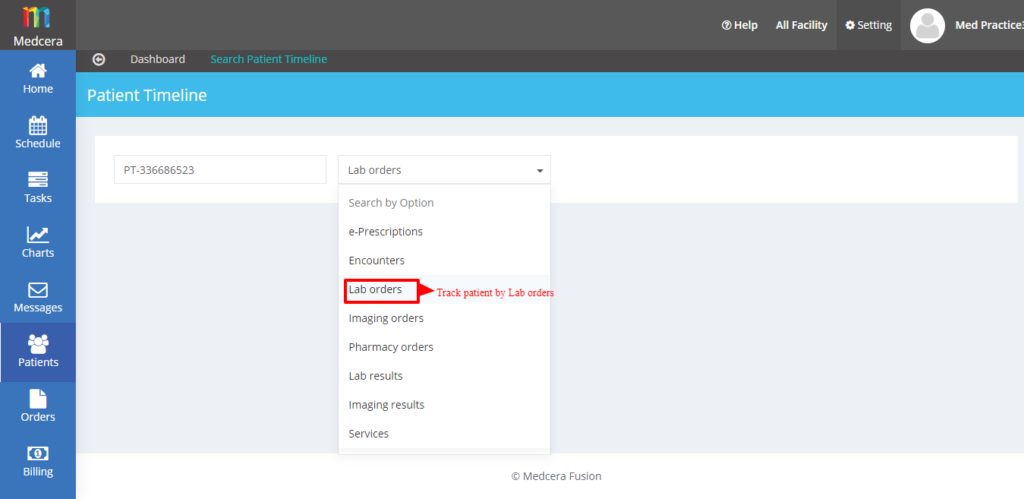
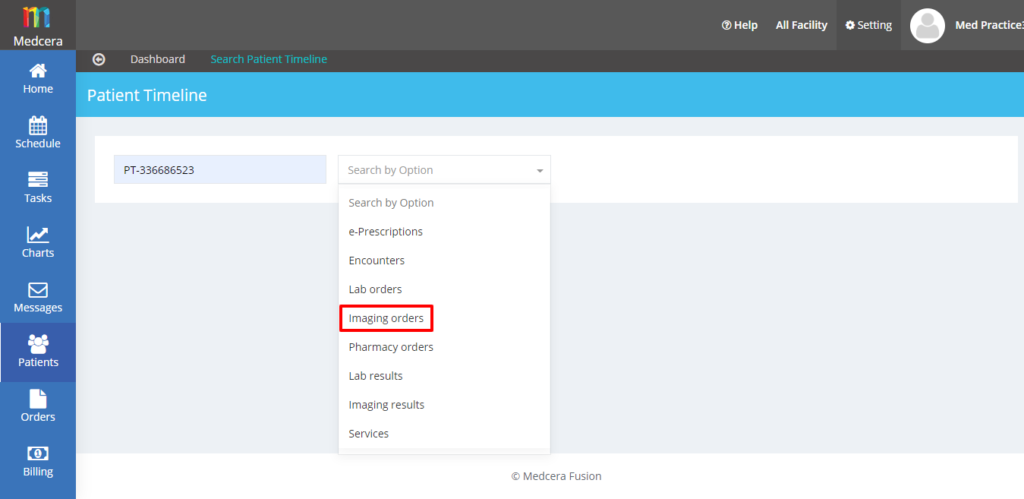
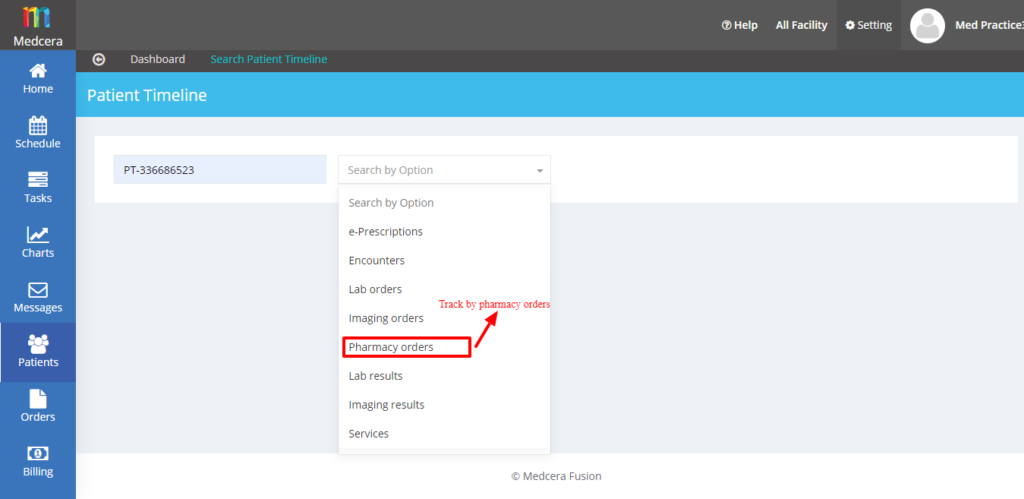
- Go to the dashboard and click on “Patient Timeline” to track patient medical activities such as medical reports, imaging reports, pharmacy reports (drugs and vaccines).
- Refer to the screenshot below for more information.

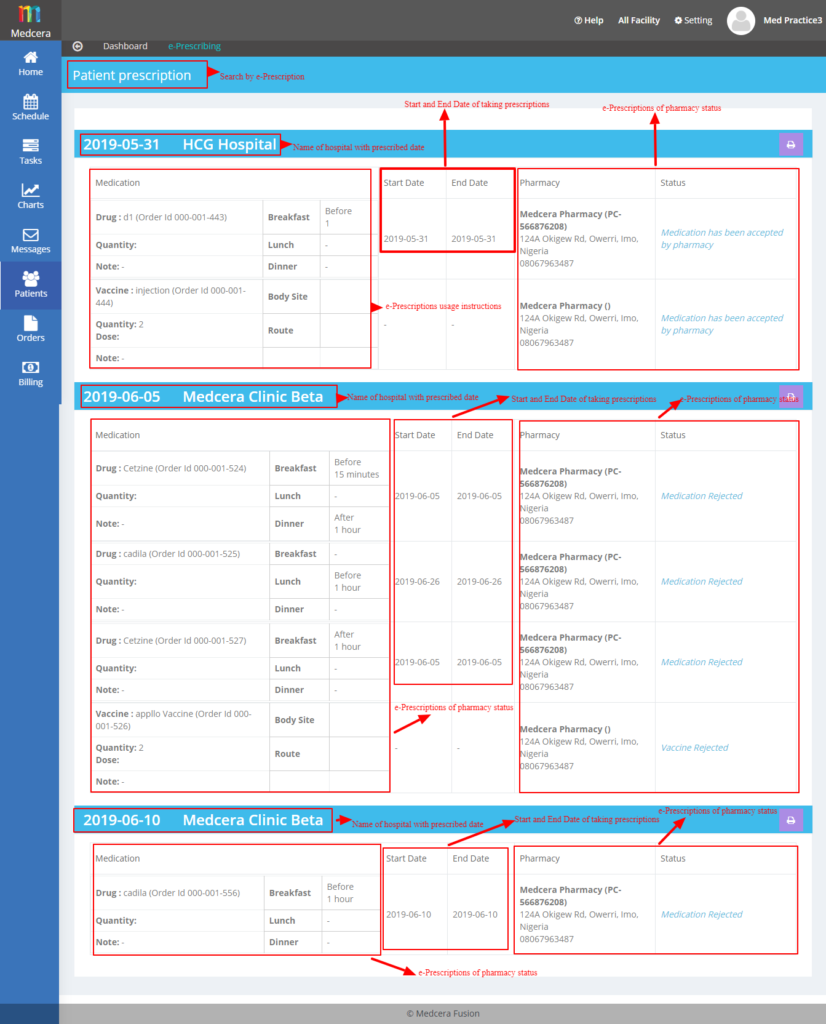
- Tracking patient by their e-Prescription shows all the list of e-Prescription records during encounter from inception to date. See sscreenshot below.

- Tracking patient by “Encounter” shows all records of patient encounters from inception to date.

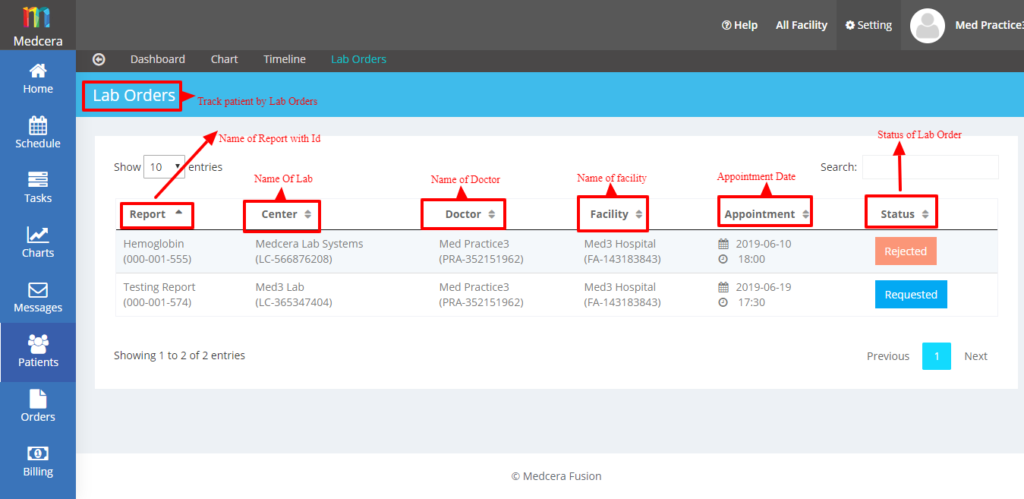
- Tracking patient by “Lab Order” shows all records of Lab Orders of that particular patient from inception to date.
- When patient timeline is tracked by “Imaging Order”, it will show all records of Imaging Orders of that particular patient till date.
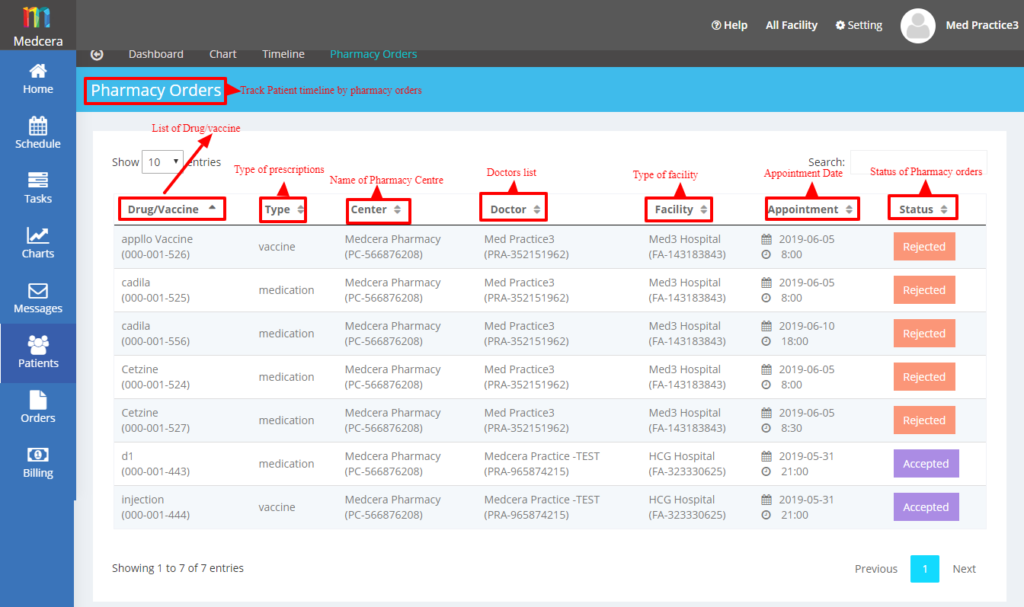
- Tracking patient timeline by “Pharmacy Order” shows all records of Pharmacy Orders of that particular patient till date.
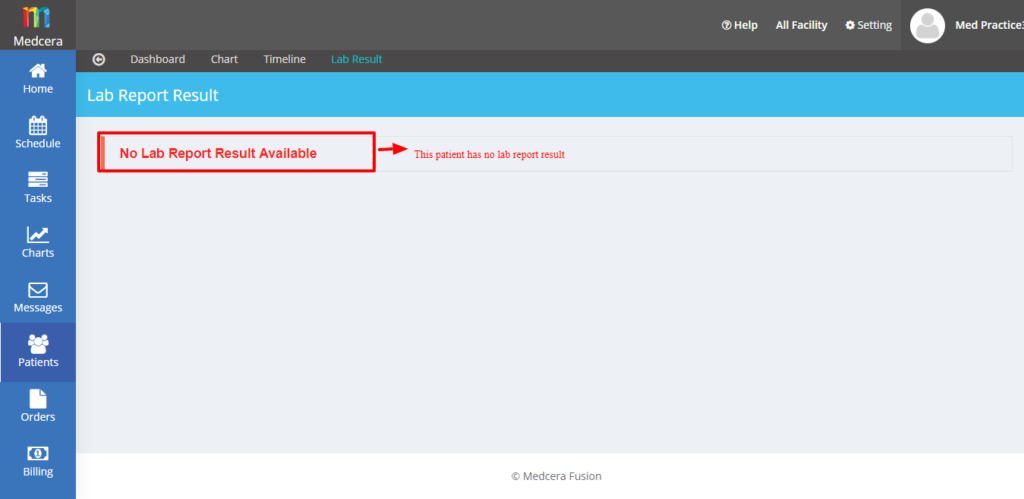
- When patient timeline is tracked by “Lab Result” it will show all records of Lab results of that particular patient from inception to date.
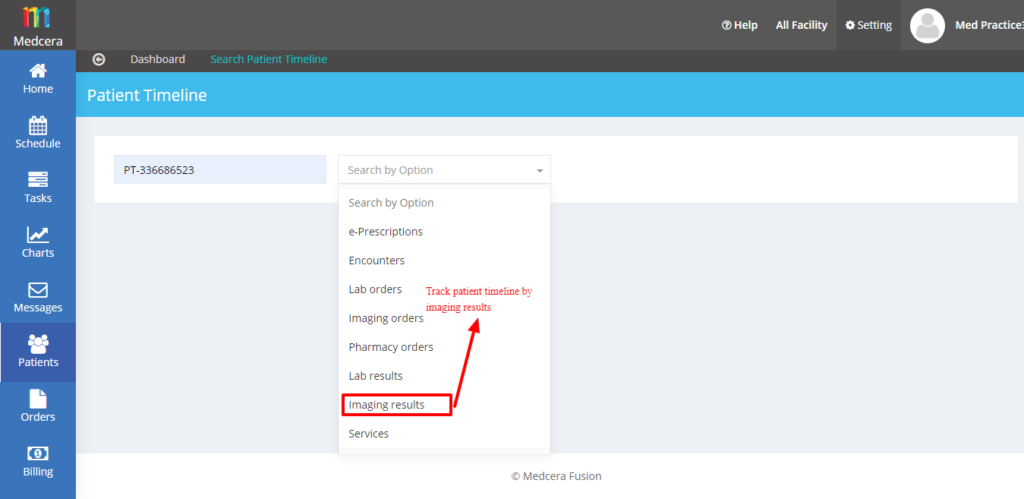
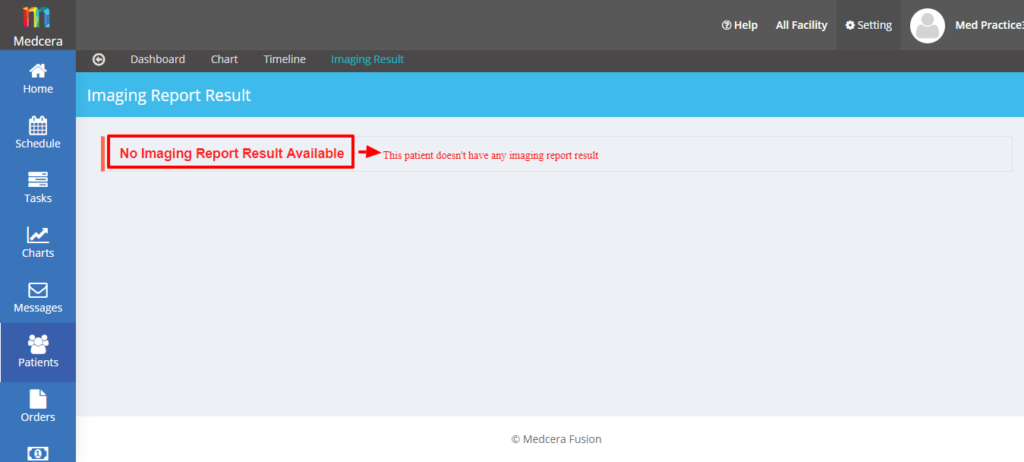
- Tracking patient by “Imaging Result” shows all records of Imaging results of the patient till date.
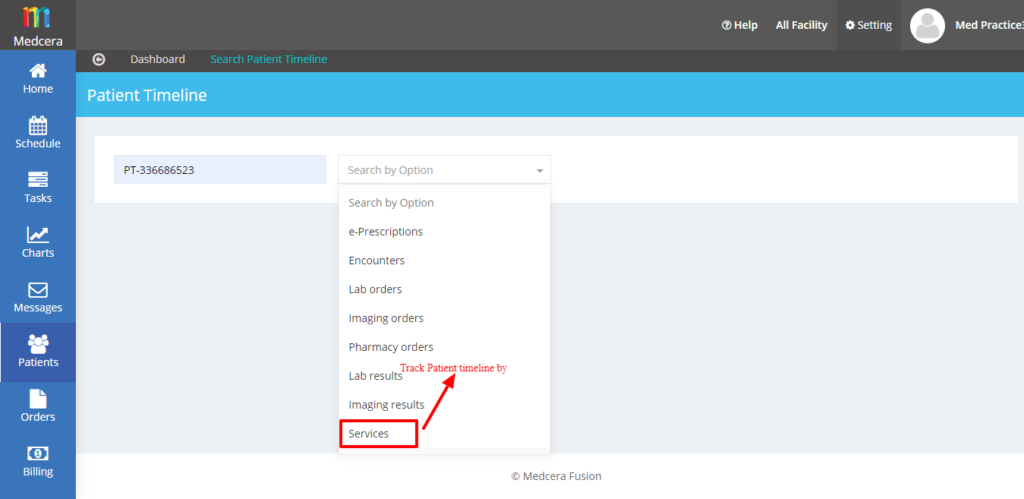
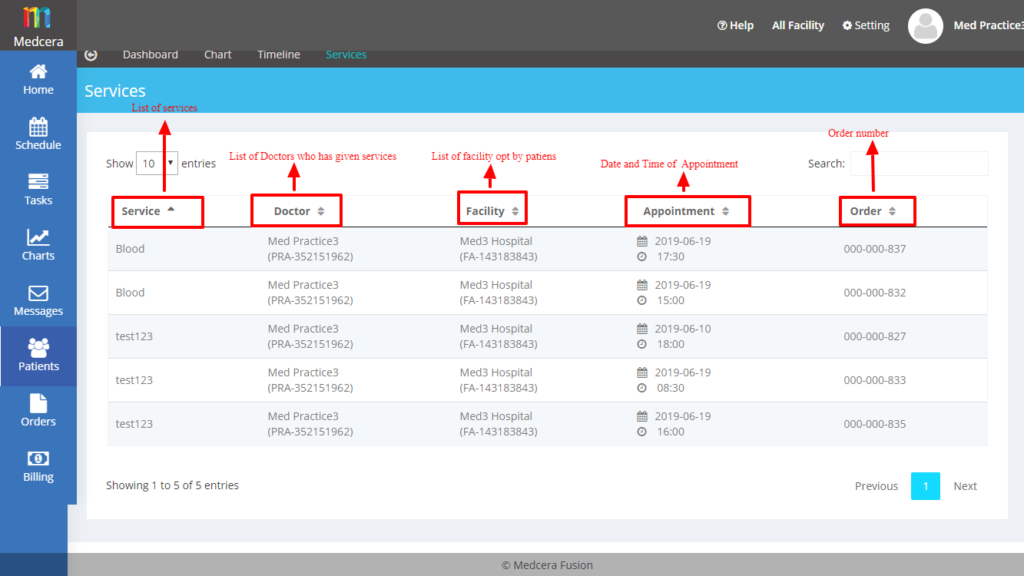
- Tracking patient timeline by “Services” shows all records of all services which have been used by that particular patient.
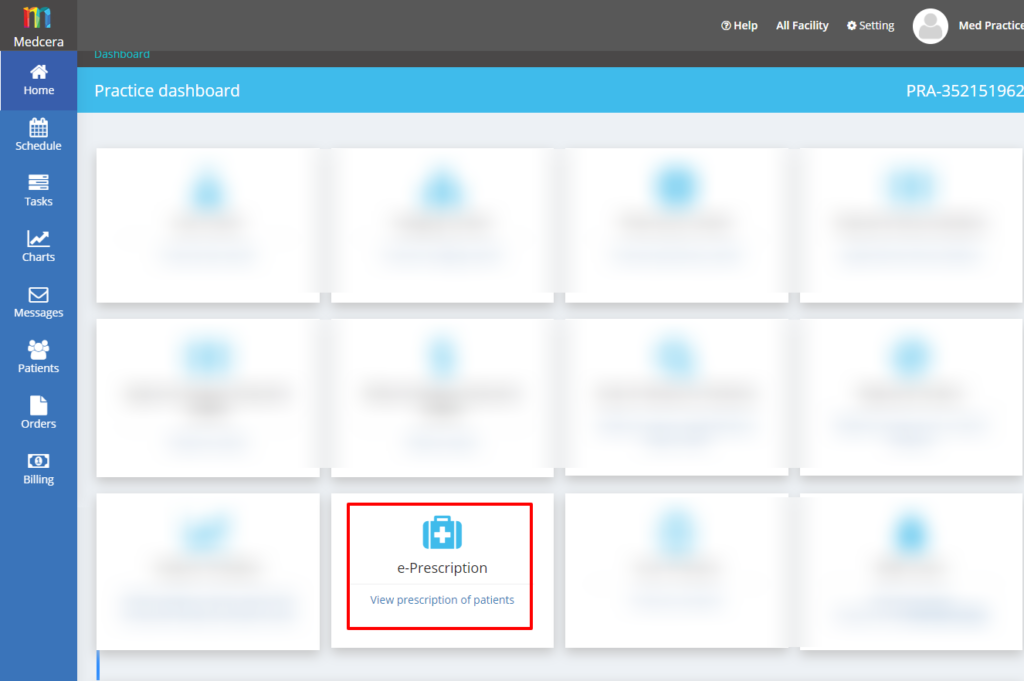
- Go to the dashboard and click on “e-Prescription” to view e-prescriptions of patients.
- refer to the screenshot below for more details on patient e-prescription.
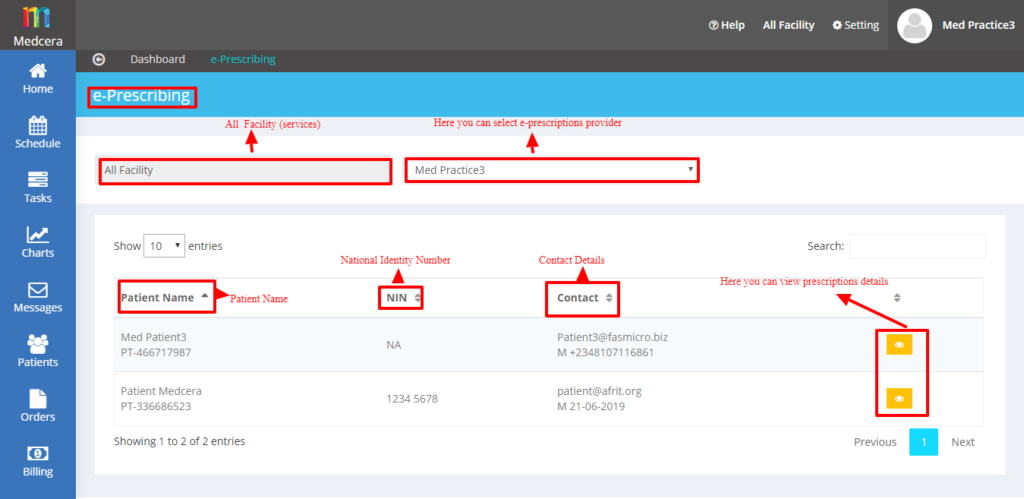
- A click on “View” button takes you to the screen below.
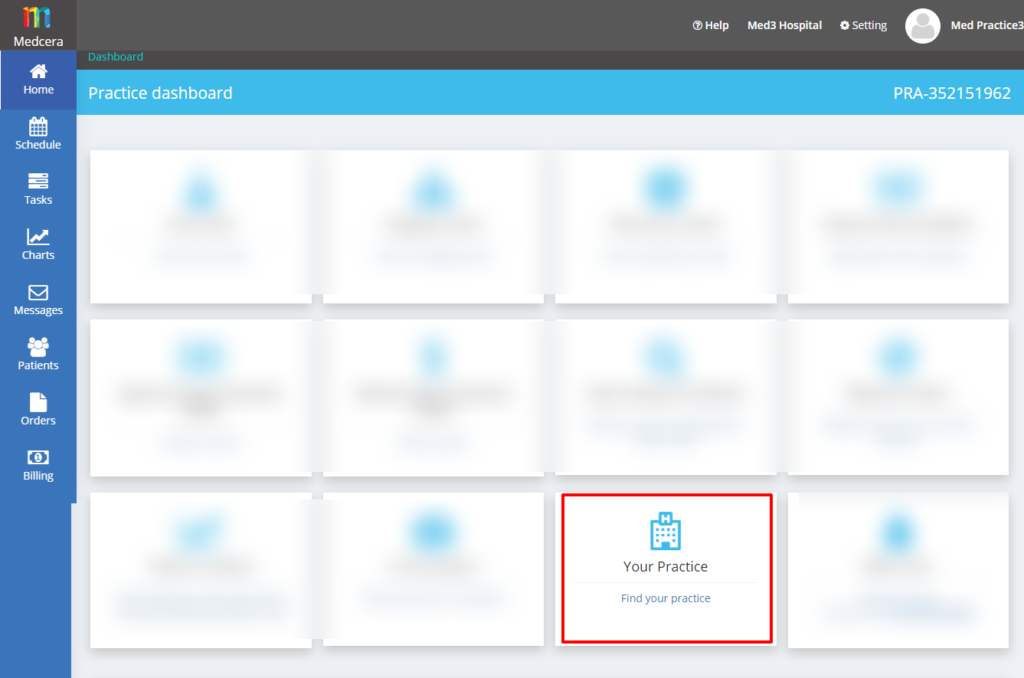
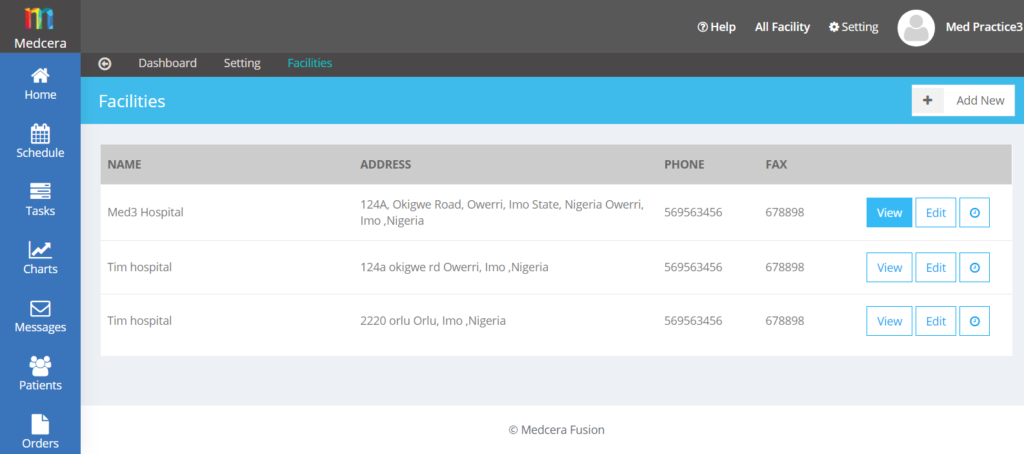
- Go to the dashboard and locate “Your Practice.”
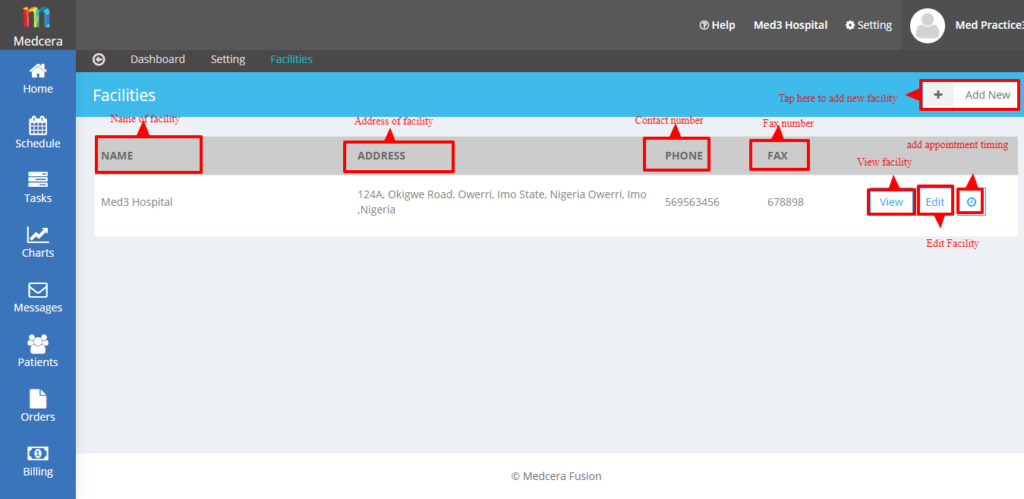
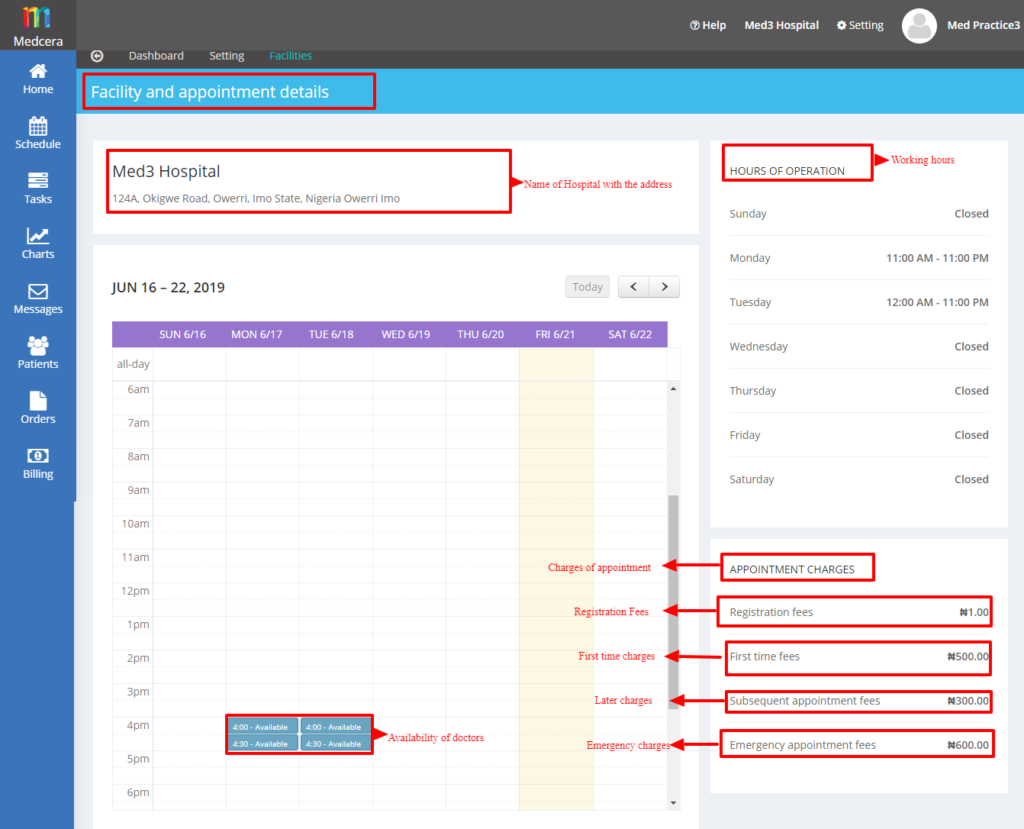
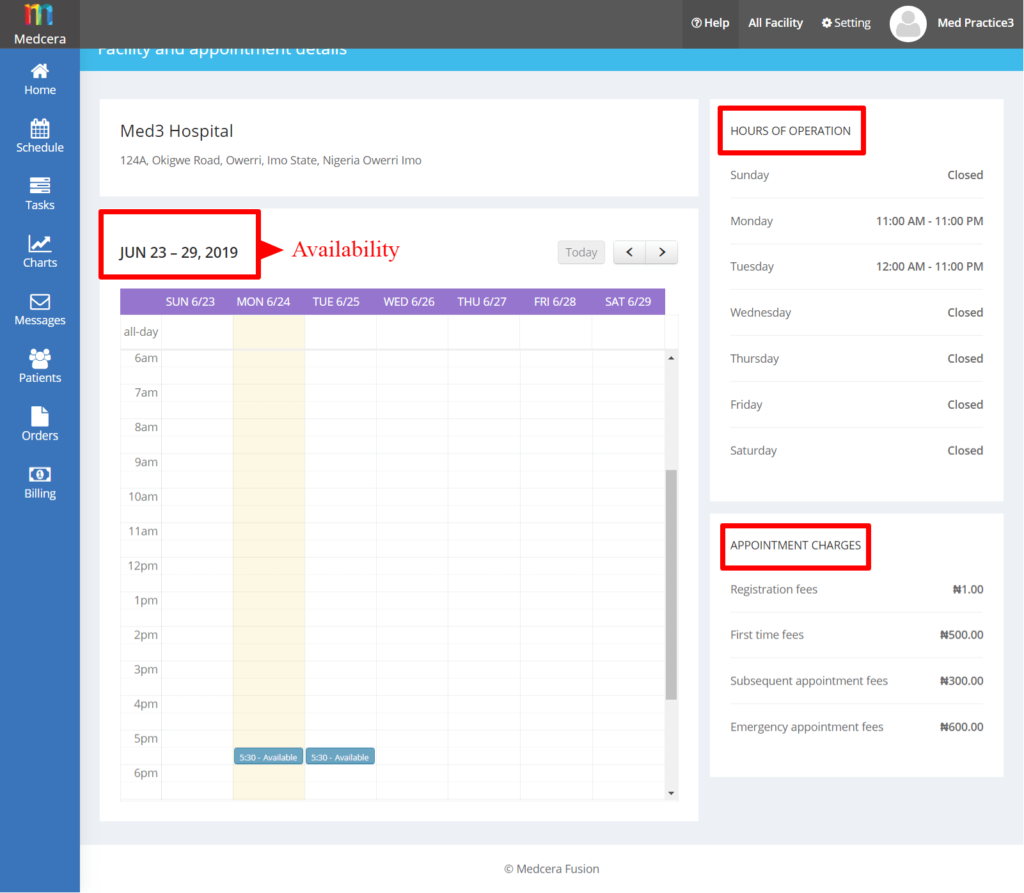
- Click on “View” button to see “Facility and Appointment Details” as shown below.
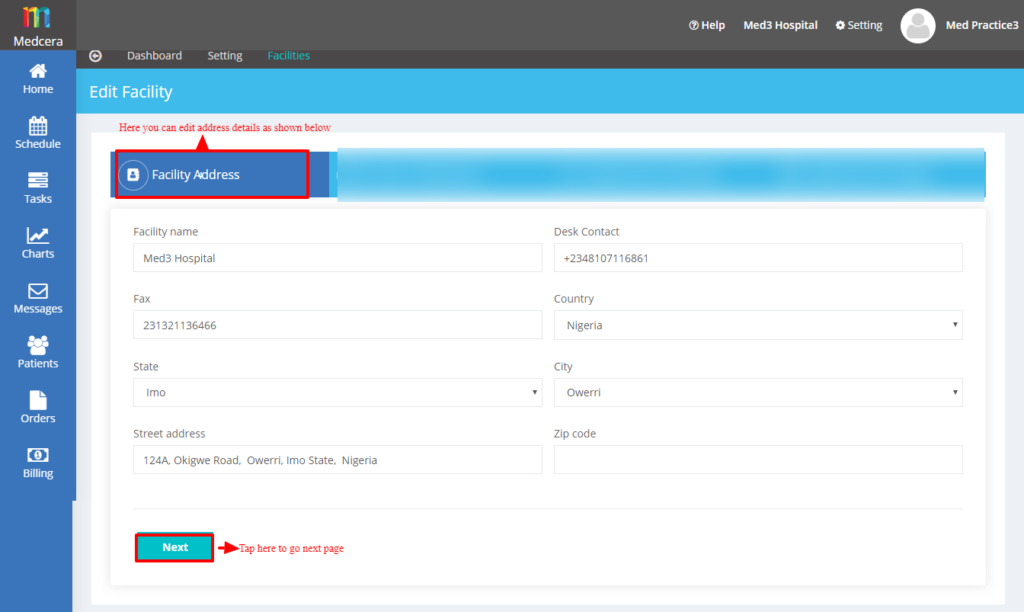
- Click on “Edit ” button to Edit Facility as shown below.
- Click on “Next” button takes you to practice “Hours of Operation” where you can edit the hours and also notify the staff members through mail.
- “Notify time changes to staff” button is for informing the staff members as shown below.

- A click on “Next” button takes you to “Appointment Schedule” where you can edit appointment schedule as shown below.
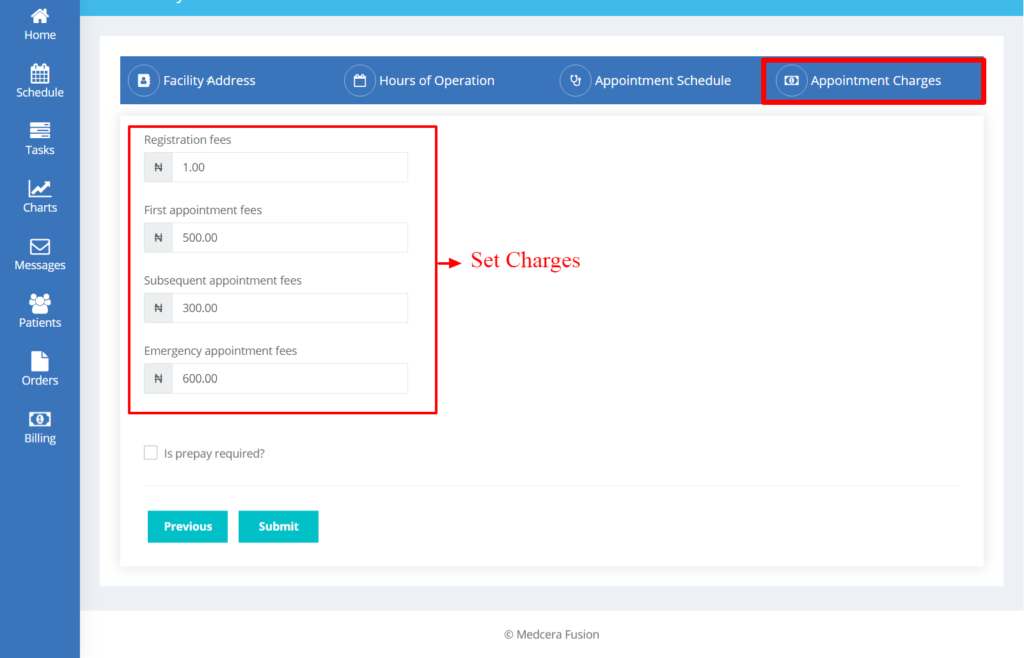
- Click on “Next” button to see “Appointment Charges” where you can edit appointment charges as shown below.
- Click on “Clock ” icon after edit button to “Add Appointment timing.”
- Tap on “Save Time” and the message, “Appointment Timing Saved” props up.
- Go to the dashboard and locate “EMR USERS” where you can add and search more users including staff, Doctors/Physician, Nurse and NA/PA/.
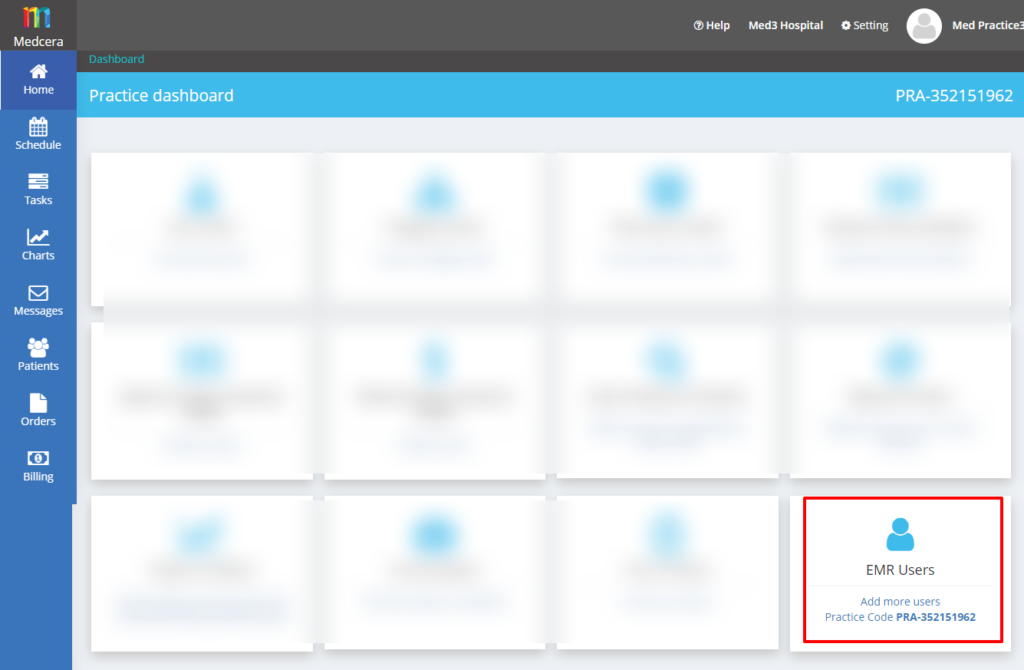
- To add Doctor/Physician, tap on “EMR USERS.”
- Click on “Add Staff” and fill out the mandatory fields.
- Select Doctor/Physician from the drop down button under Role Details.
- Click on “Save” tab to complete the process.
- See below Doctors/ Physicians details.
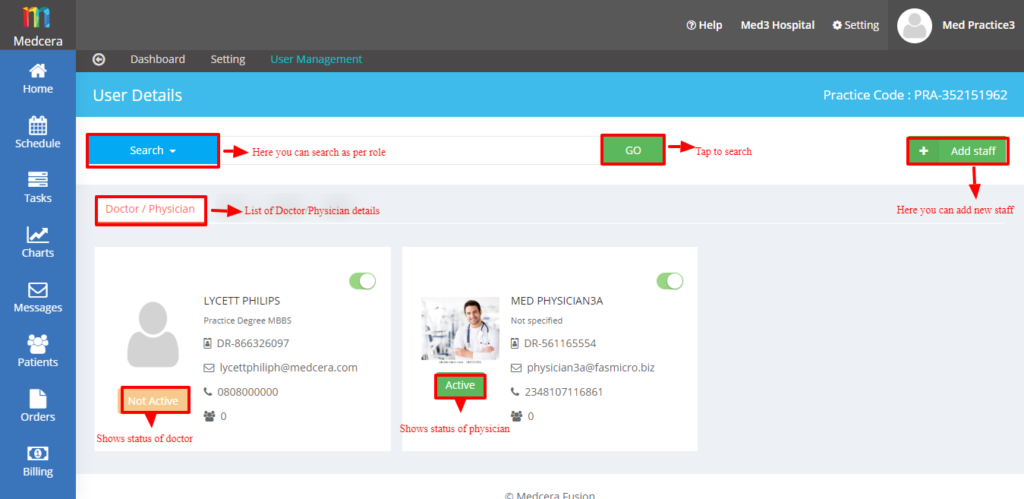
- You can change the role of a particular user by clicking on the green button and the message, “This user successfully changed in Practice Non Admin” props up as seen in the above screenshot.
- To add Nurse, tap on “EMR USERS.”
- Click on “Add Staff” and fill out the mandatory fields.
- Select Nurse from the drop down button under Role Details.
- Click on “Save” tab to complete the process.
- See Nurse details below.

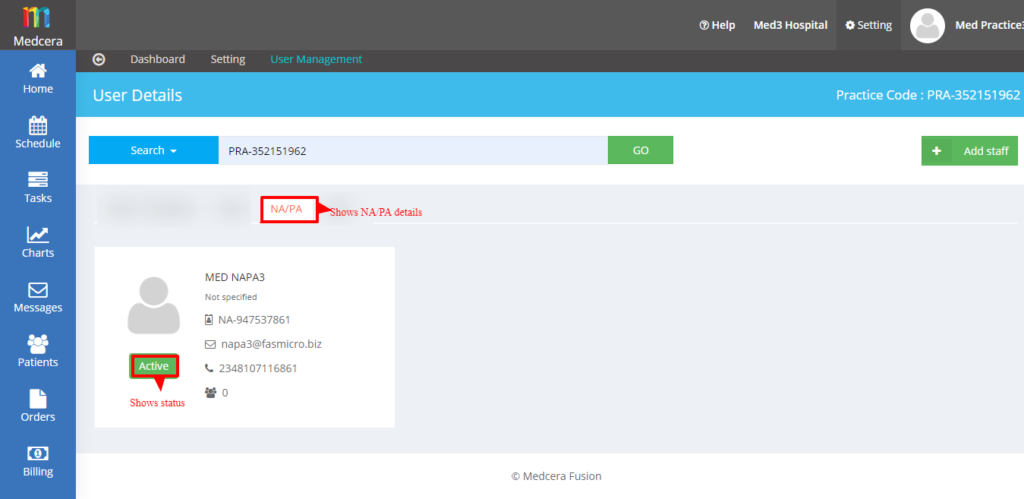
- To add NA/PA, tap on “EMR USERS.”
- Click on “Add Staff” and fill out the mandatory fields.
- Select NA/PA from the drop down button under Role Details.
- Click on “Save” tab to complete the process.
- See NA/PA details below.
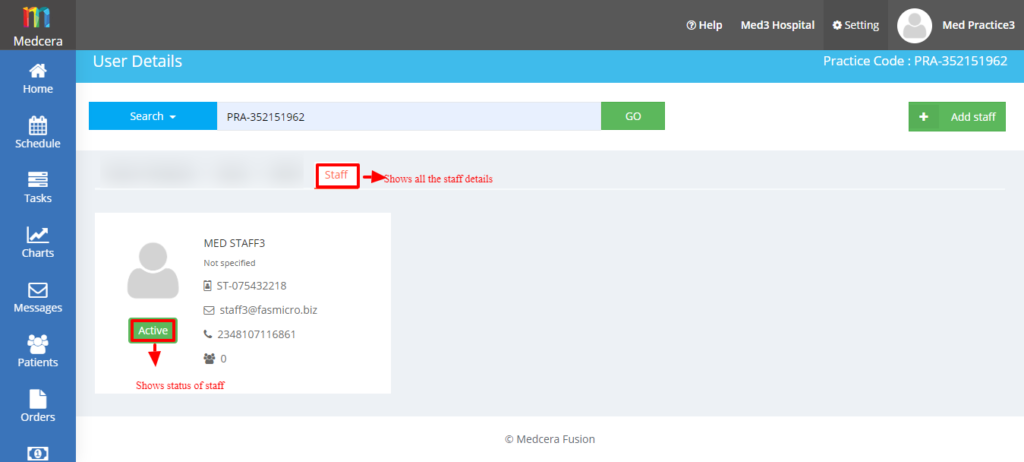
- To add Staff, tap on “EMR USERS.”
- Click on “Add Staff” and fill out the mandatory fields.
- Select Staff from the drop down button under Role Details.
- Click on “Save” tab to complete the process.
- See Staff details below.
- A Click on “Add staff” button, shows the screen below to be filled out.
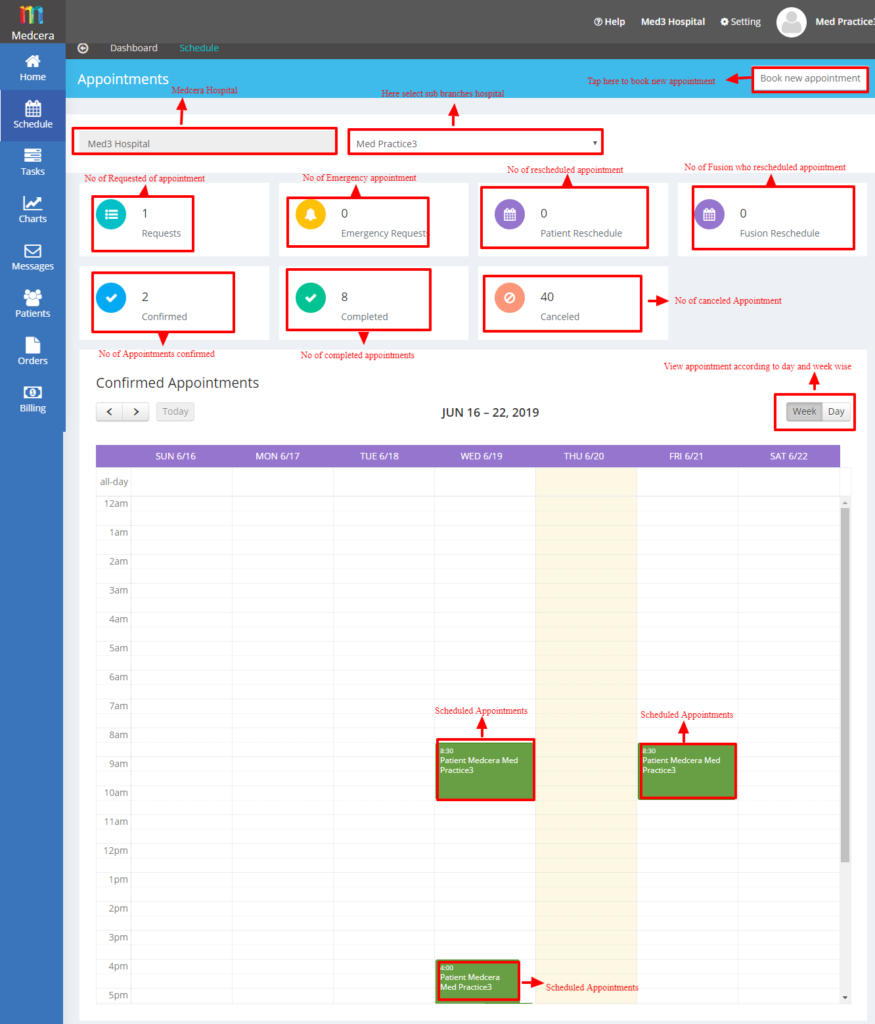
- Go to the vertical Menu bar in the dashboard and click on “Schedule” to see the schedule of all appointments and status as shown below.
- A click on “Book New Appointment” displays the page below.
- To book an appointment for a new patient, click on “New Patient” and fill out the mandatory fields.
- To book an appointment for an existing patient, click on the “+” icon and fill out the mandatory fields.

- Click on “Next” button and populate ‘the reason for the visit’ as shown in the screenshot below.

- A tap on “Next” button takes you to the screen below.
- Click on “Next” button to get to payment payment page as shown below.

- Appointment charges + Emergency Charges= Total Charge
- Click on any of the preferred payment options and confirm payment to complete the process.

- Go to the vertical Menu bar in the dashboard and tap on “Task.”
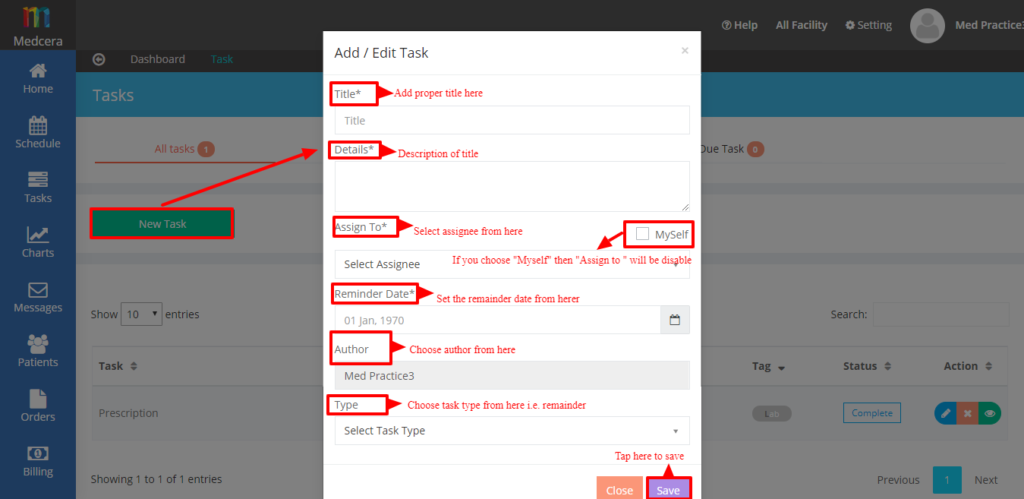
- Click on “New Task” tab to assign a new task to either self or other user.
- All tasks show the list of tasks assigned by a user to other users including admin, fusion, connect partners and patient.
- My Tasks: These are tasks assigned to fusion user by other users.
- Myself Tasks: These are tasks assigned to self.
- Due Task: These are tasks that should be executed immediately.
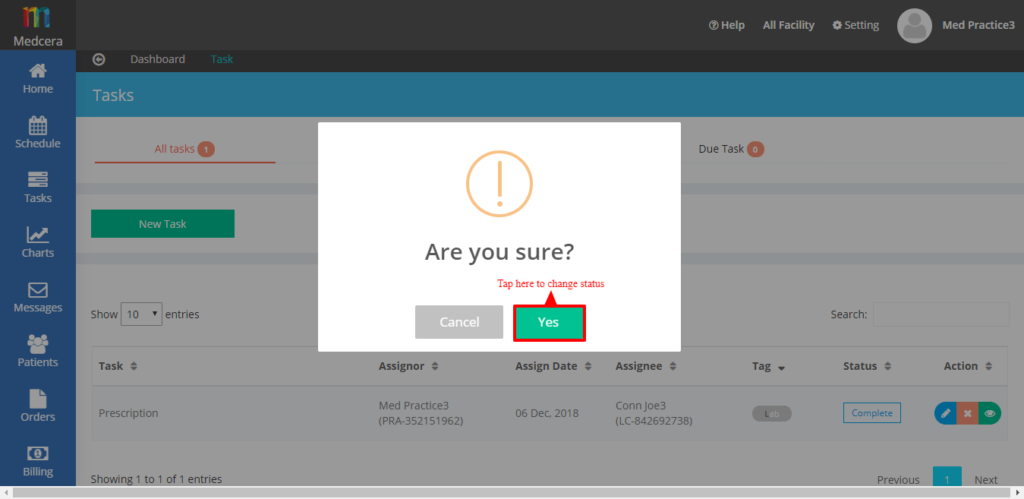
- Status: Task status can be either open or complete. The screenshot below shows a complete task status which can also be changed to open where necessary.
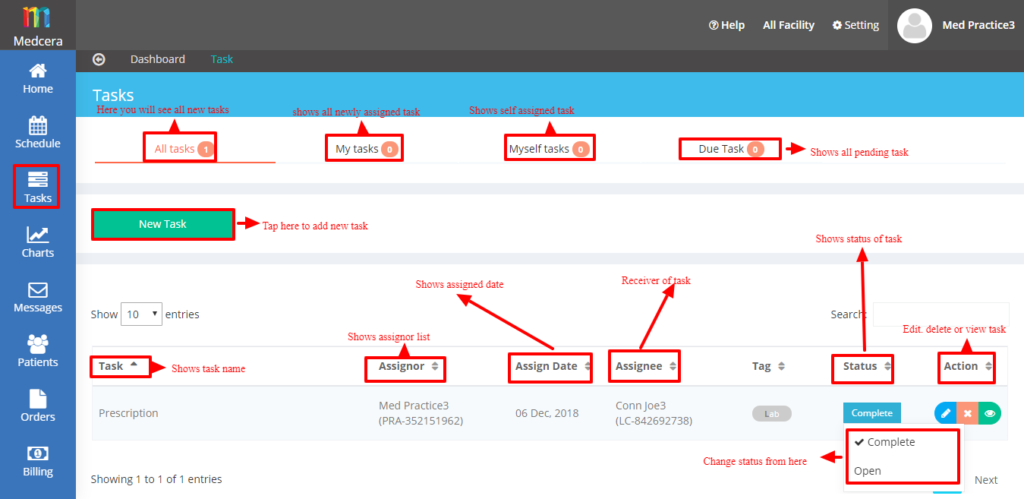
- To change task status, tap on status and change to either open or complete as shown in the screenshot below.
- New Task: click on “New Task” to assign a new task to either self or other user.
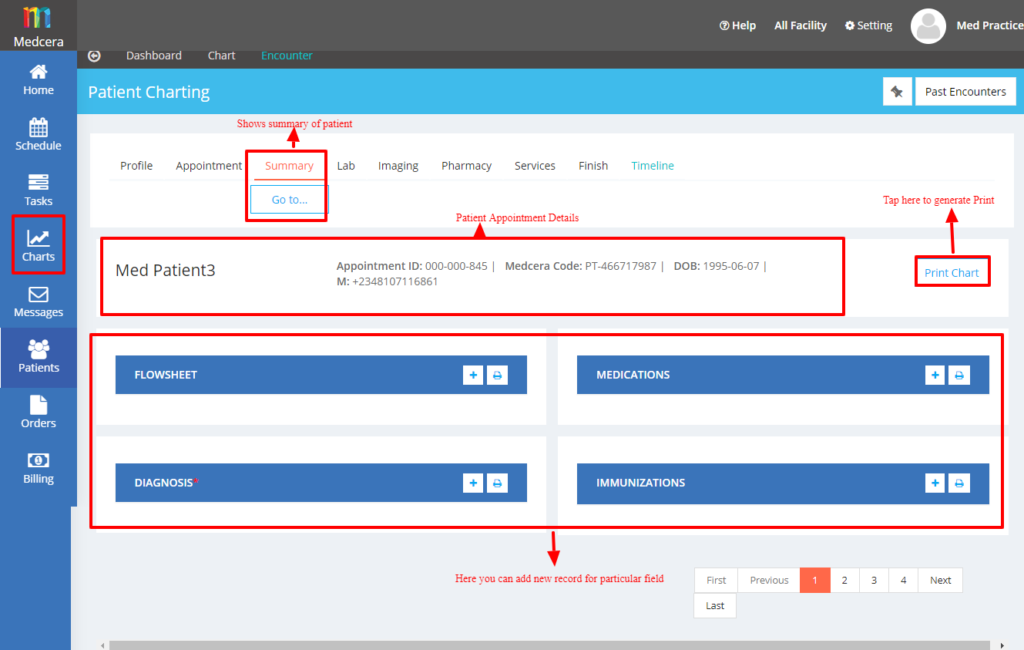
- Go to the vertical Menu bar in the dashboard and tap on “Charts” to view all the confirmed appointments of a particular patient as shown below.
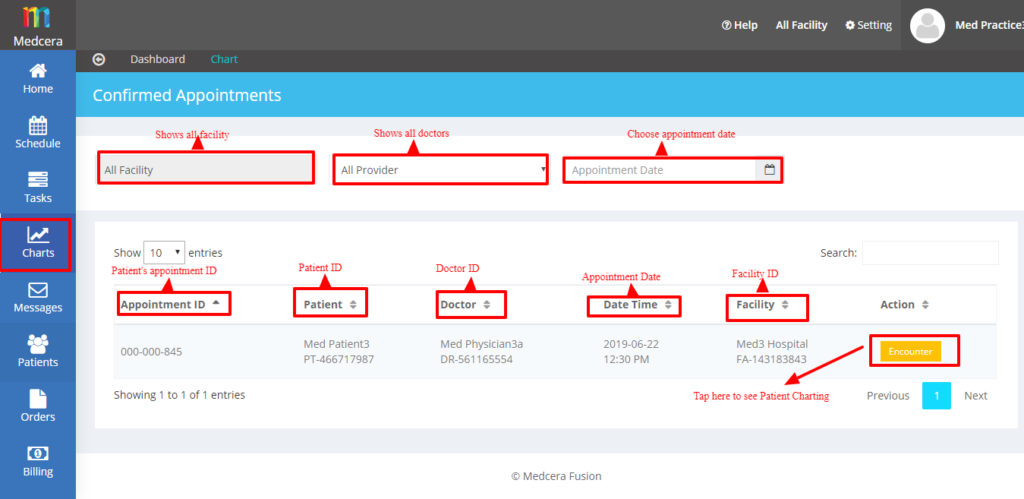
- Click on “Encounter” button to view Patient charting as shown below.
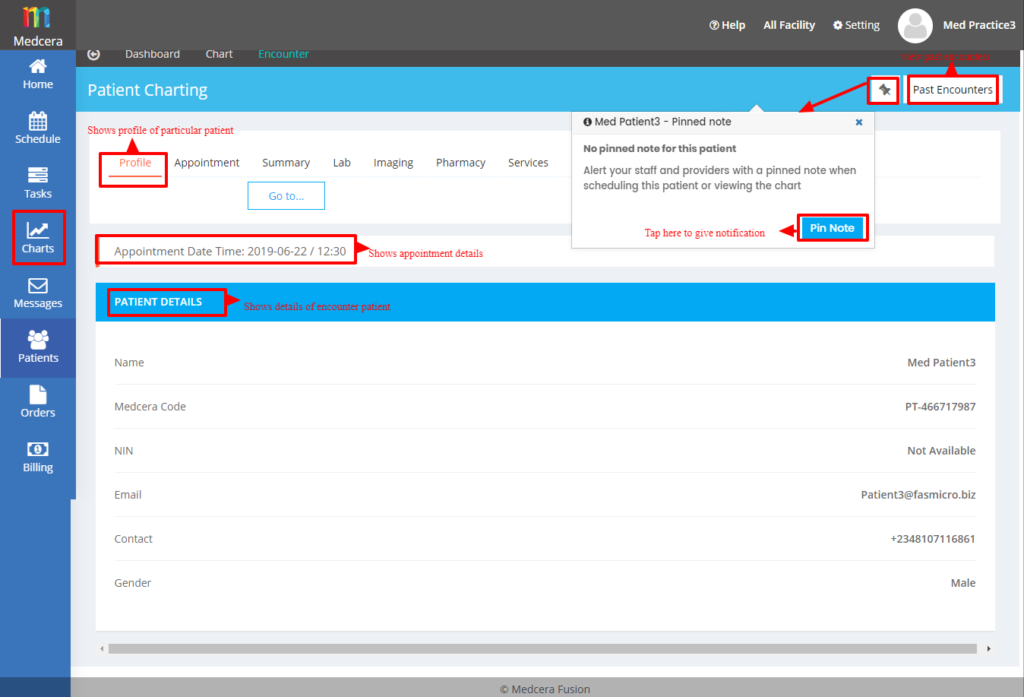
- Note that only doctor can view Past Encounters of any patient.
- Click on “Appointment” to see appointment details as shown below.

- In charts section, user can add new record if the user has been given access control.
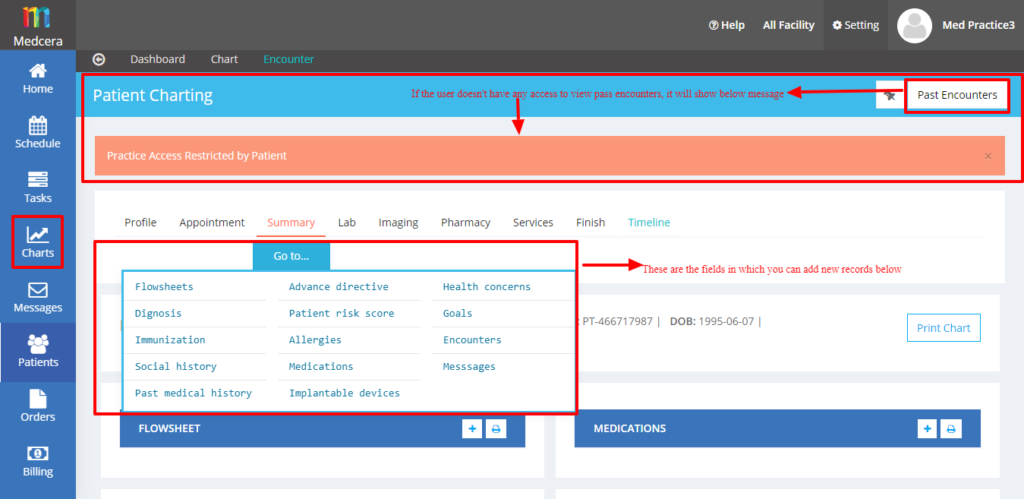
- If a user does not have access to view past encounter, the message, “practice access restricted by patient” pop-up.
- Similarly can add new records in all the fields as shown in Summary-Go To.. Tab
- Tap on the flow sheets to populate the vitals and click the save button.
- Click on “Diagnosis to input the prognosis and click the “save” button (Only doctors have access).
- Tap on “Medication” to place e-prescription order to pharmacy center and click “Save” button.
- Click on “immunization” to fill out the fields and save.
- Click on Allergies to input applicable data and save.
- Click “Past Medical History” to add patient data tap “Save” button.
- Follow through the list under summary to latter and save data populated.
- Tap on “Lab” tab in the charts and click on “+” icon to place test order to a particular Lab as shown below.
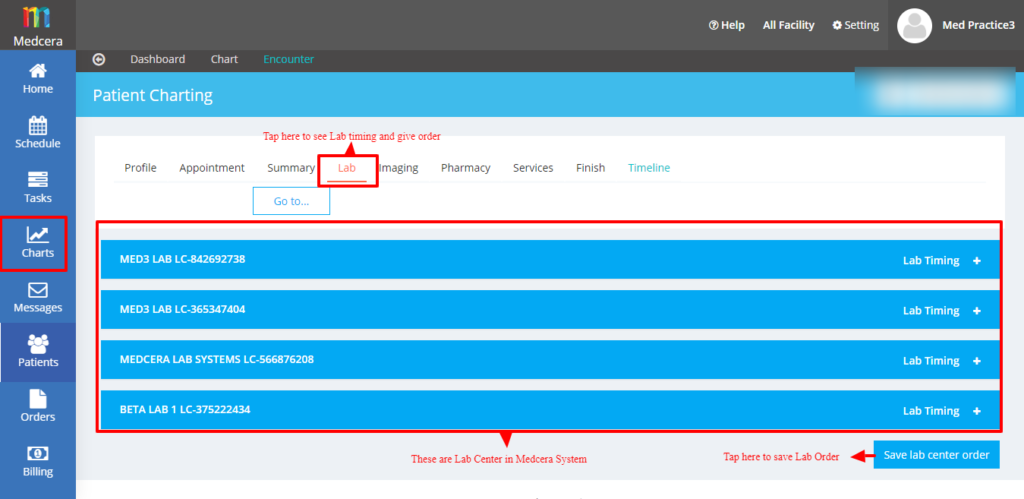
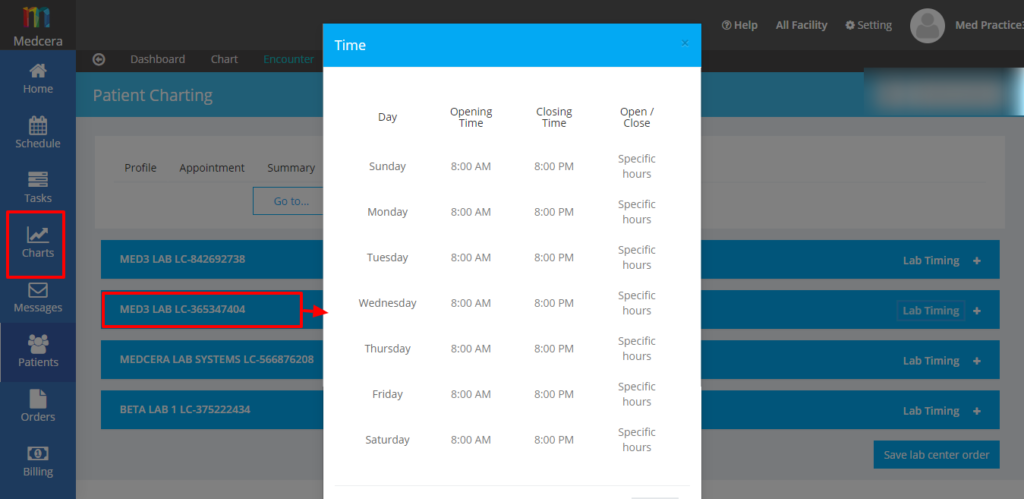
- Click on “Lab timing” to view hours of operation of a particular Lab as shown below.
- See more details on order placement to Lab in the screen below.
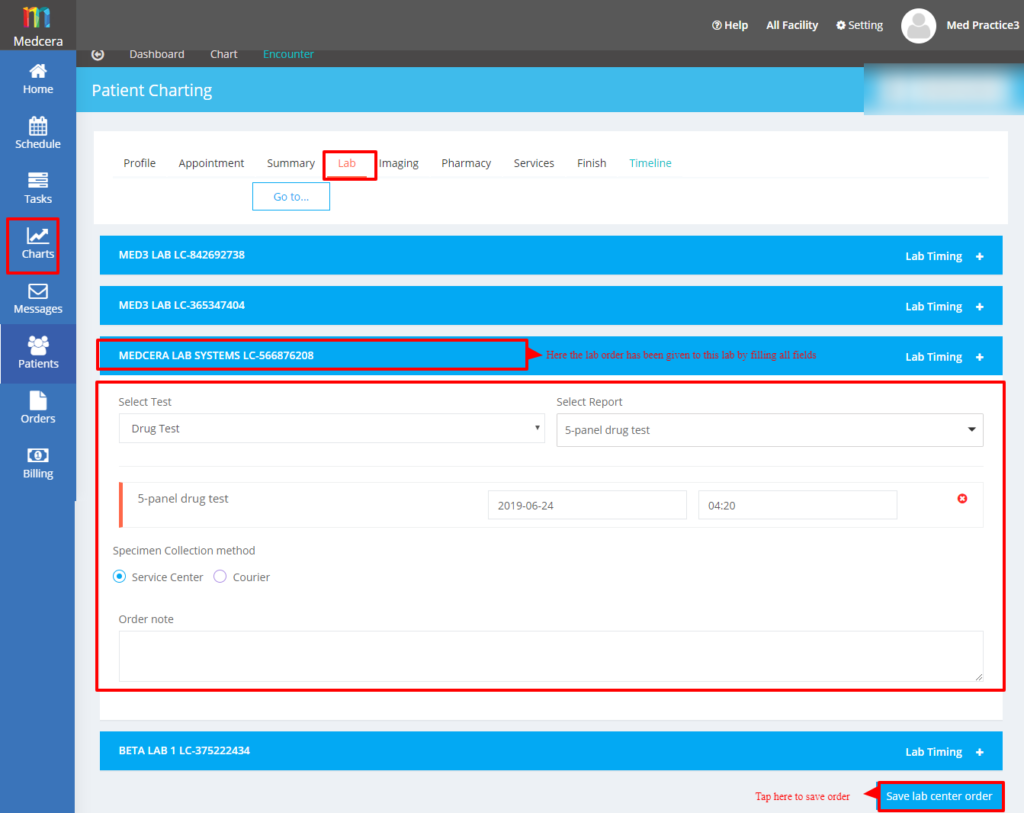
- Note: Replicate same steps above to place order and view connect timing for Pharmacy and Imaging centers.
- Click on “Services” in the charts tab to add new practice service and apply existing services as shown below.
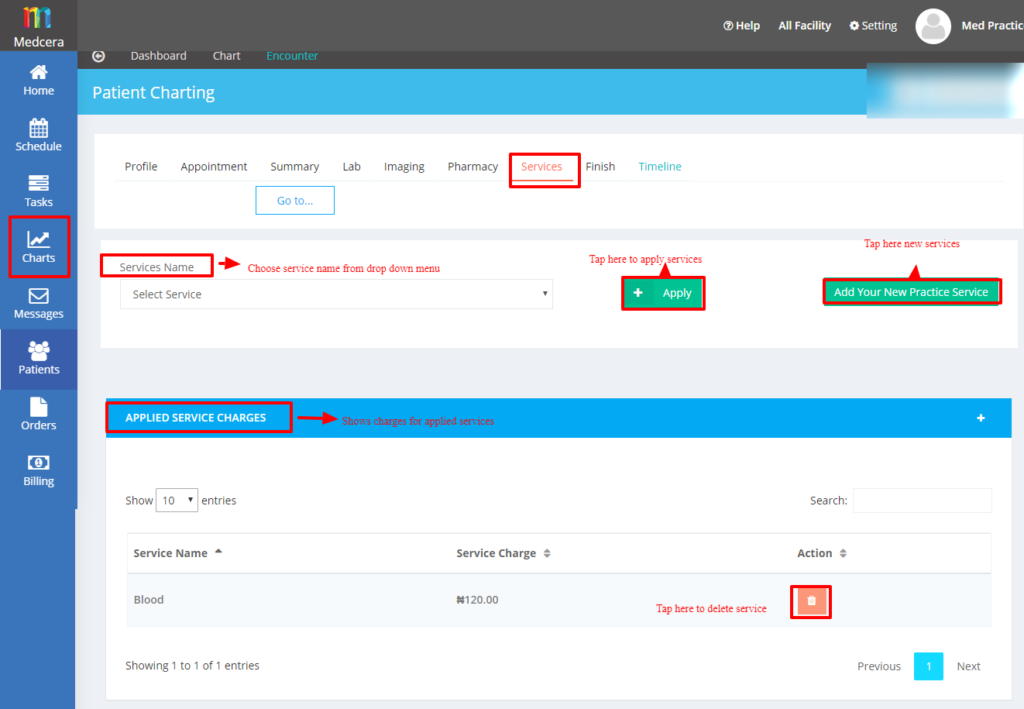
- Refer to the image below for detailed guide on how add practice services.
- A click on “Edit” Button displays the message below.
- A click on “Delete” Button pops up the message below.
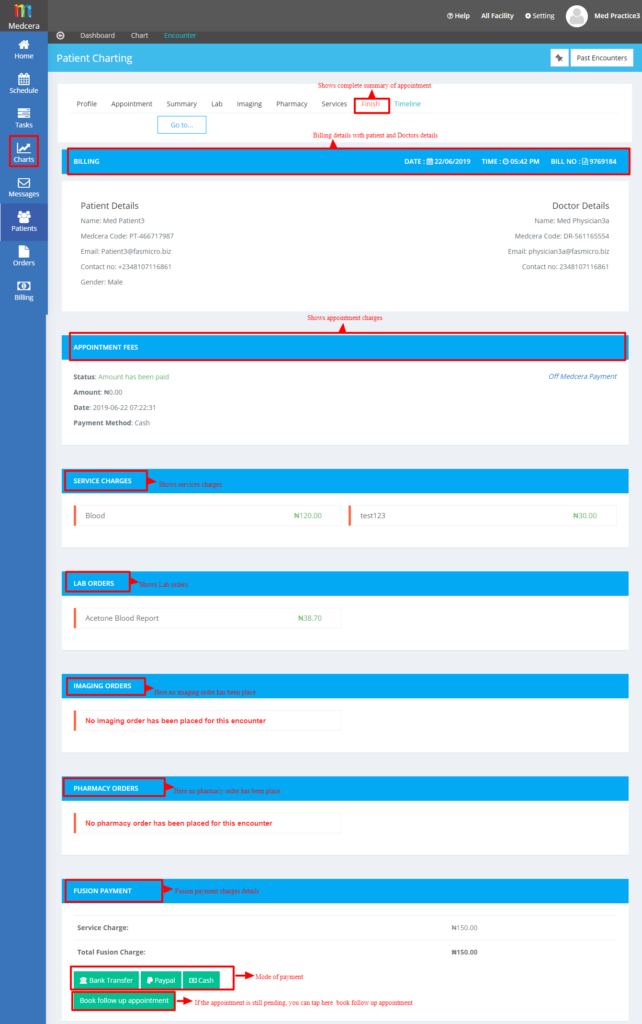
- Click on “Finish” to view encounter data.
- Note: If an appointment is still pending, user can “Book follow up Appointment” which redirects you to “Book New Appointment” page and you have to follow through new appointment booking process.
- Click on “Timeline” to track the timeline of all the orders. Tap on particular order to view the timeline.
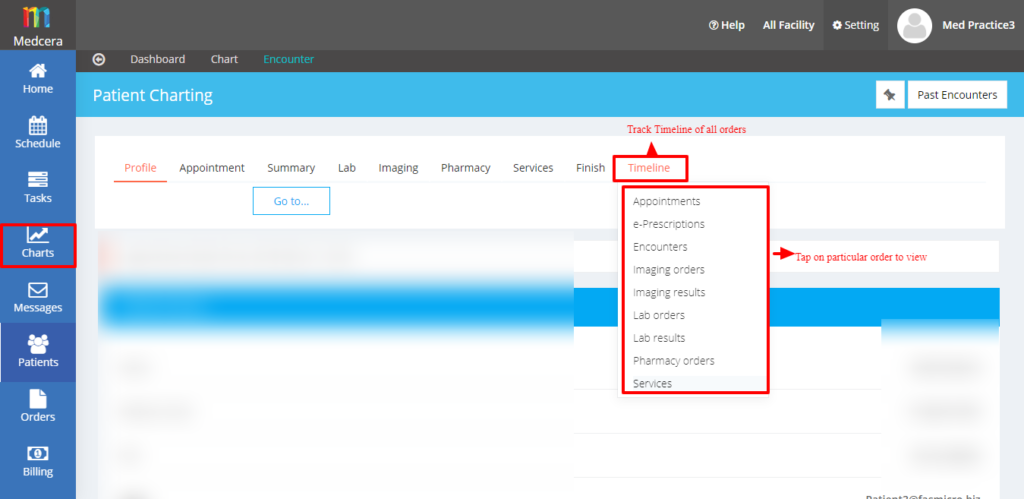
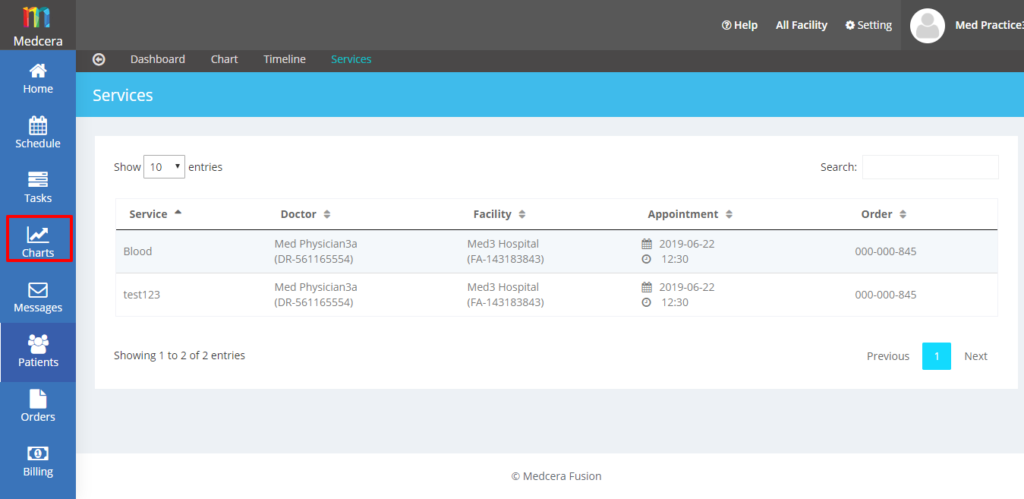
For example, if user selects “Services” then you will able to track all services in a particular encounter as shown below.
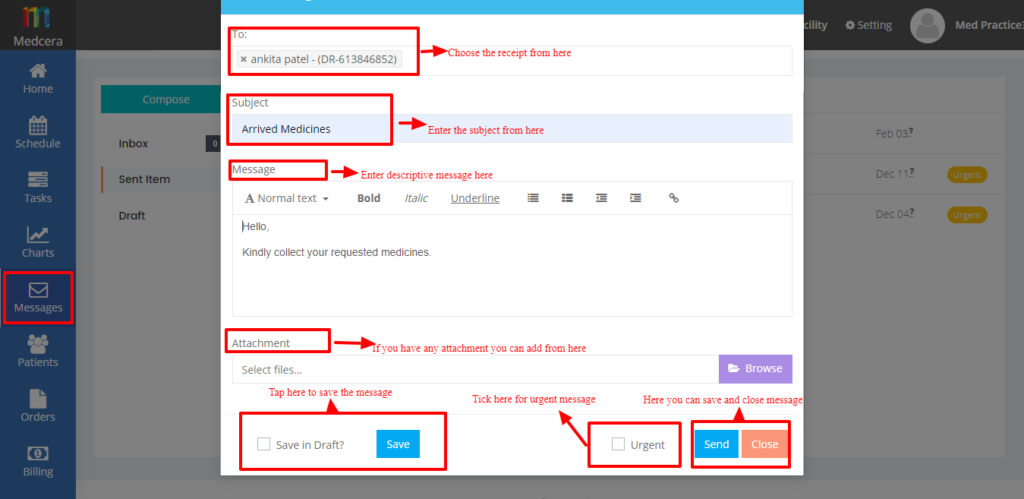
- Go to the vertical Menu bar in the dashboard and tap on “Messages” button.
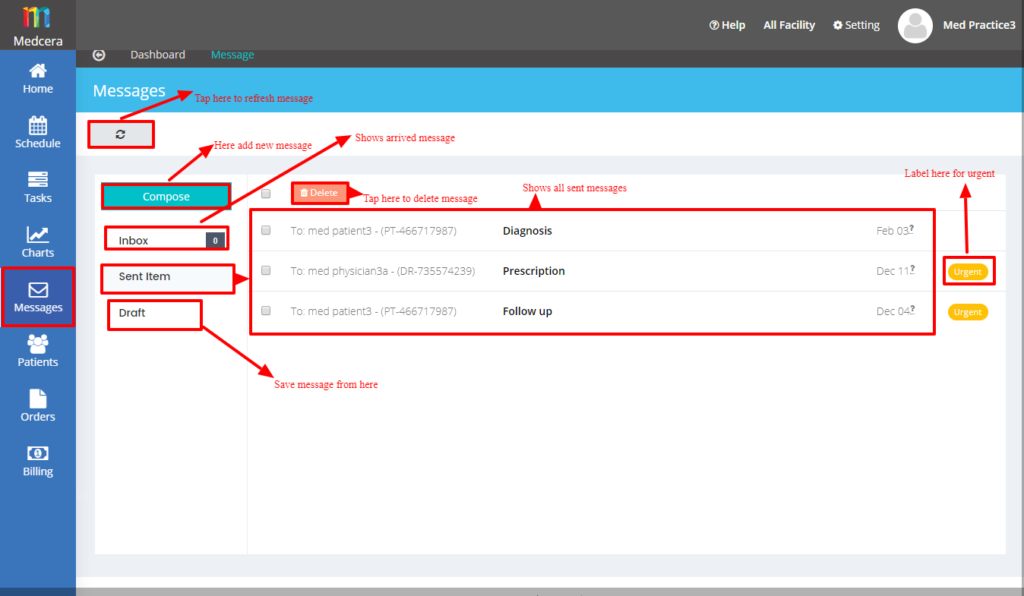
- Click on “Compose” to send multiple messages to users fusion had previous interface with, select recipient and tap “Send” tab.
- Click on “Sent Item” to view sent Messages.
- “Message has been sent successfully”will be displayed at the top of the screen.
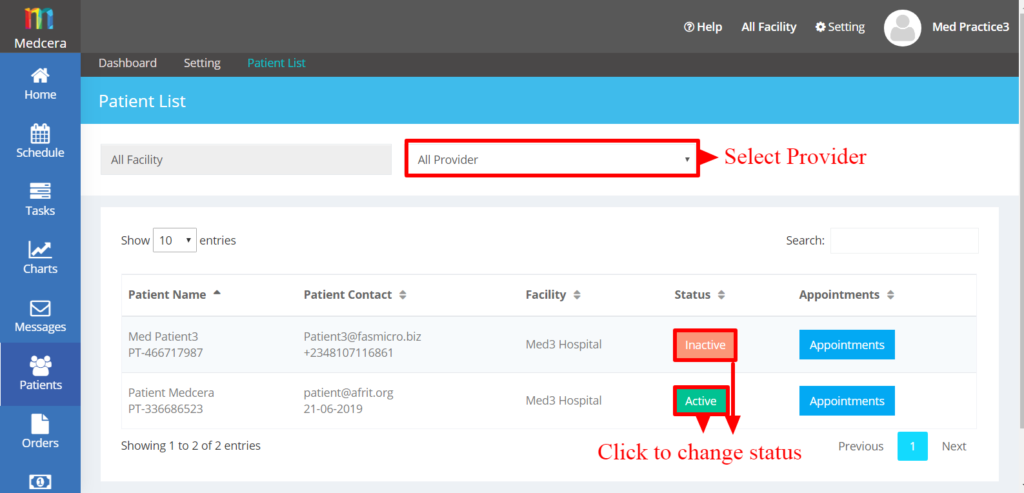
- Go to the vertical Menu bar in the dashboard and tap on “Patients” to view the list of patients as shown below.
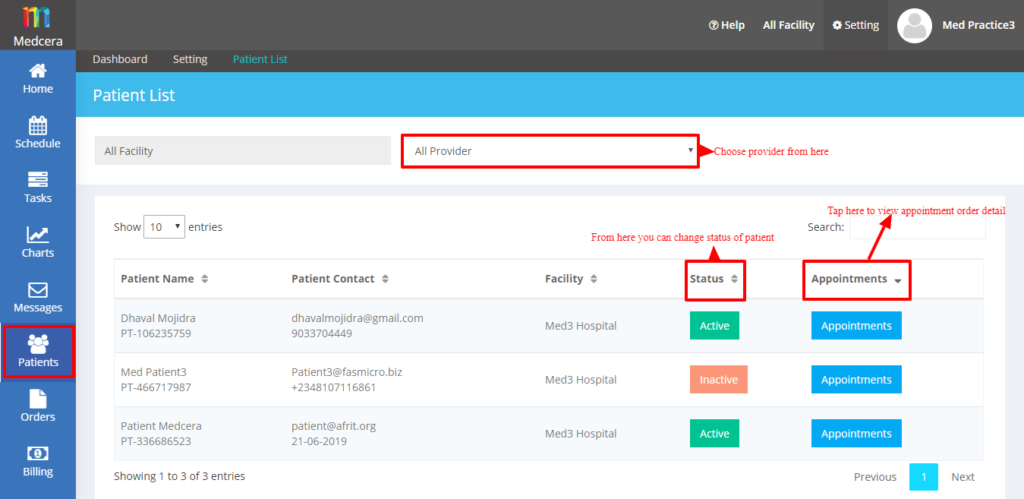
- Click on “Status” button to change patient status to either active or inactive as shown below.

- Click on “Appointments” to view “Appointment Order Detail” as shown below.
- Go to the vertical Menu bar of the dashboard and click on ”Orders” to view patient order details for Lab, Imaging and Pharmacy as shown below.
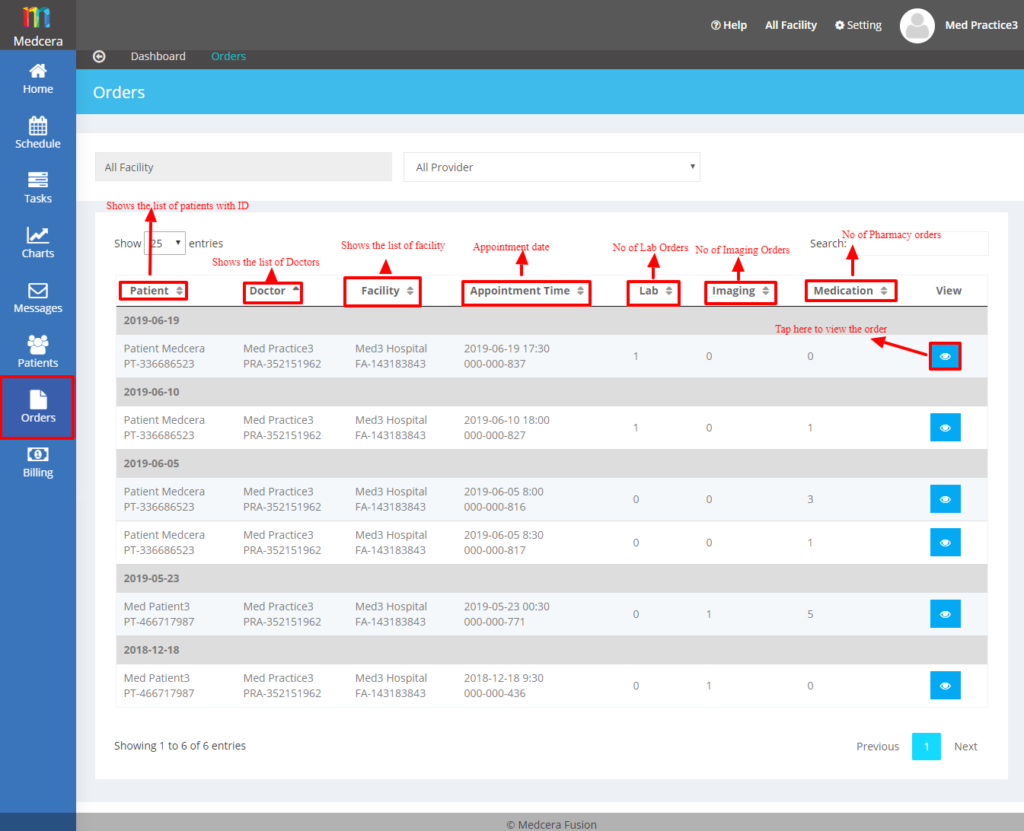
- Click on “View” to see the order details of a particular patient as shown below.
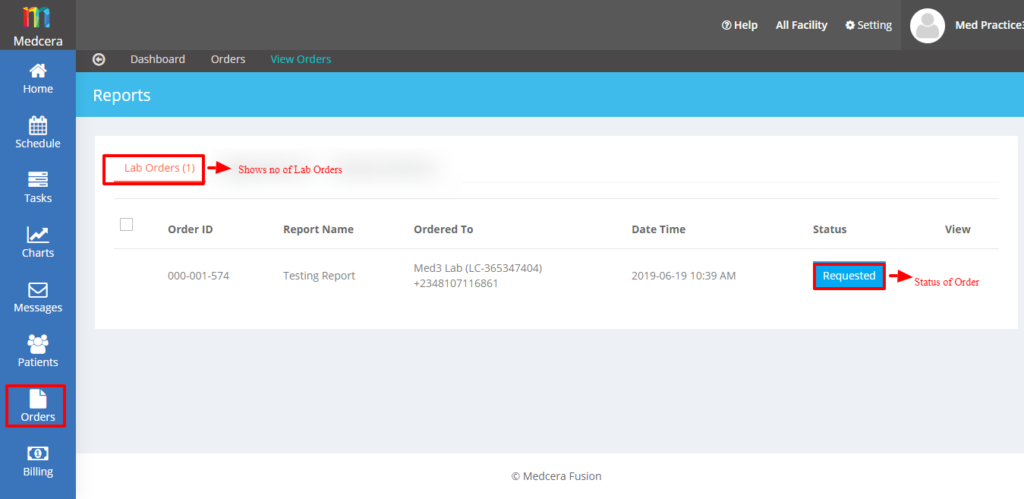
- See orders views of Imaging Centers.
- A tap on “Re-request” button takes you to the screen below.
- See pharmacy orders view below.
- Tap on the vertical Menu bar in the dashboard and click on ”Billing” to generate and print patient bill, Lab bill, Imaging center bill, Pharmacy Center bill as shown below.
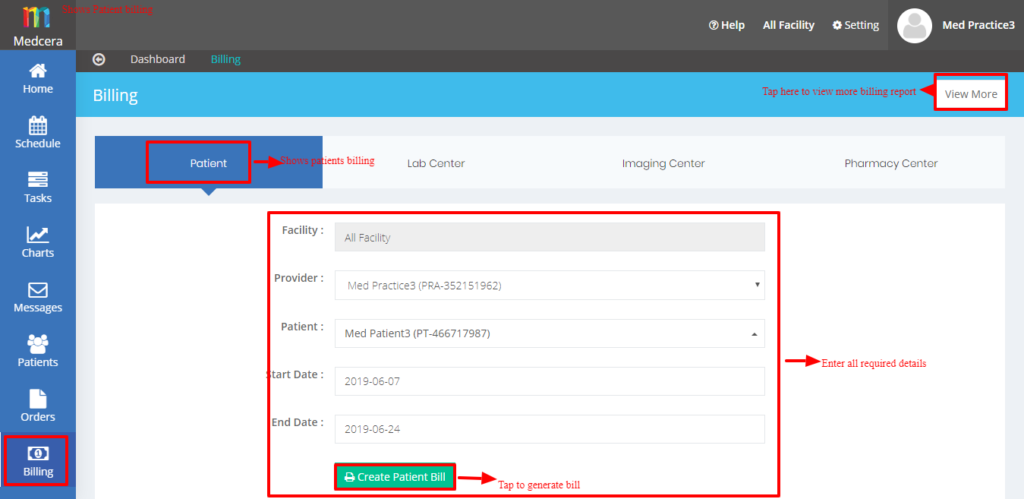
- Tap on “Create Patient Bill” to generate patient bills as shown below.
- Click on “View more” to generate more billing reports as shown below.
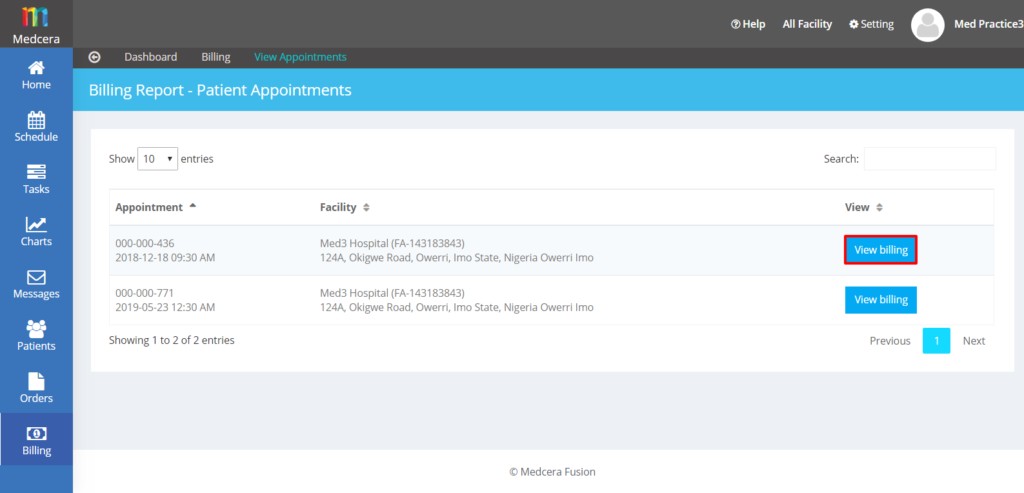
- Tap on “View Appointments” and click on “View Billing” to see bills of a particular patient.
- A click on “View billing” shows the screenshot below.
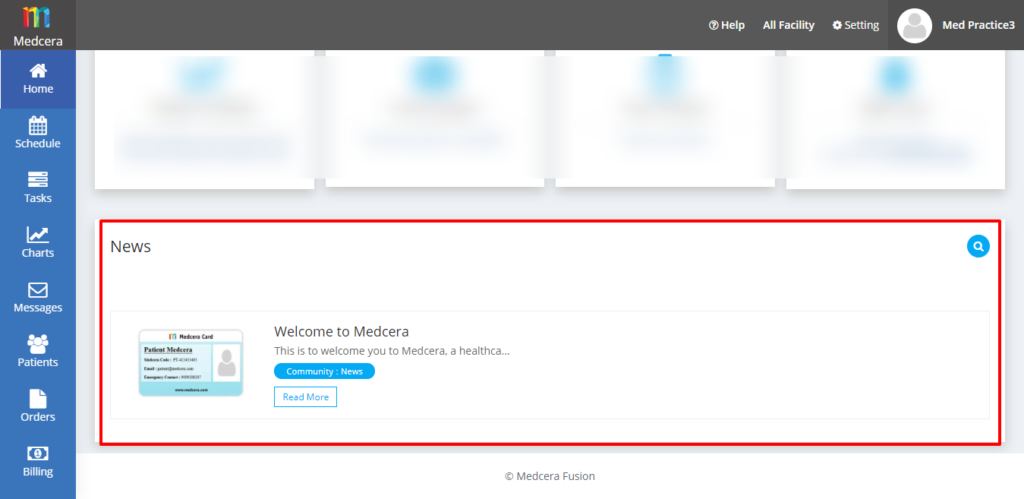
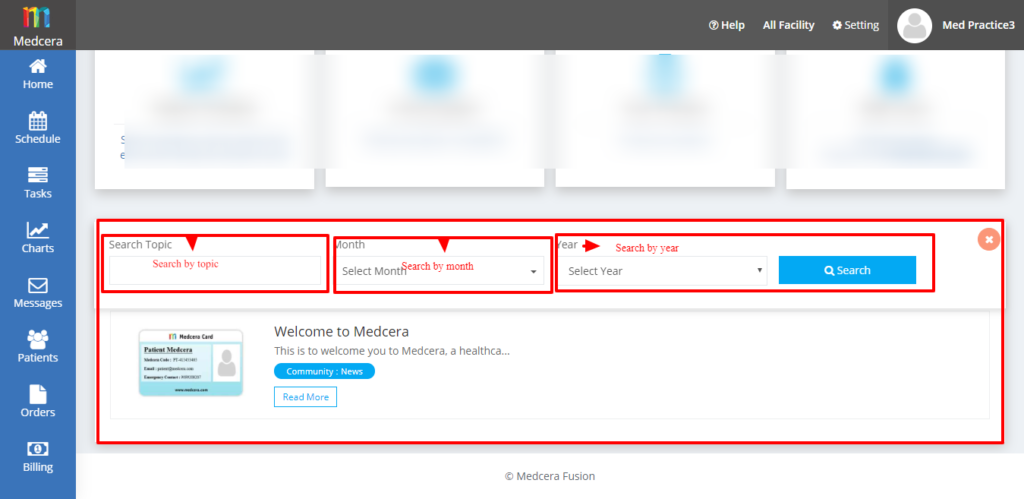
- The “News” tab is at the bottom of the Dashboard where Medcera related and health news is posted by Medcera admin and can be read by users. See screen below.
- A click on the search symbol takes you to the page below.
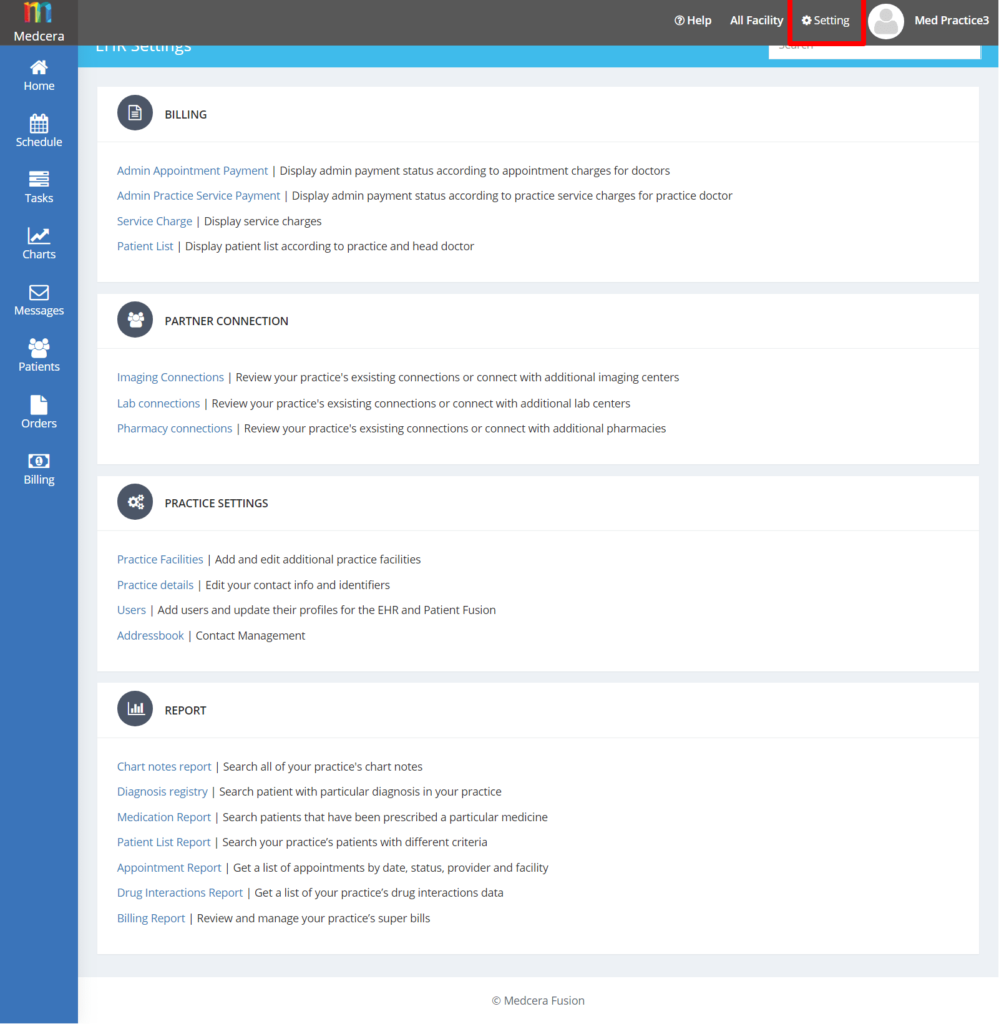
- Click on “Setting” tab to maintain settings in Fusion portal.
- There are 4 (four) types of setting as displayed in the screen below.
- Billing
- Partner Connection
- Practice Settings
- Report
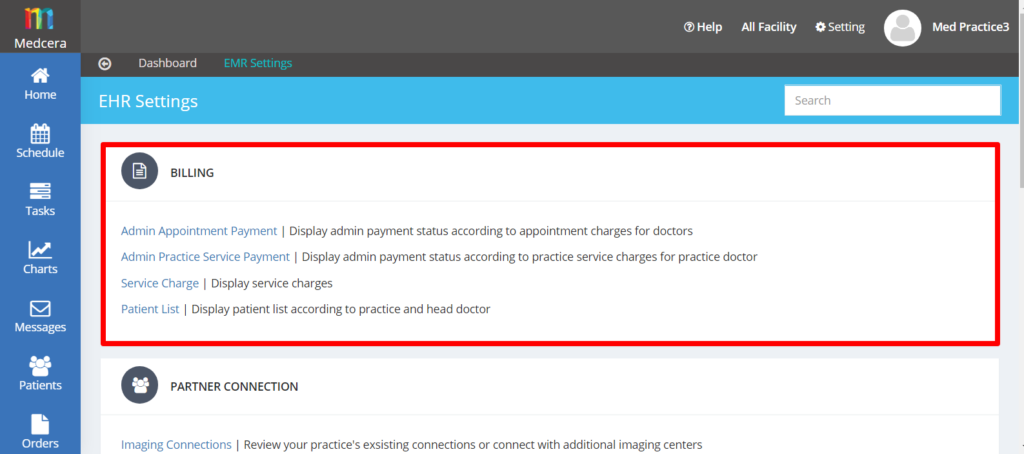
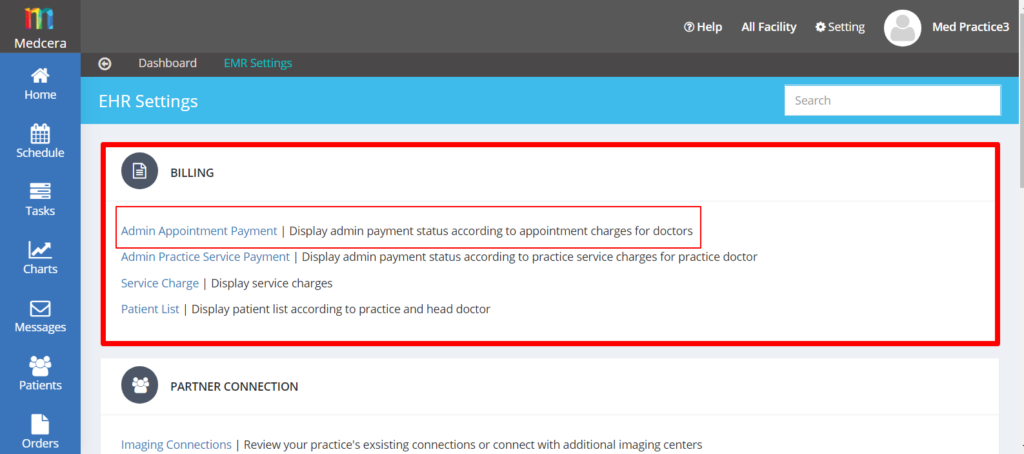
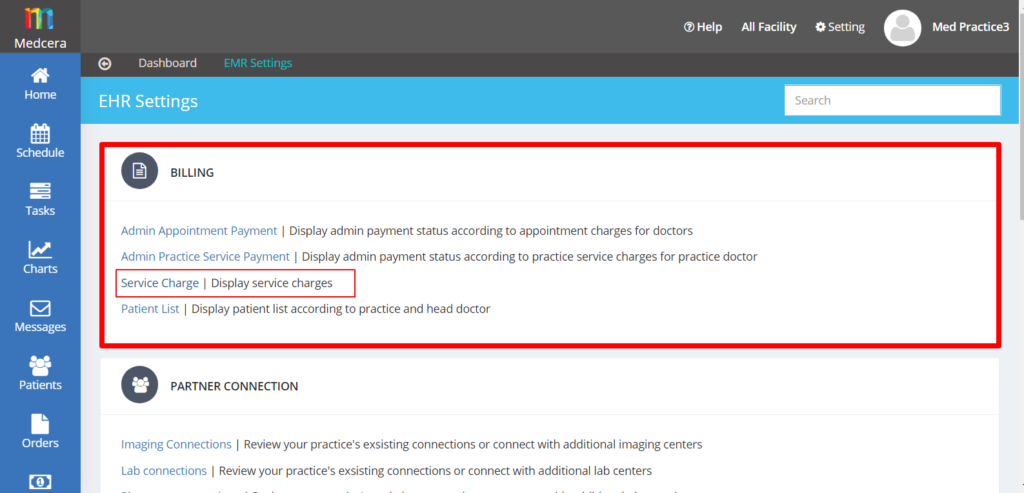
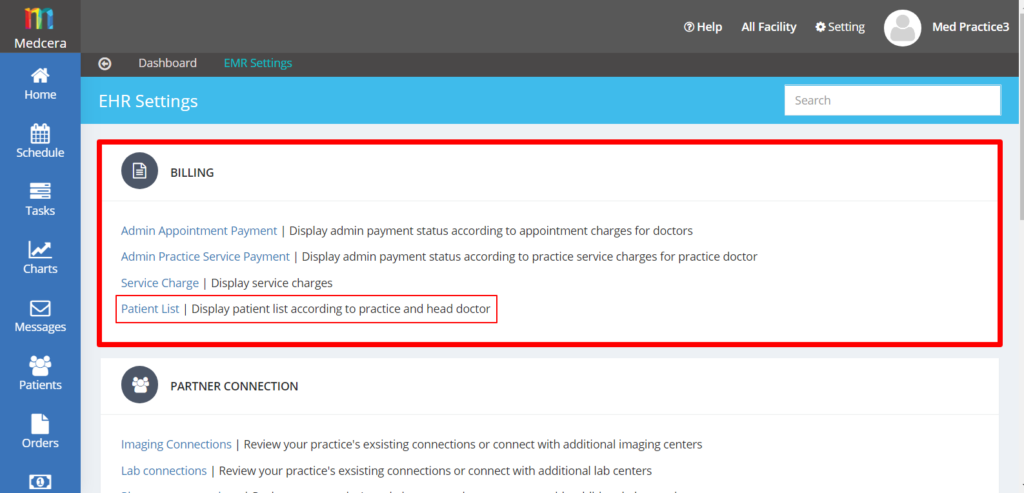
25.1 BILLING
- Settings related Billing will be available in “Billing” as shown in the screen below.
25.1.1 Admin Appointment Payment
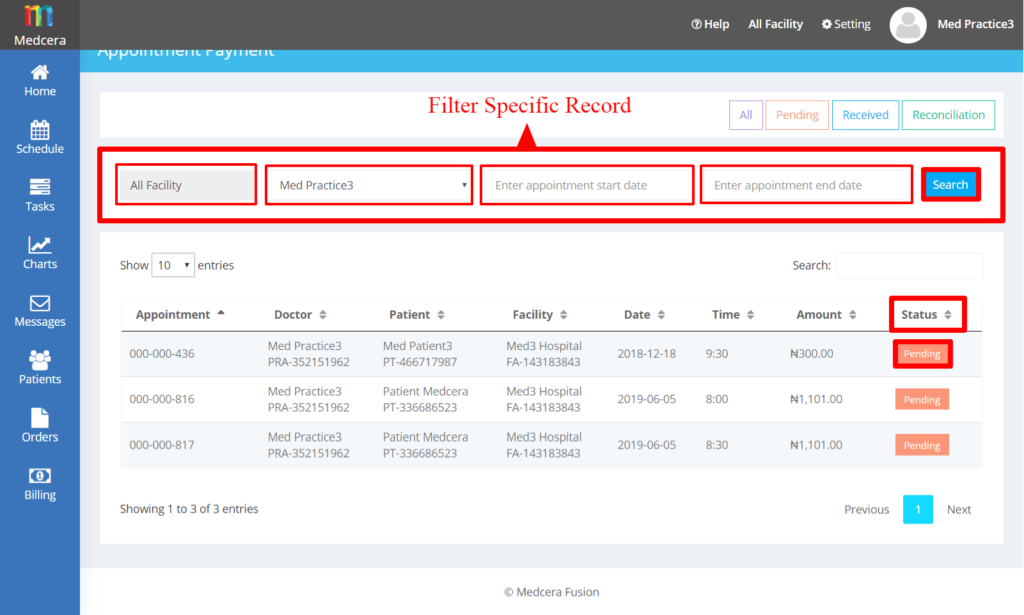
- Click on “Admin Appointment Payment” to view the Admin payment status of appointment charges for fusion as shown below.
- Add Doctor Name and Time fields to filter specific search and click search button as shown in screen below.
- Payment made by patient will be sent to Medcera Admin first for approval.
- Status will be shown as “Pending” until admin Approves payment as shown below.
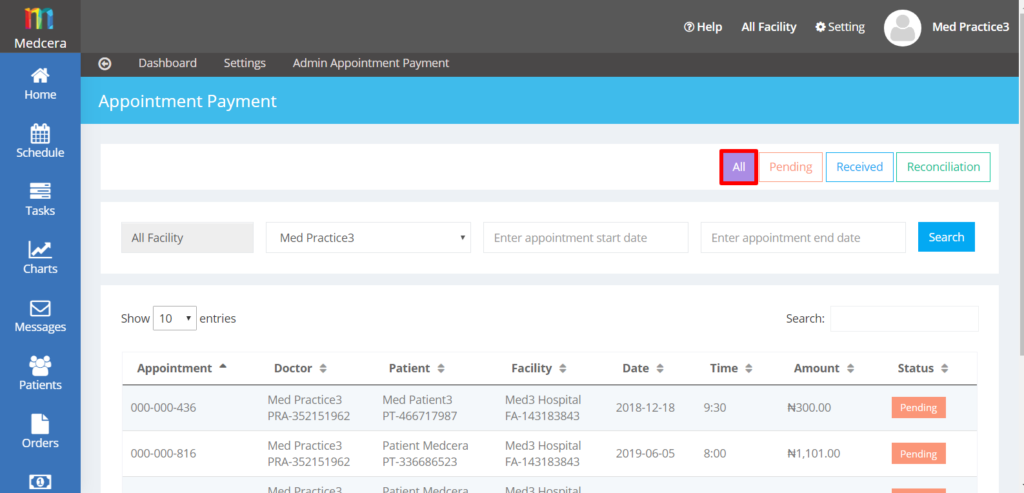
- Click on “All” button to view payment records as shown in the screen below.
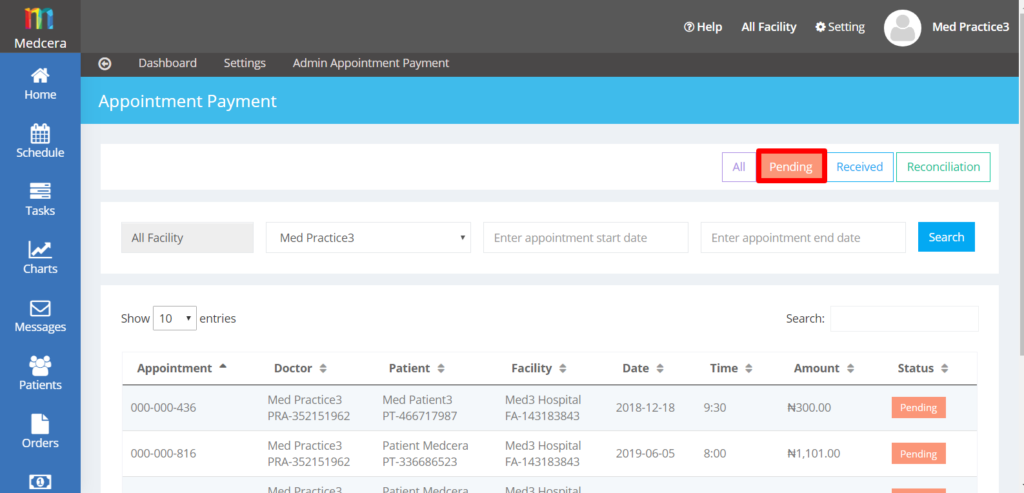
- Click on “pending” button to view pending payment records as displayed below.
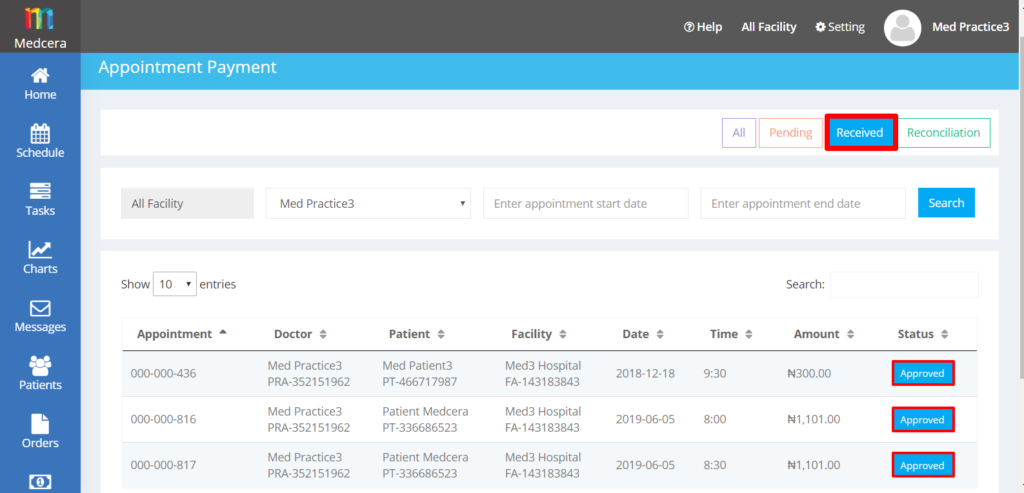
- Click on “Received” button to view Approved payment records as shown in below:
- Click on “Reconciliation” button to view Reconciliation records of payments as shown below.
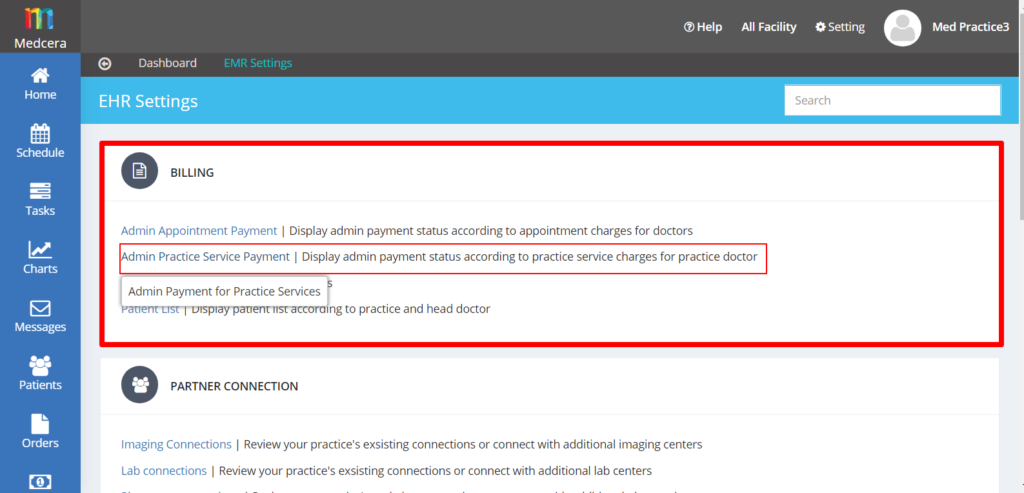
25.1.2 Admin Practice Service Payment
- Click on “Admin Practice Service Payment” to display admin payment status according to practice service charges as shown in screen below.
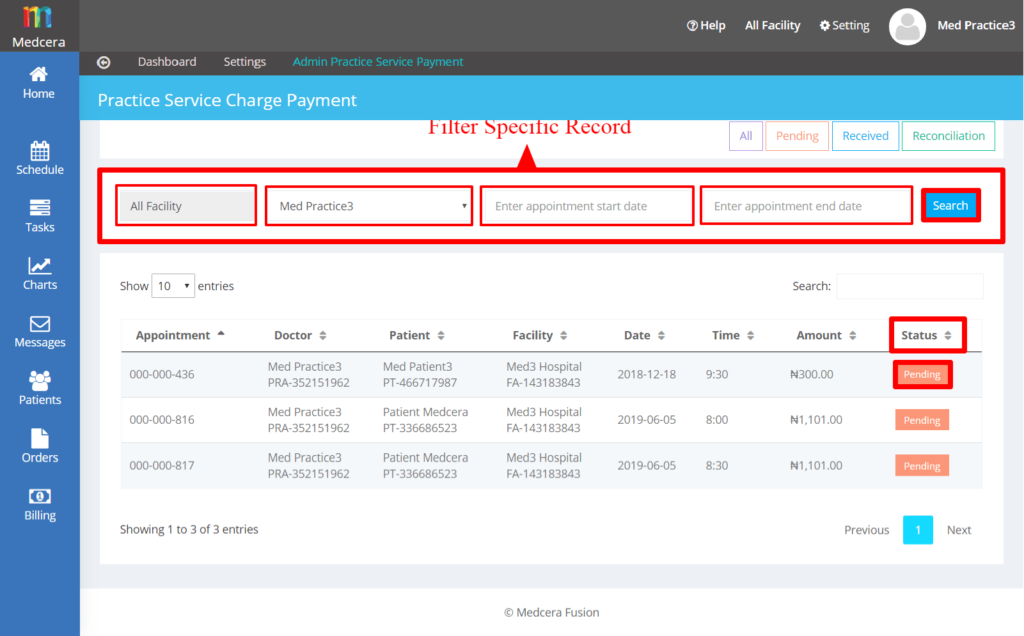
- Add Doctor Name and Time fields to filter specific search, and click search button as shown in the screen below.
- Payment made by patient will be sent to Medcera Admin first for approval.
- Status will be shown as “Pending” until admin approves payment as shown below.
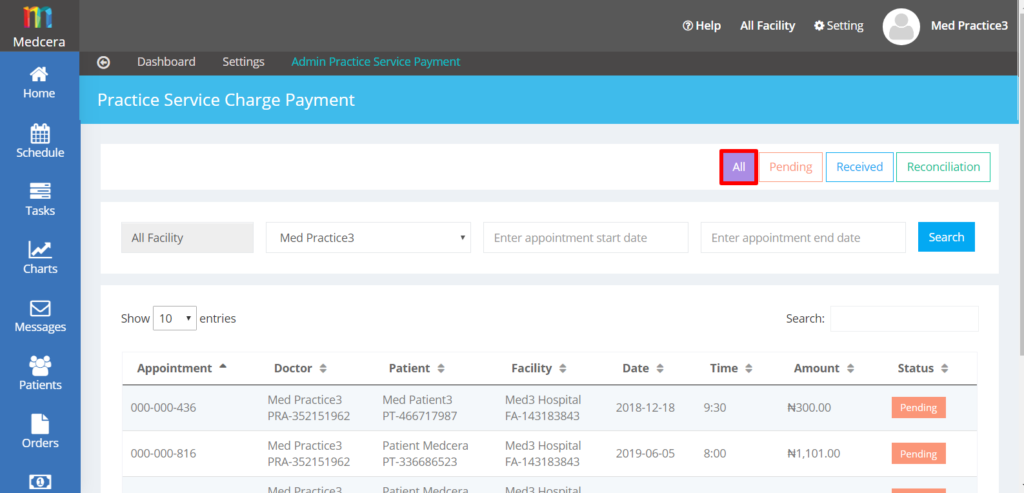
- Click on “All” button to view payment records as shown in the screen below.
- Click on “pending” button to view records of pending payments as shown below.
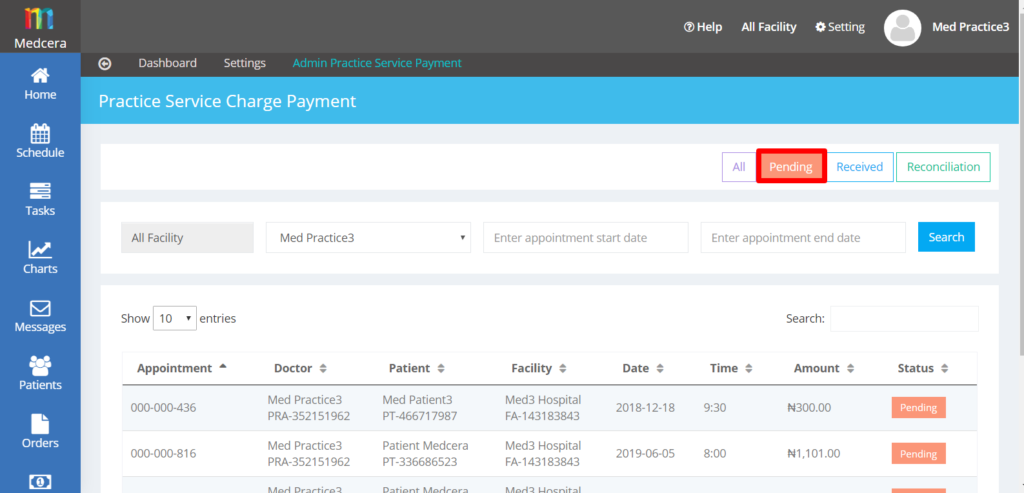
- Click on “Received” button to view Approved payments as shown below.

Click on “Reconciliation” button to view Reconciliation records of payments as shown in the screen below.
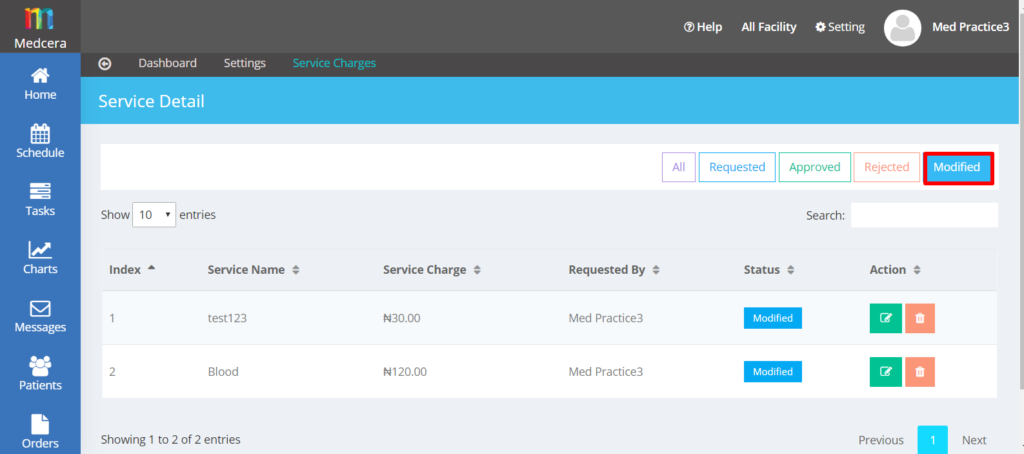
25.1.3 Service Charge
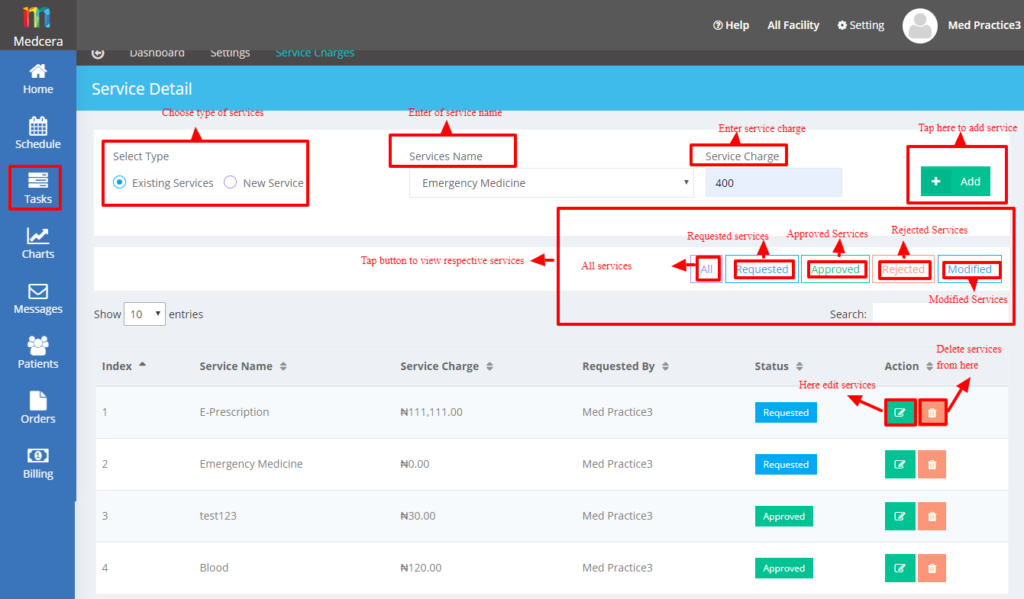
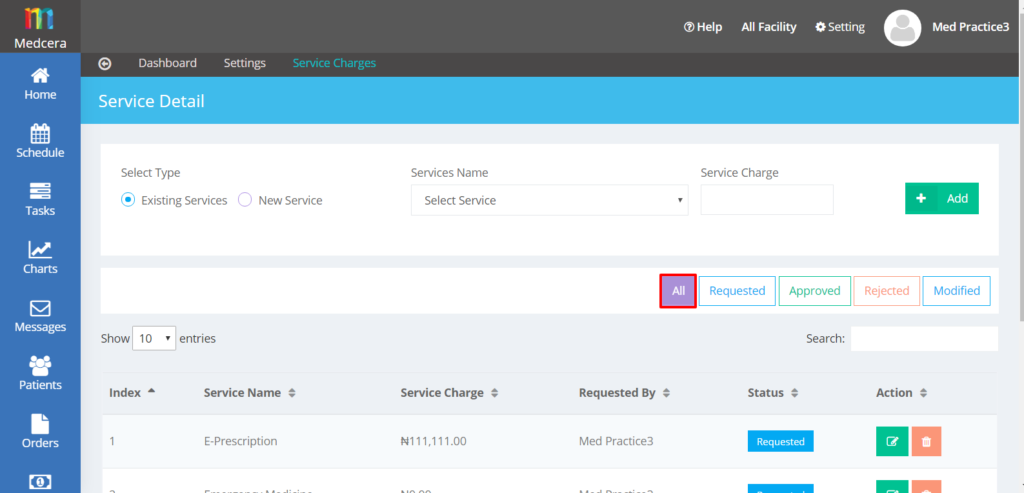
- A Click on “service charge,” displays service charges as shown below.
- Select either from the list of Existing services or add New service.
- Click on the Services Name drop-down and Select service Name from the list, input charge for it, and click Add button to add that service.
- If the service is not available in the drop down, select “Add New Service” and add new service. See screen below.
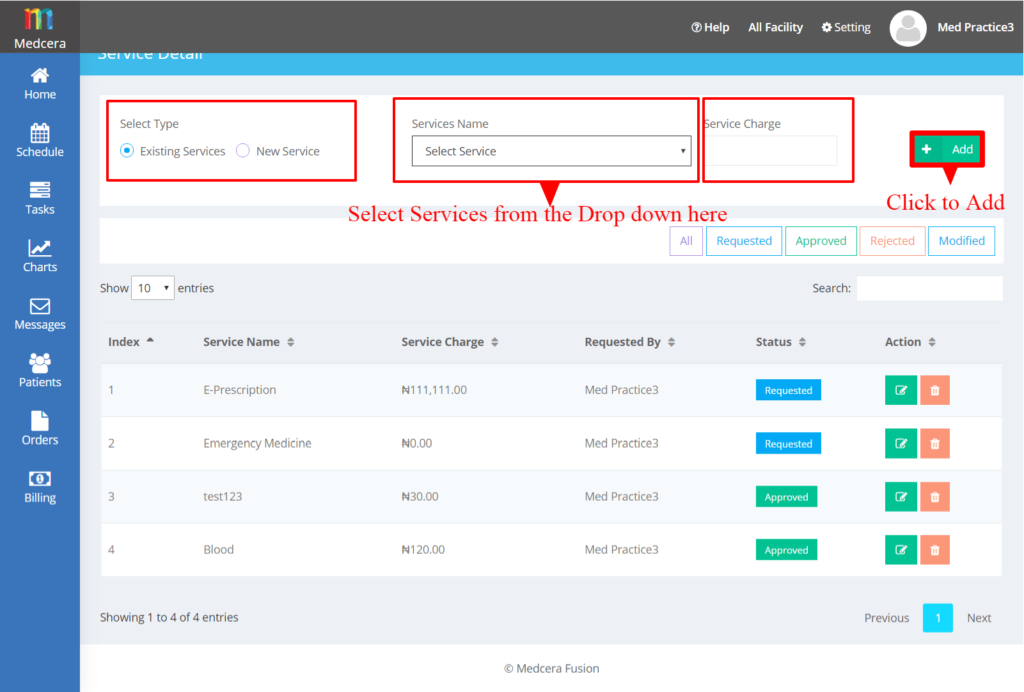
- The Status of the Service Charges will be displayed as shown below.
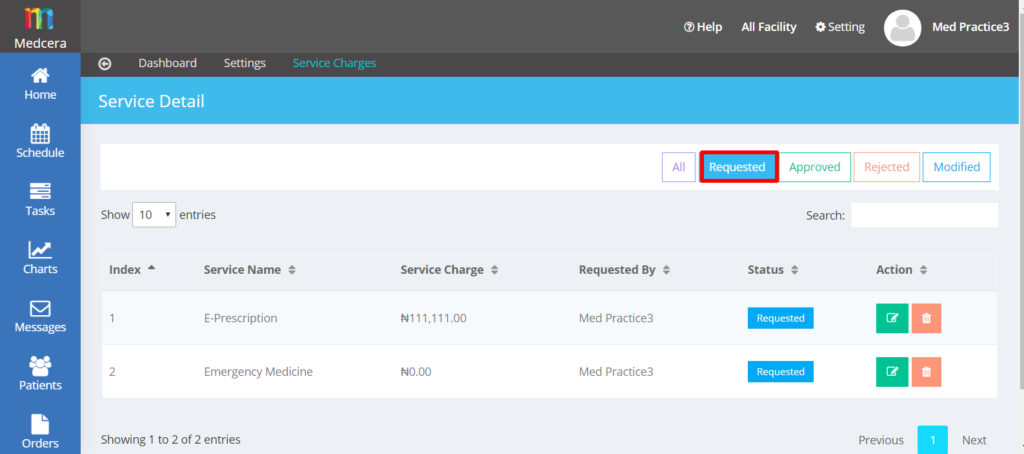
- Requested service Charges that have not been Approved by Medcera Admin will be stated as “Requested” as shown below.
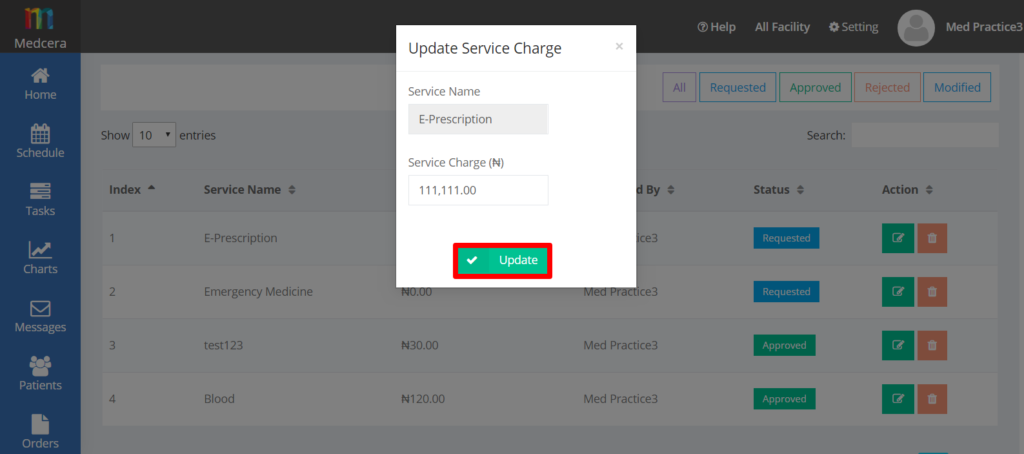
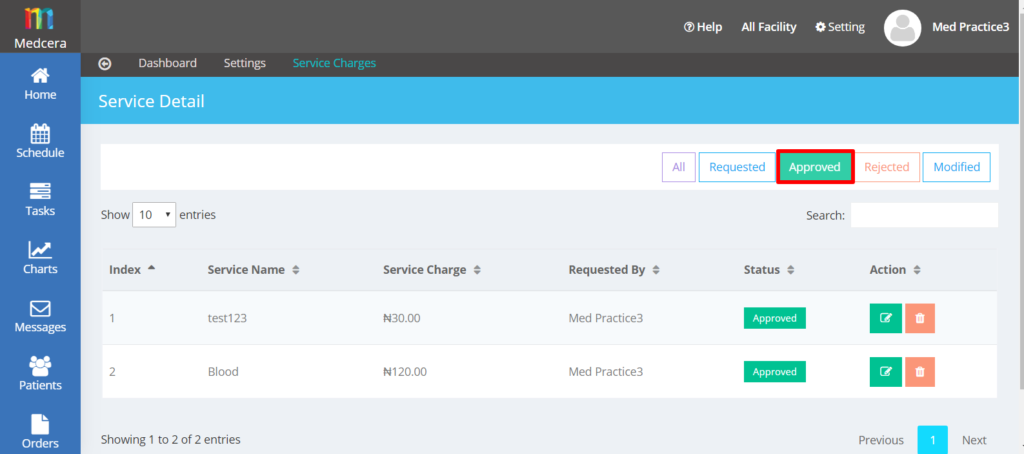
- Request that has been approved by admin will be displayed as “Approved” as shown below.
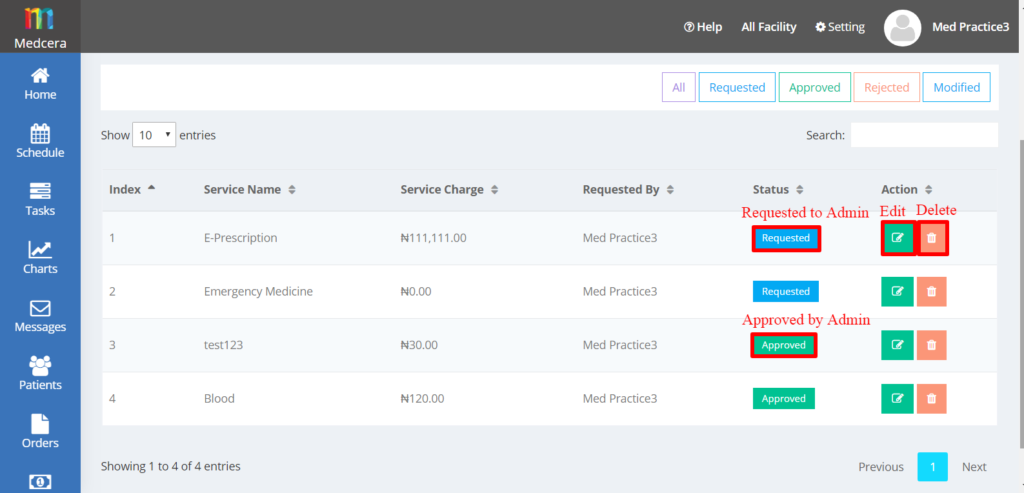
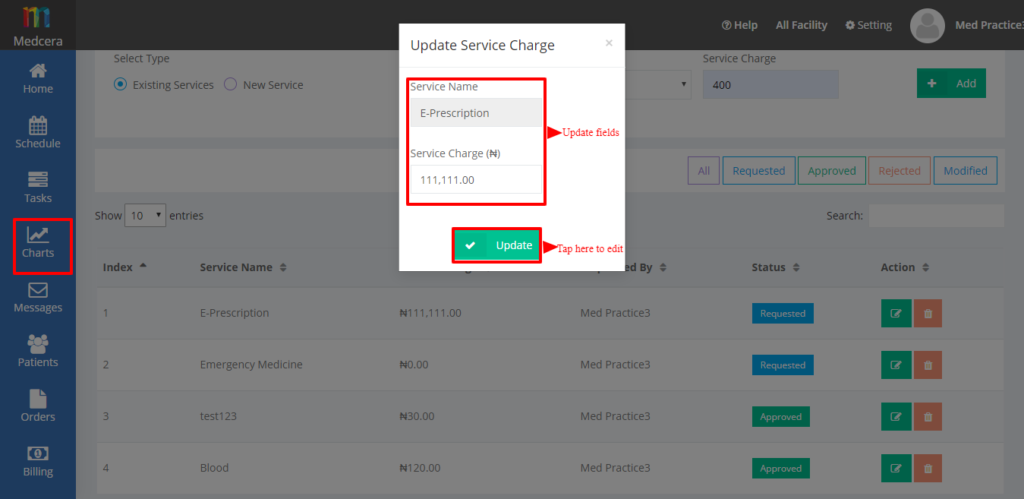
- You can edit service Charges by clicking on Edit ( ) button as shown in the screen below.
- Update your details and Click on Update Button a shown in the Pop-Up below.
- To edit Approved Services, user will request again and Medcera Admin will approve for new updates.
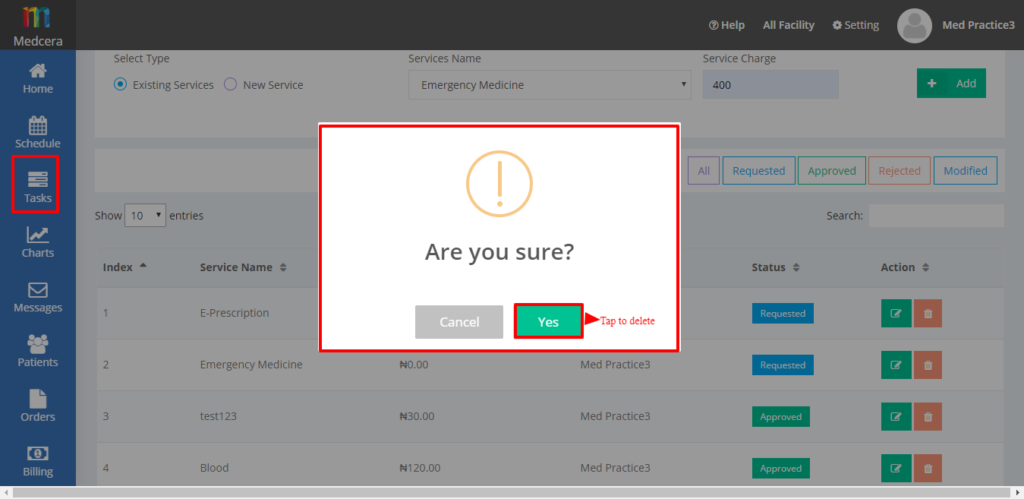
- Click on “Delete” Button to delete existing service (s).
- Click on “All” to display all records for Service Charges.
- Click on “Requested” to display all requested service charges records.
- Click on “Approved” to display all Approved service charges records.
- Click on “Rejected” to display all Rejected service charges records.
- Click on “Modified” to display all Modified service charges records.
25.1.4 Practice List
- Click on “Practice List” from billing card of a dashboard as shown in below screen:
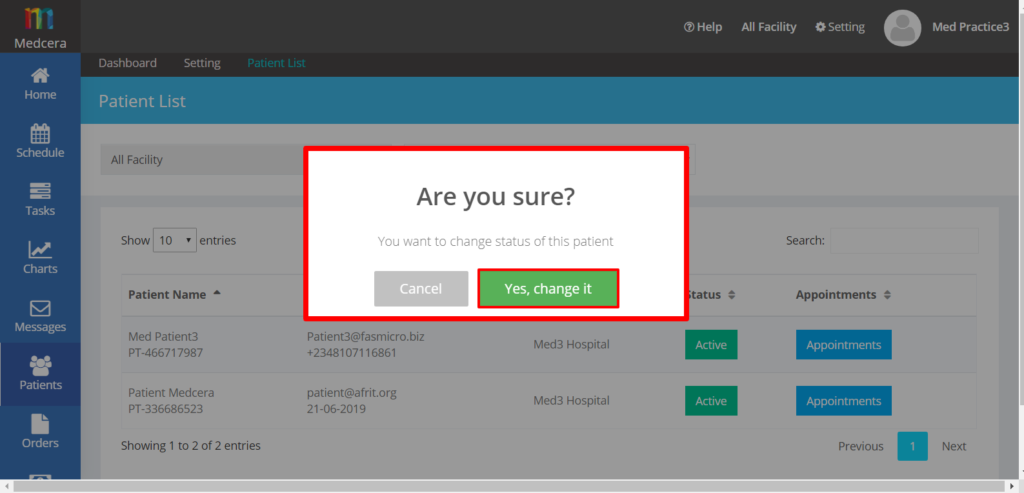
You can change activation status as below to active or inactive the status.
- Click yes to change activation status as shown in below screen:
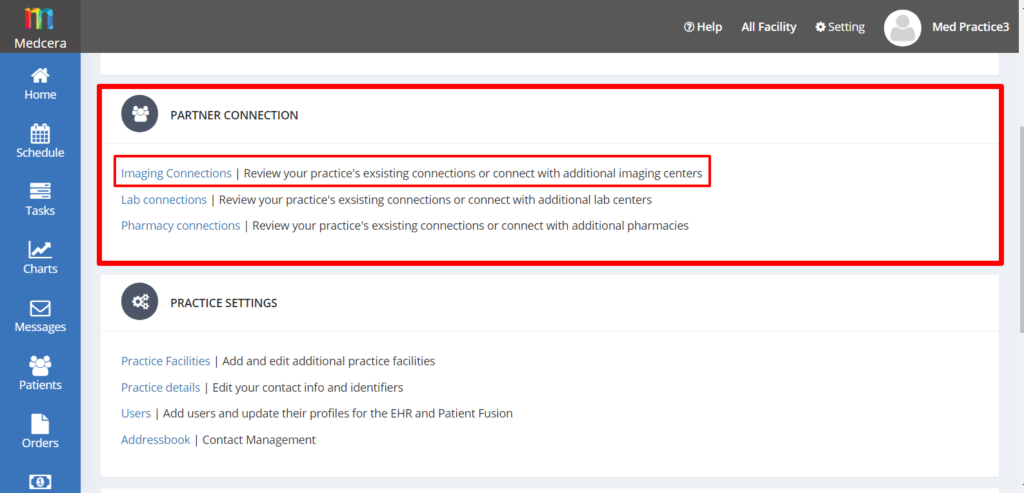
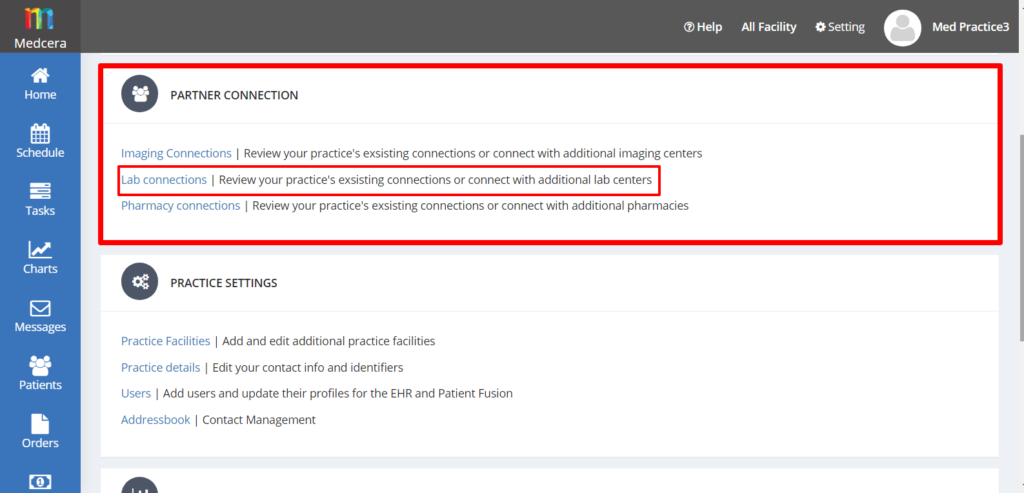
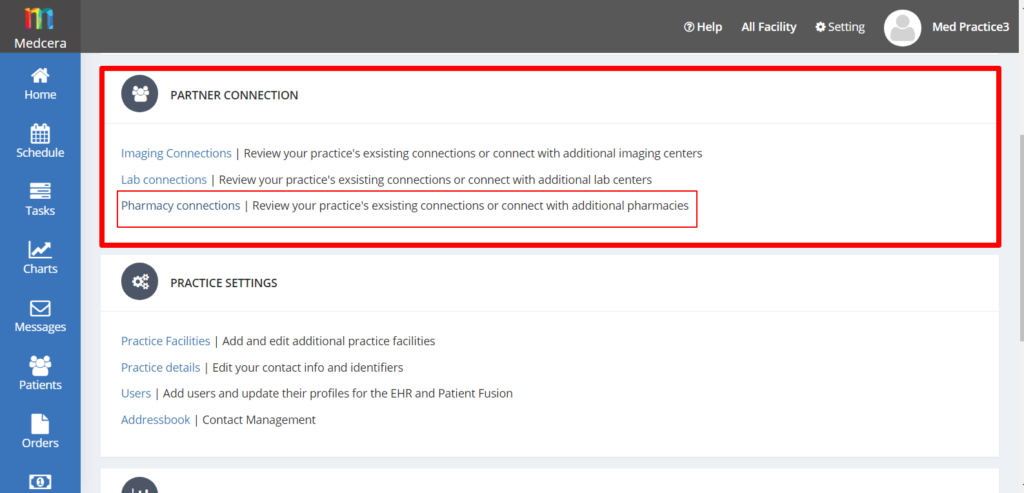
25.2 PARTNER CONNECTION
- Go to fusion setting and click on “Partner Connection” card to maintain setting for connect partners.
- There are 3 (three) connect partners as seen below.
- Imaging Connections
- Lab Connections
- Pharmacy Connection
25.2.1 Imaging Connections
- Click on Imaging Connections to review your practice’s existing connections or connect with additional imaging centers as shown in the screenshot below.
- Click on “Imaging Connections” to review existing Imaging Centers that are connected to your practice as seen below.
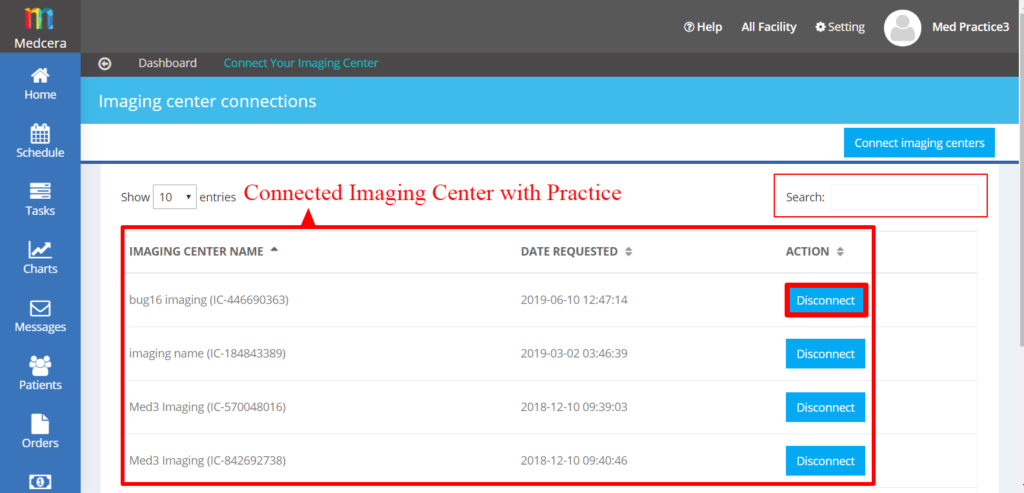
- Fusion user can Connect New Imaging Center with their Practice or can Disconnect existing Imaging Center.
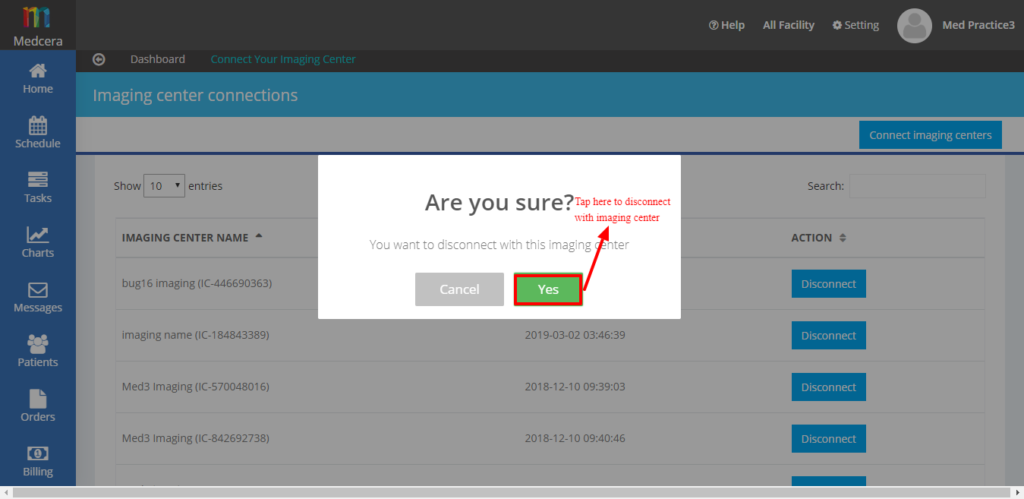
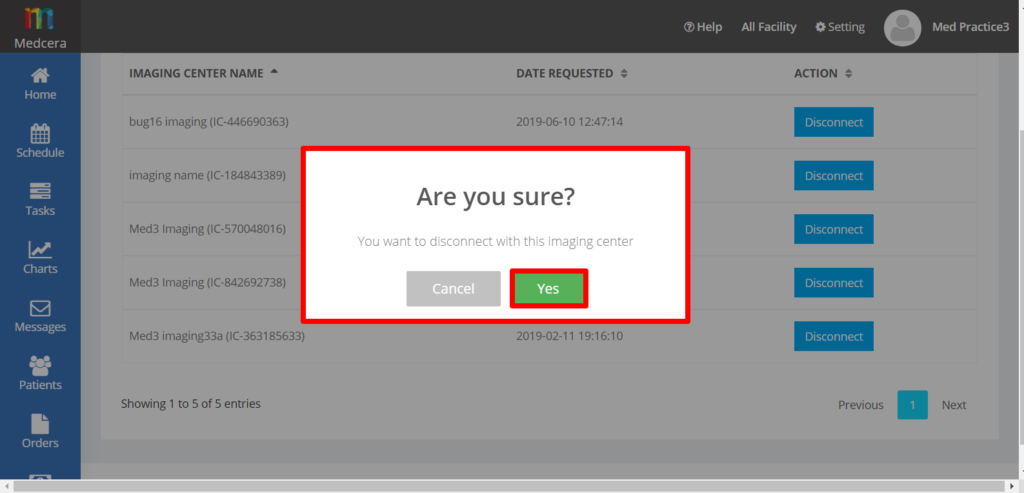
- Click on “Disconnect” button to disconnect Imaging Center as shown below.
Click on “Connect Imaging Center” button to connect with new Imaging Center as shown in the screenshot below.
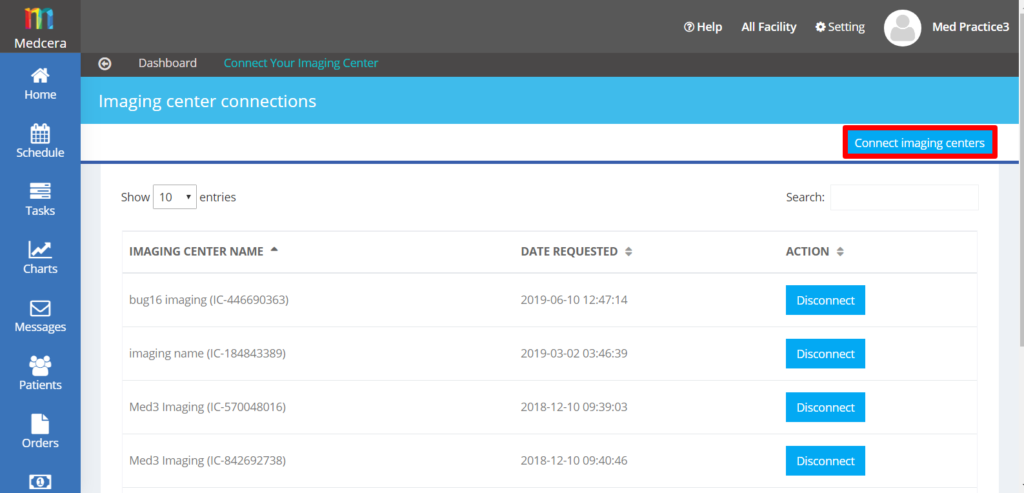
- Click on “Connect Imaging” to view list of Imaging Centers connected to your practice.
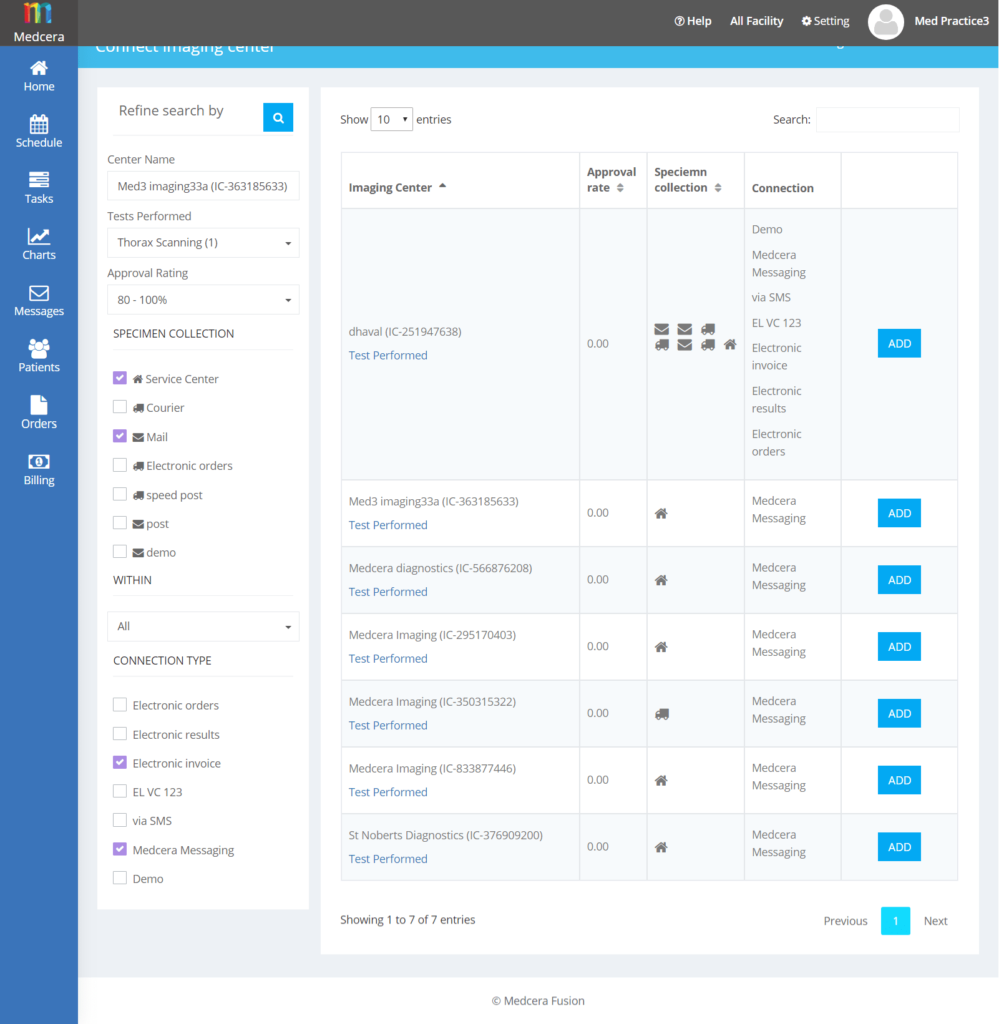
- Filter search to connect with specific Imaging Center as shown below.
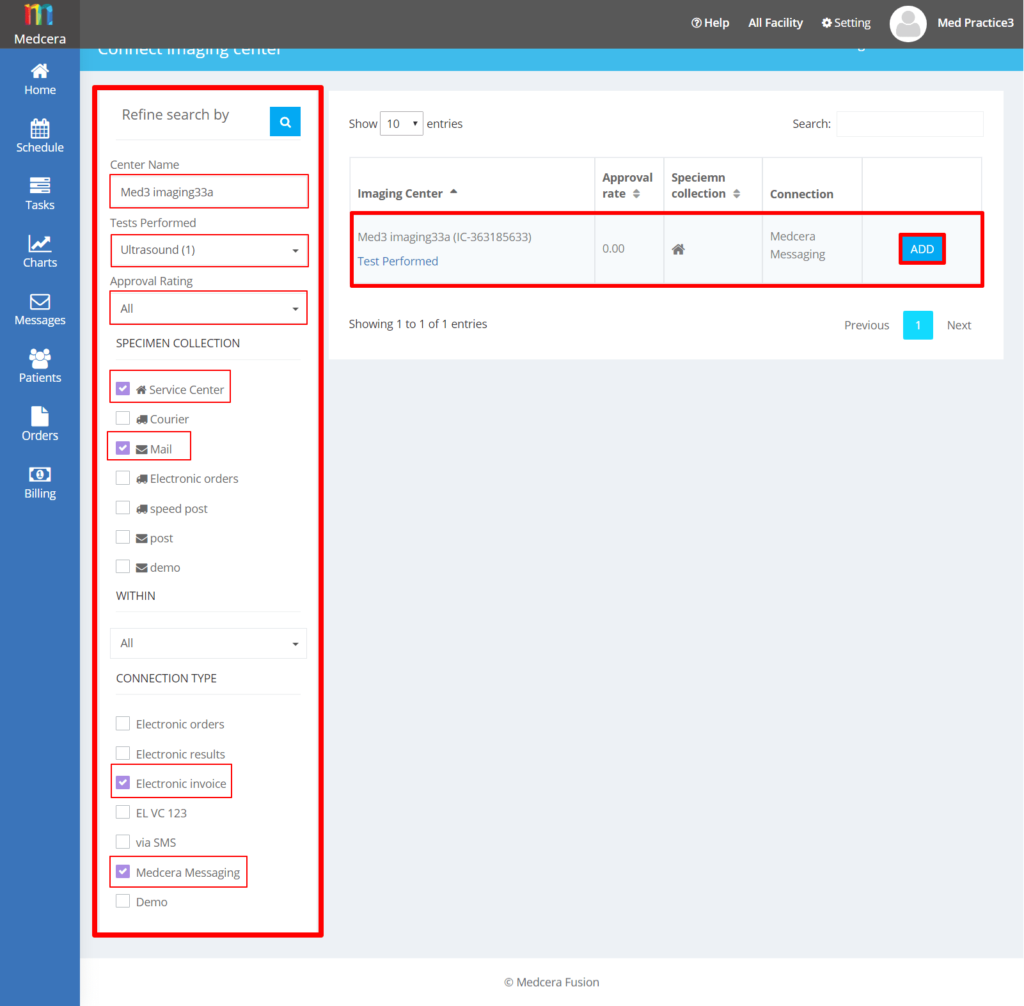
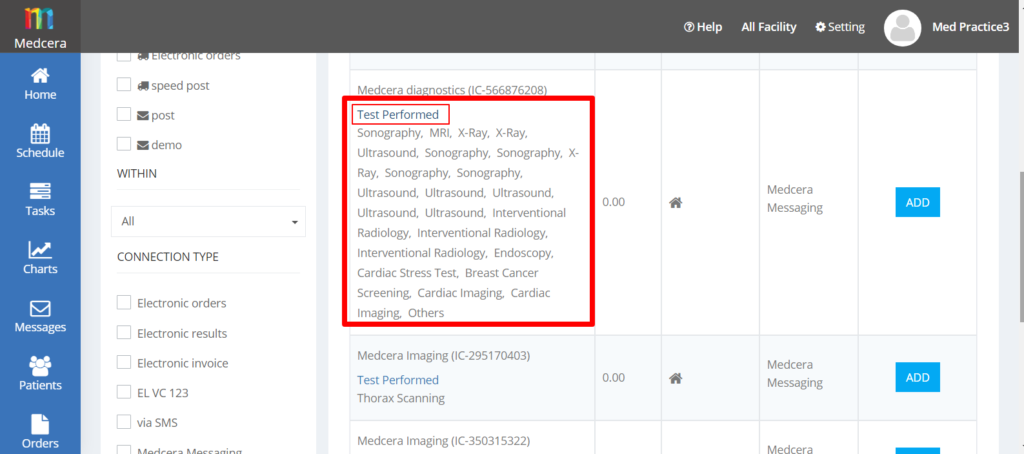
- Click “Test Performed” to view test that are performed by the Imaging Centers as shown below.
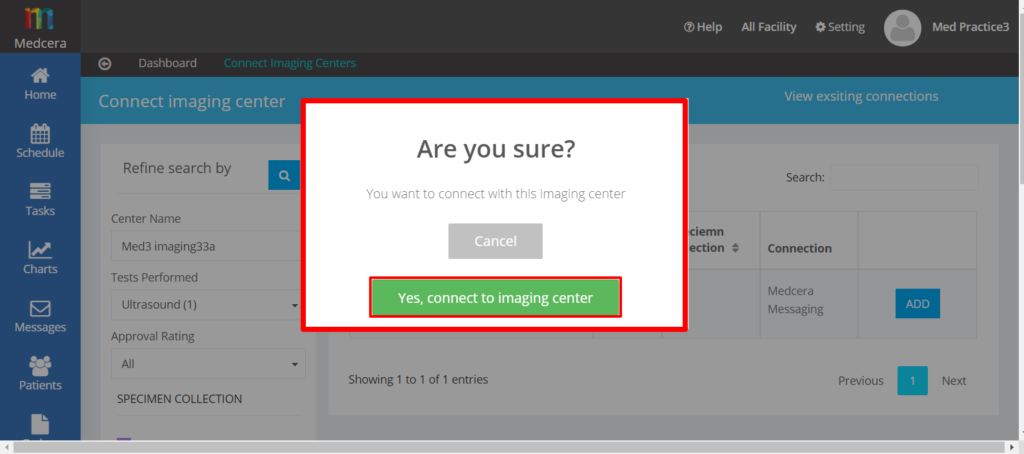
- Click “Add” Button to added new Imaging Center to your practice as seen below.
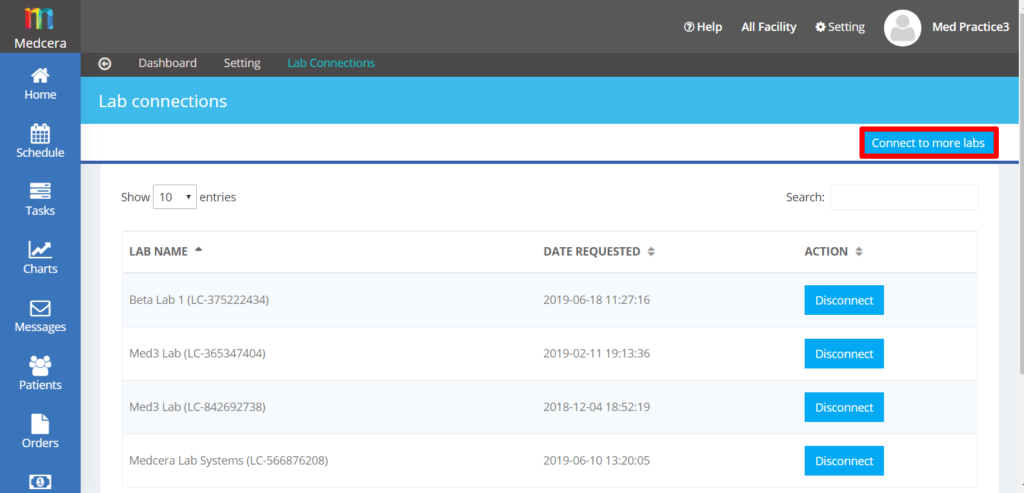
25.2.2 Lab Connections
- By clicking on Lab Connections below screen will be displayed containing existing Connected Lab Centers with your practice.
- You can Connect New Lab Center with your Practice or can Disconnect any existing Lab Center.
- Click on “Disconnect” button to disconnect Lab Center as shown below.
- Click on “Connect Lab Center” button to connect with new Lab Center as shown in below screen:
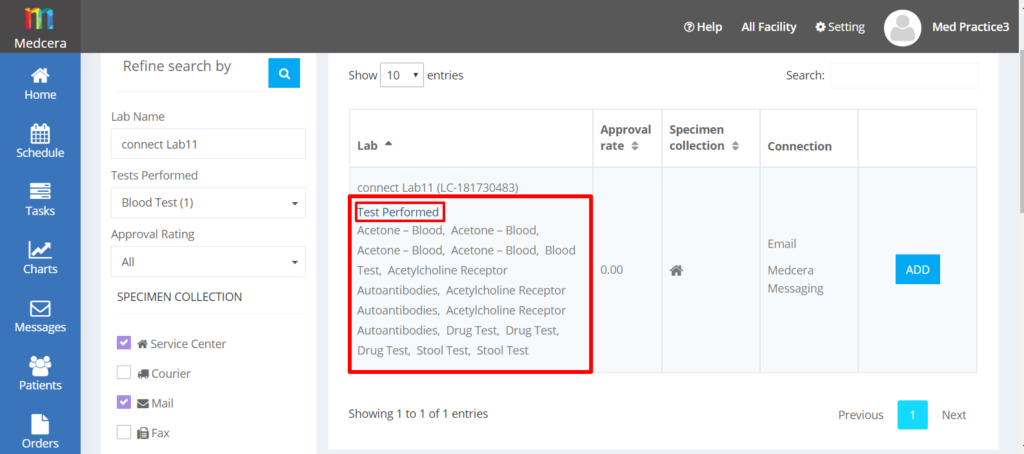
- By clicking Connect Lab below screen will be displayed containing list of Lab Centers.
![]()
- You can filter search if you want to connect with specific Lab Center as shown in below screen:
![]()
- To view the list of the test those are being performed at Lab click on the “Test Performed” as shown below:
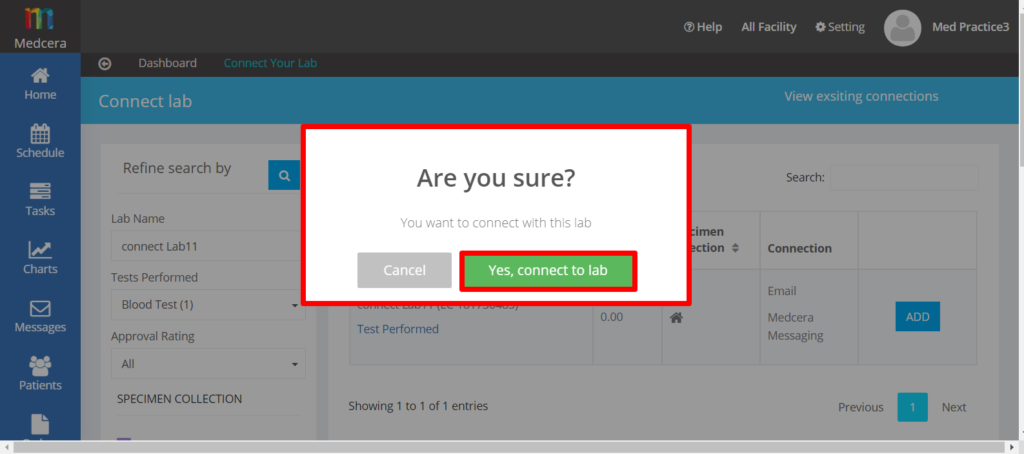
- By clicking “Add” Button Pop Up will be displayed as shown below and by clicking yes it will be added to existing Lab Center Connection.
25.2.3 Pharmacy Connections
- Click on Pharmacy Connections for Pharmacy Center settings as shown in below screen:
- By clicking on Pharmacy Connections below screen will be displayed containing existing Connected Pharmacy Centers with your practice.
- You can Connect New Pharmacy Center with your Practice or can Disconnect any existing Pharmacy Center.
- Click on “Disconnect” button to disconnect Pharmacy Center as shown below.

- Click on “Connect Pharmacy Center” button to connect with new Pharmacy Center as shown in below screen:

- By clicking Connect Pharmacy below screen will be displayed containing list of Pharmacy Centers.
You can filter search if you want to connect with specific Pharmacy Center as shown in below screen:
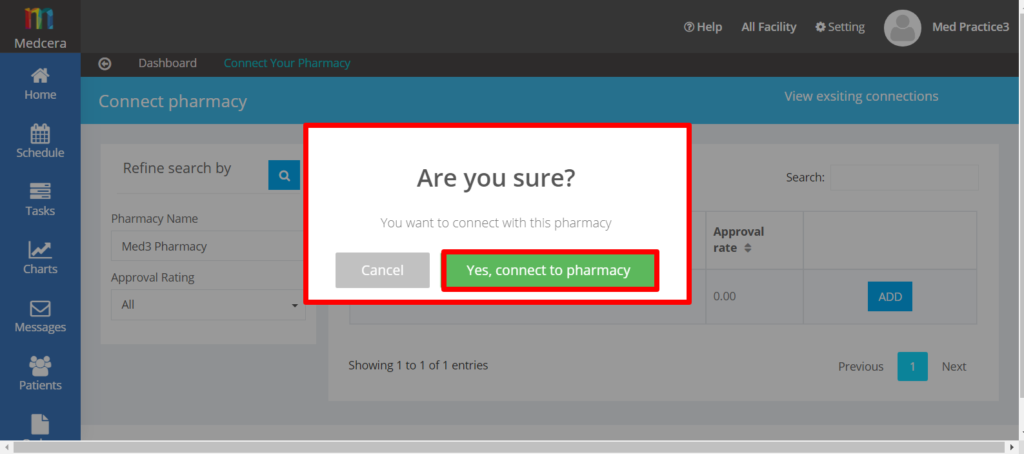
- By clicking “Add” Button Pop Up will be displayed as shown below and by clicking yes it will be added to existing Pharmacy Center Connection.
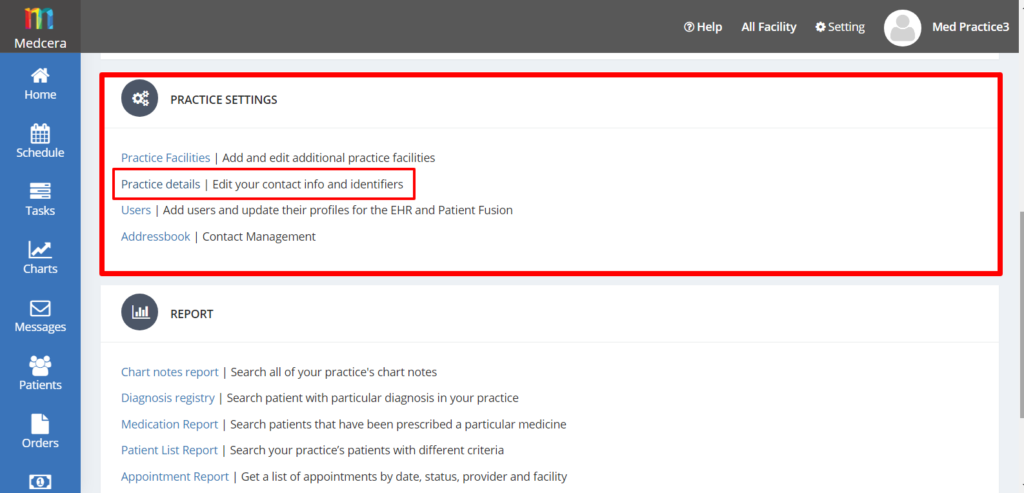
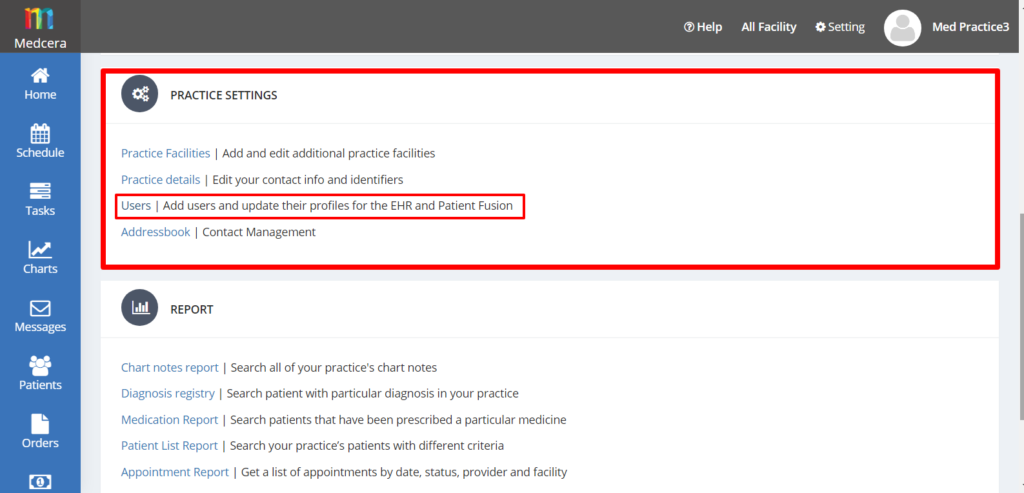
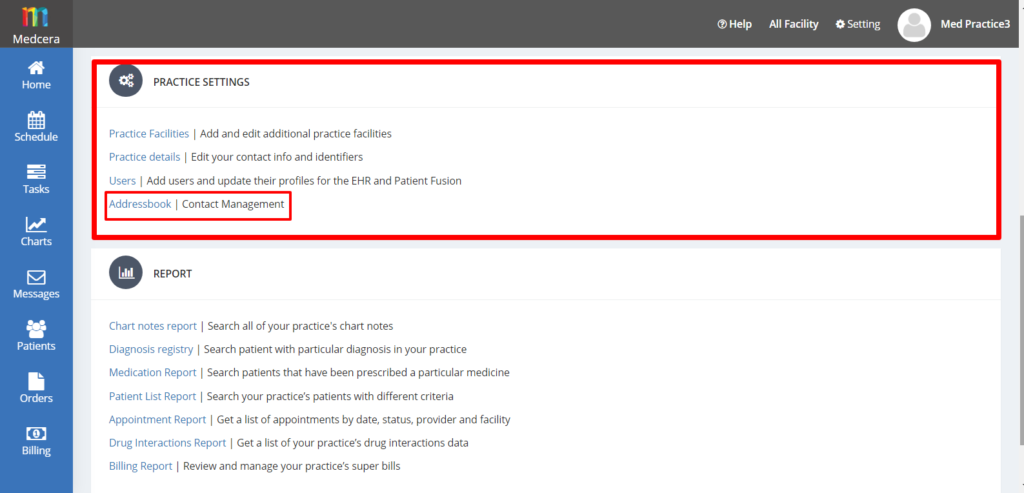
25.3 PRACTICE SETTINGS
- Practice Settings “Practice Settings” card as shown in below screen:
- Various types of Practice Facilities as below list will be displayed as shown in below screen:
- Practice Facilities
- Practice details
- Users
- Address book
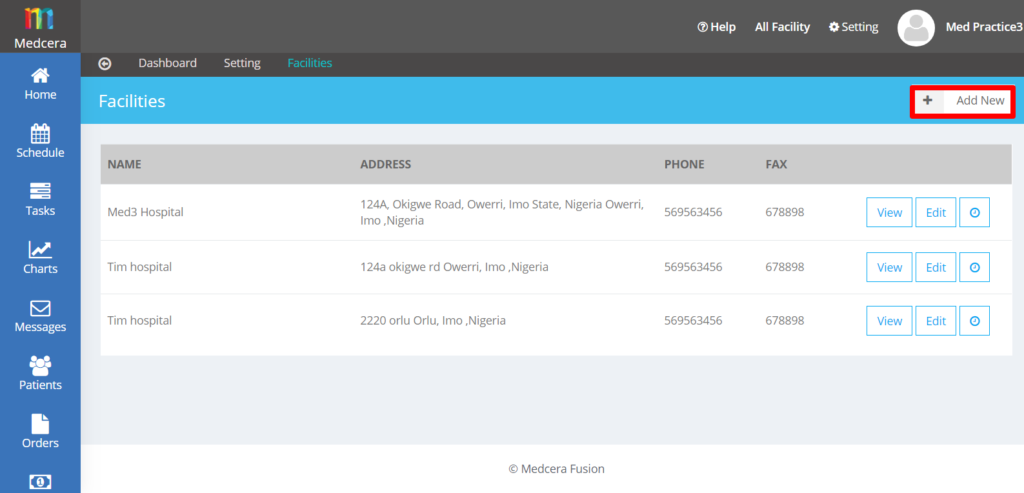
25.3.1 Practice Facilities
Click on “Practice Facilities” to add or Edit additional practice Facilities as shown in below screen:
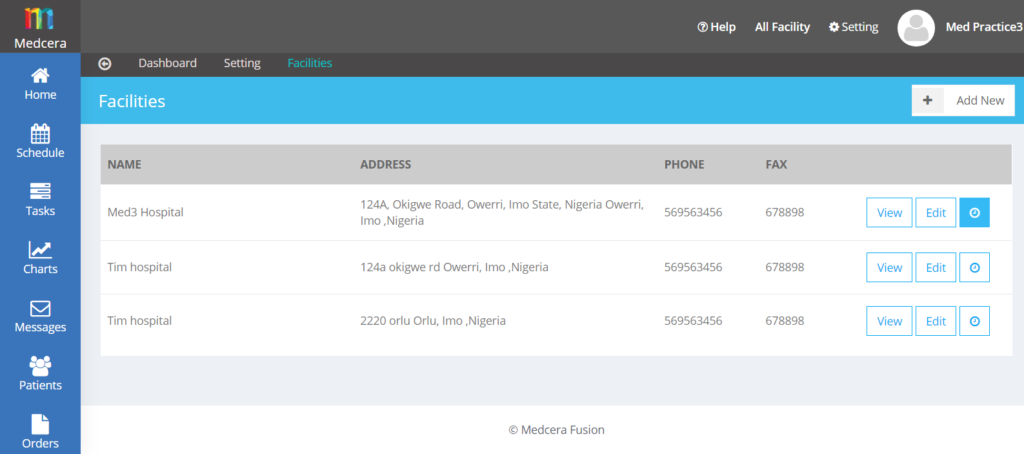
- Below screen will be displayed containing list of Facilities that you can view, edit or set time for Appointment.
25.3.1.1 View Appointment Details
- Click on “View” to view the details of Facility as shown in below screen:
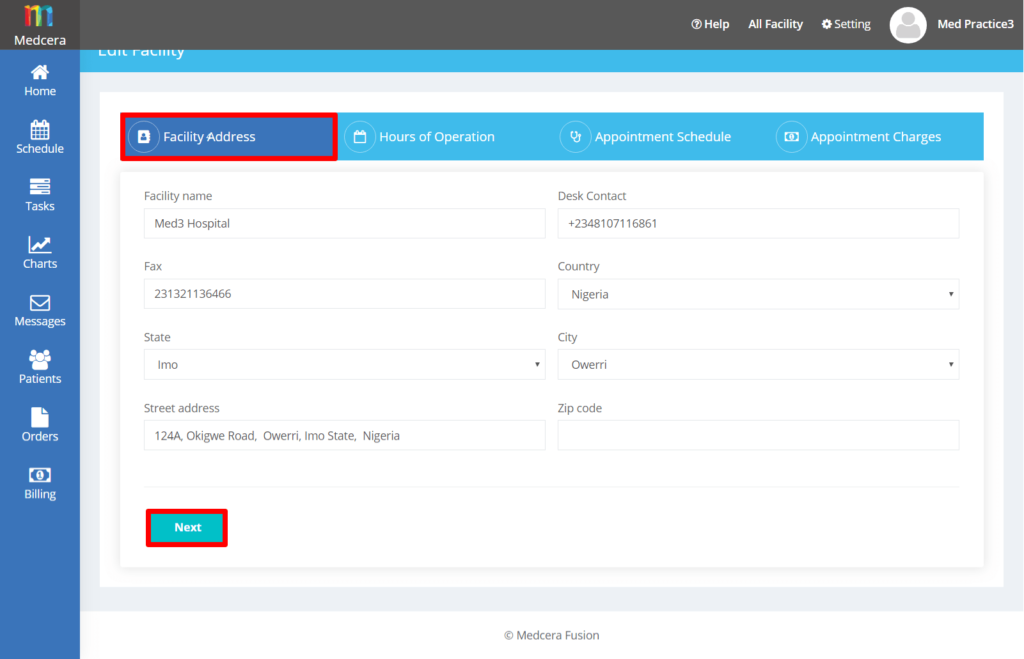
25.3.1.2 Edit Facility
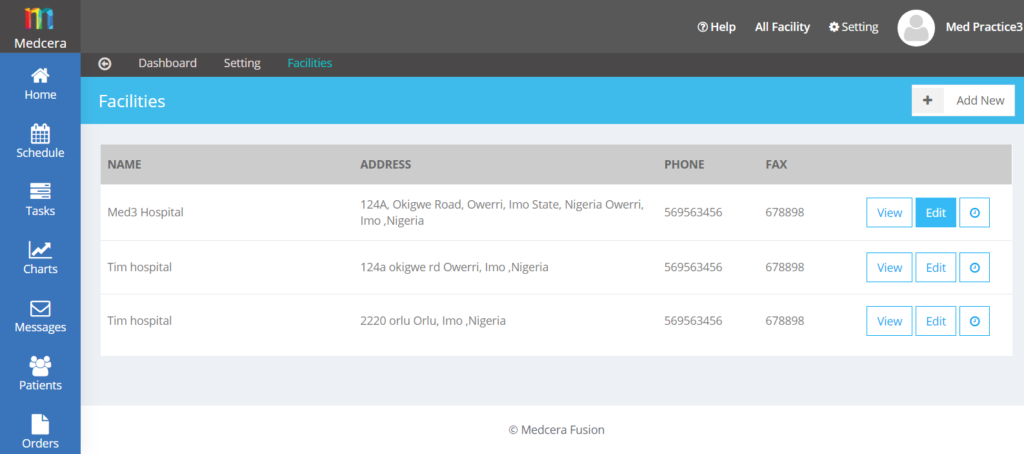
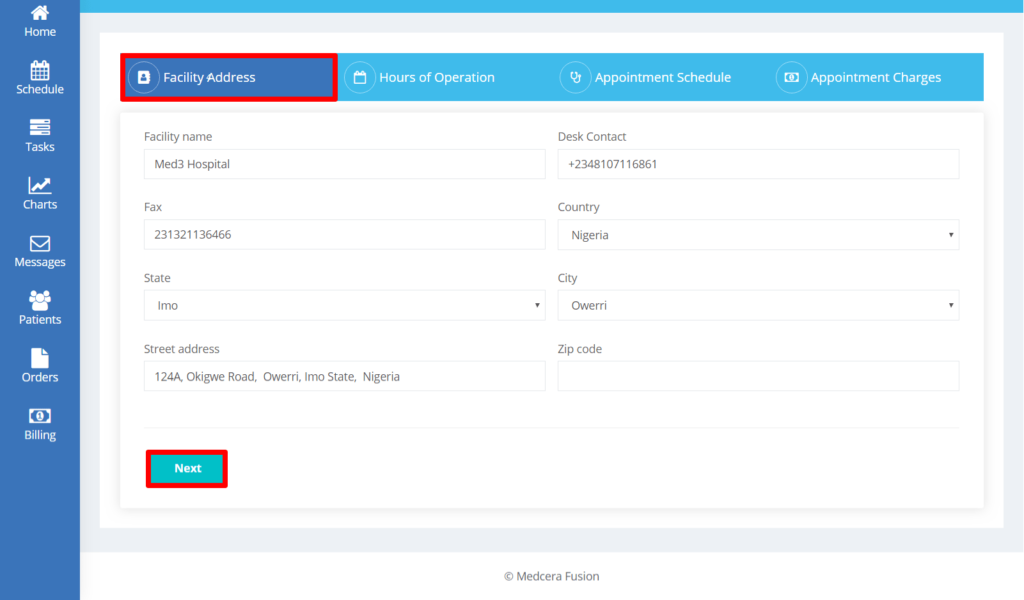
- You can Edit facilities details by clicking on “Edit” button as shown in below screen:
- Edit Facility Address and click on “Next” button.
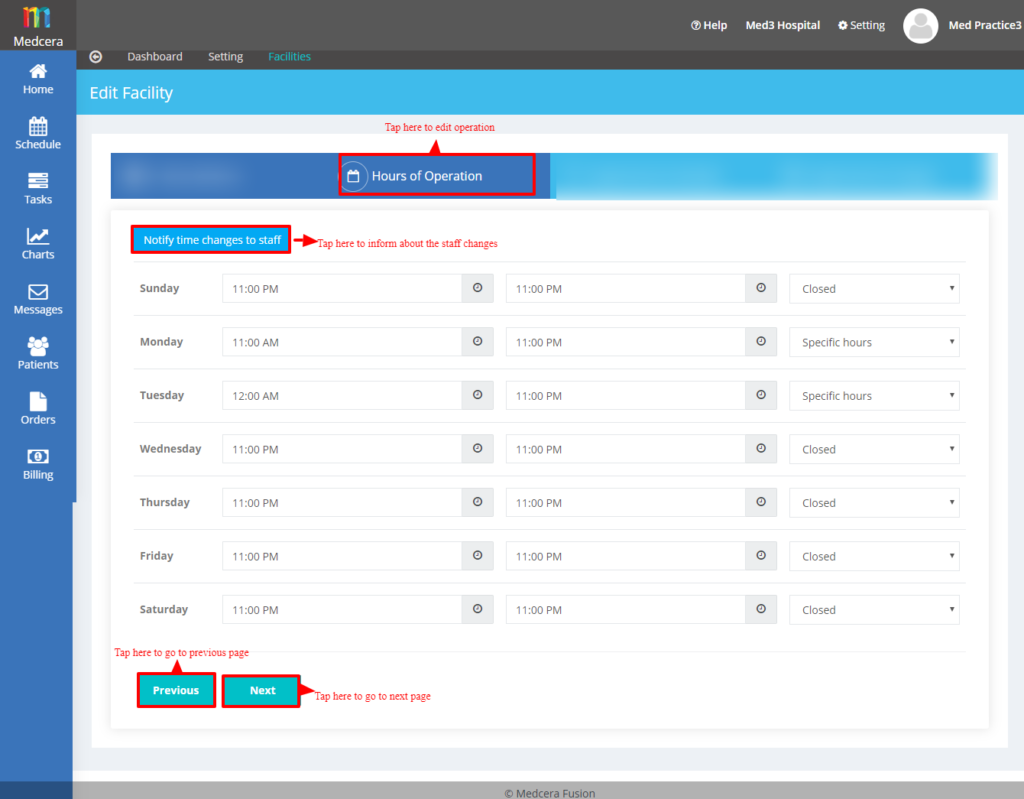
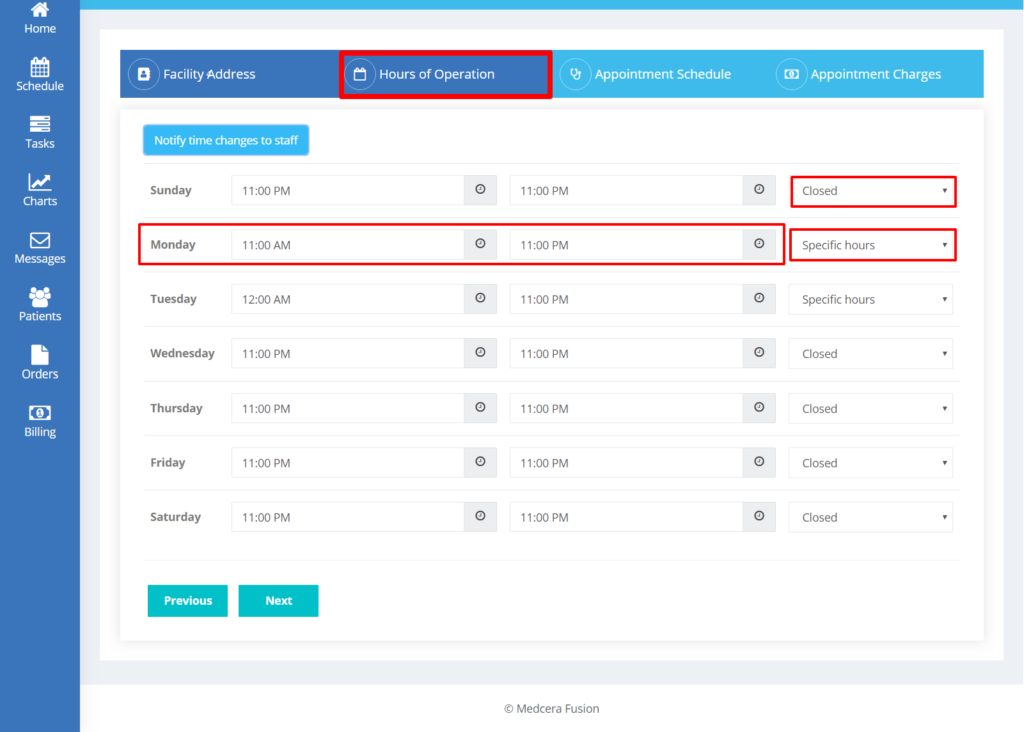
- By clicking Next below screen will be displayed containing Hours of Operation where you can define when the facility will be closed and when it will be opened during specific Time as shown in below screen:
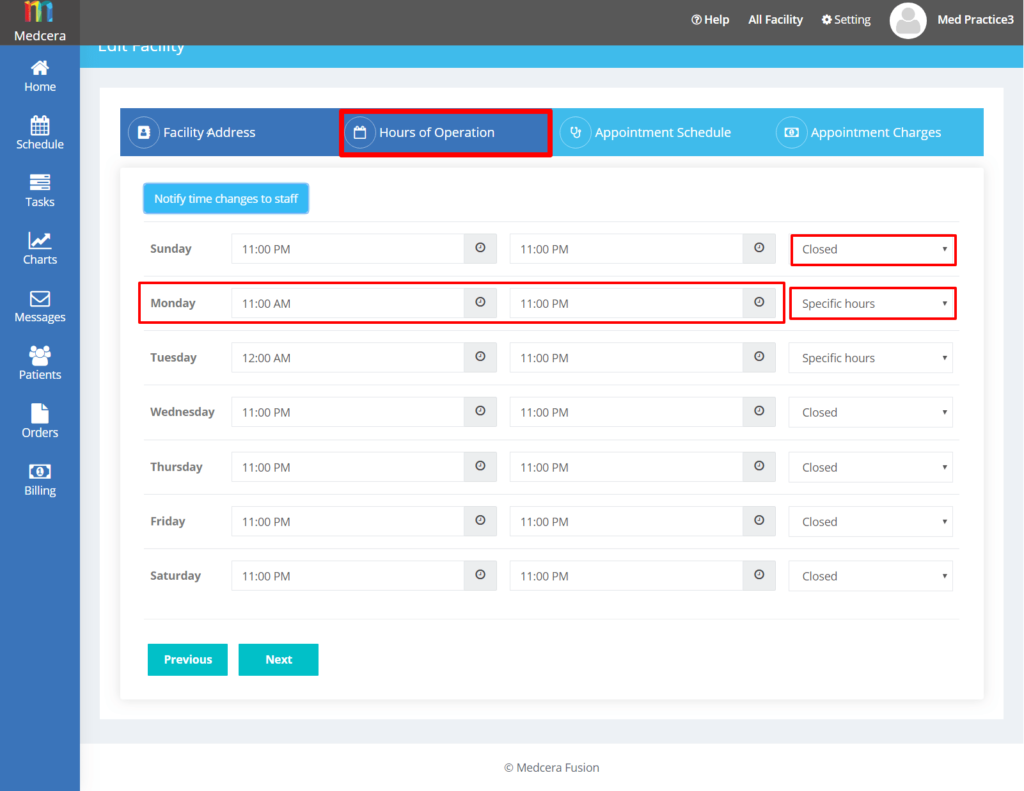
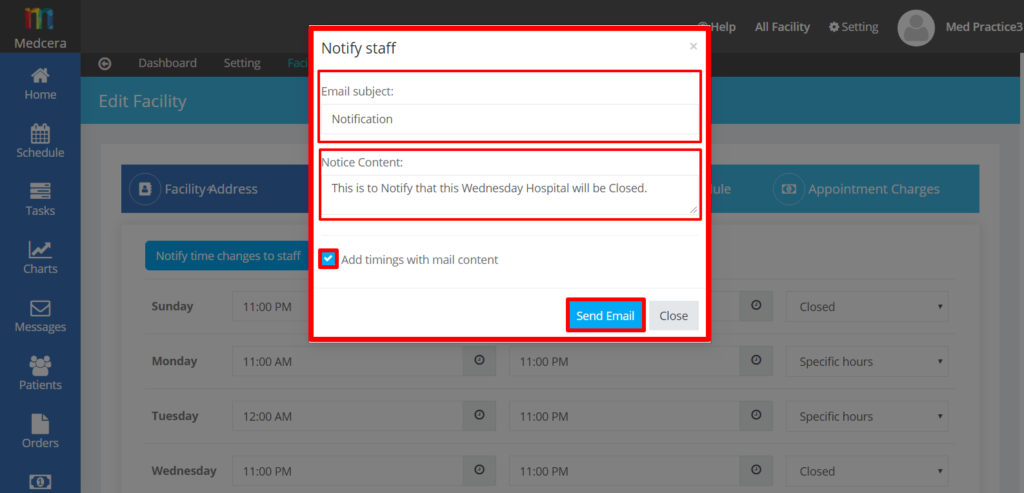
- In any case if you want to send notification to your staff you can send by clicking “Notify Time Changes to Staff” and fill details accordingly.

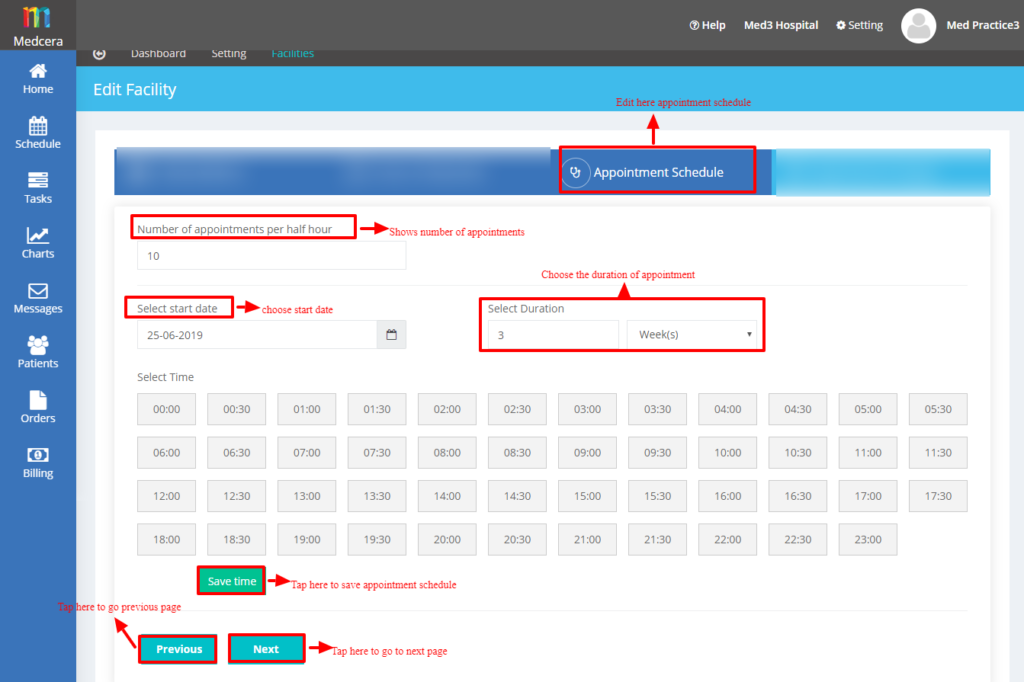
- By Clicking “Next” below sceen will be displyed containing Appointment Schedule where you can schdule Appointment time as shown in below screen:
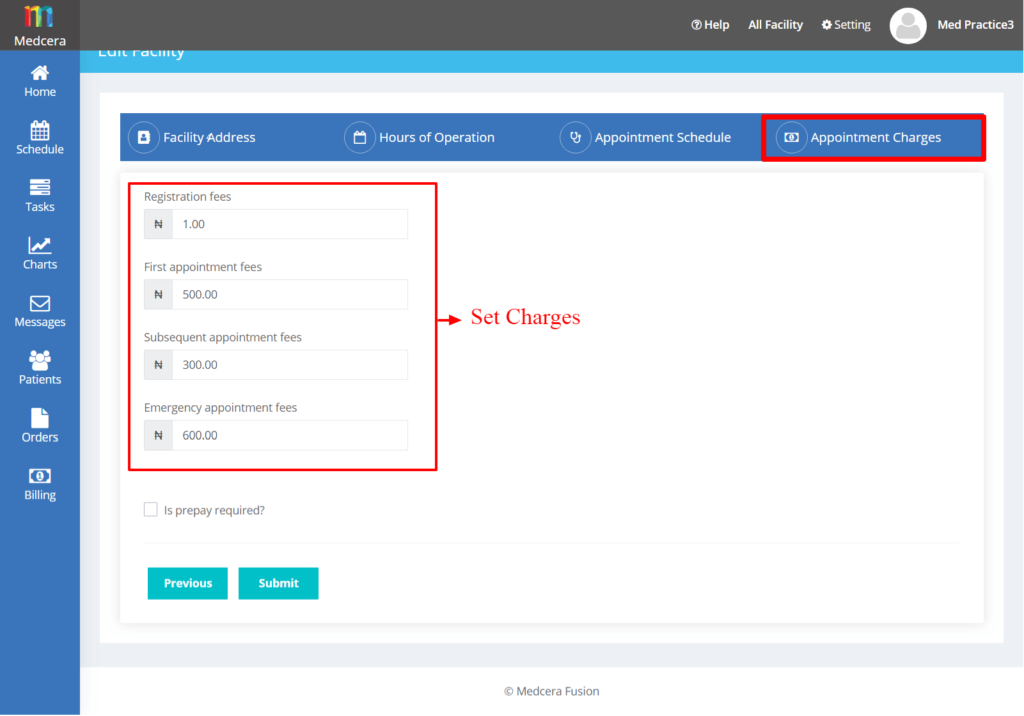
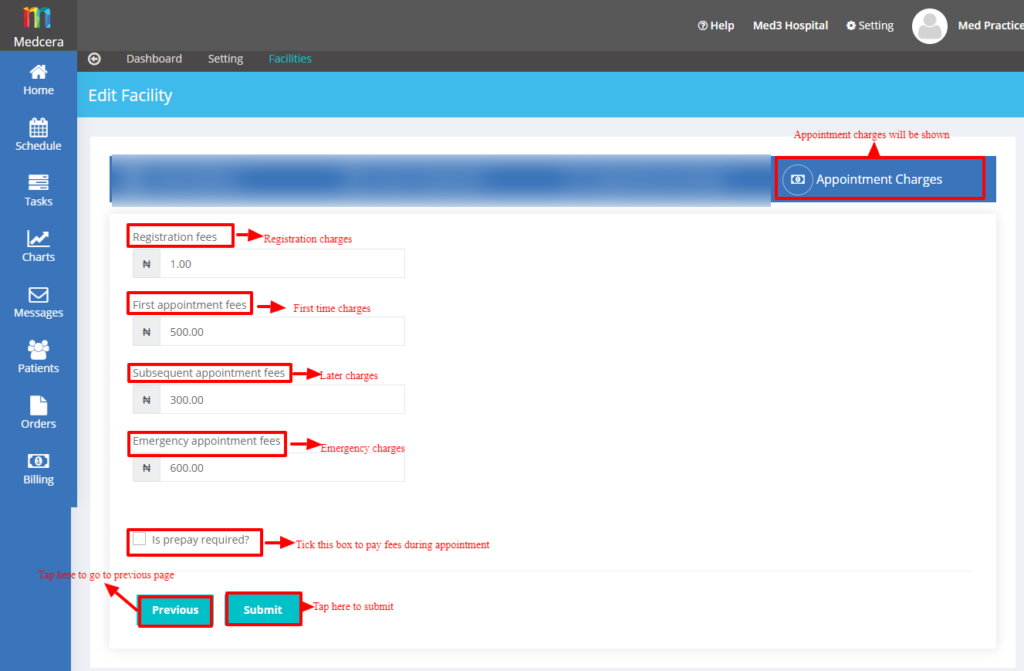
- By clicking on Next Appontment charges will b displayed, you can edit charges for Appointment accordingly and click on “Submit” as shown in below screen:
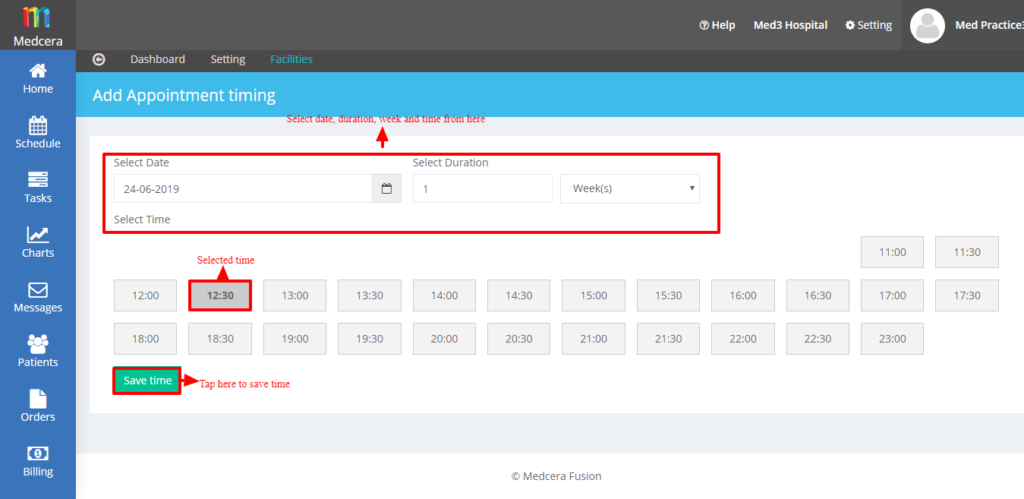
25.3.1.3 Add Appointment Timing
25.3.1.4 Add New
- You can add new Facility by clicking “Add New” button as shown in below screen:
- Add Facility Address and click on “Next” button.
- By clicking Next below screen will be displayed containing Hours of Operation where you can define when the facility will be closed and when it will be opened during specific Time as shown in below screen:
- In any case if you want to send notification to your staff you can send by clicking “Notify Time Changes to Staff” and fill details accordingly.
- By Clicking “Next” below sceen will be displyed containing Appointment Schedule where you can schdule Appointment time as shown in below screen:
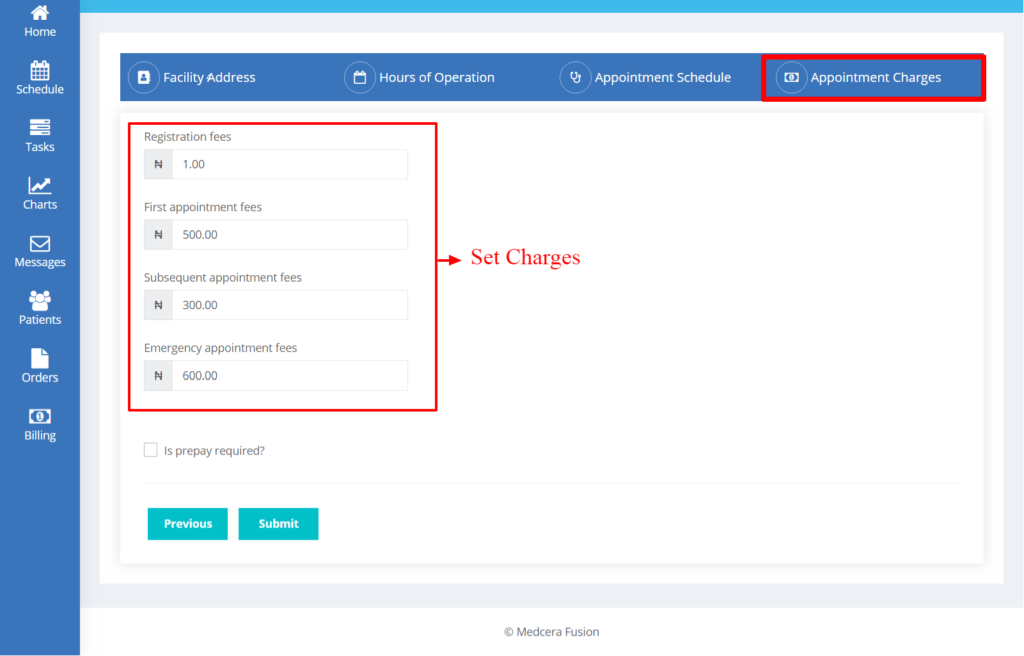
- By clicking on Next Appontment charges will be displayed, you can Add charges for Appointment accordingly and click on “Submit” as shown in below screen:
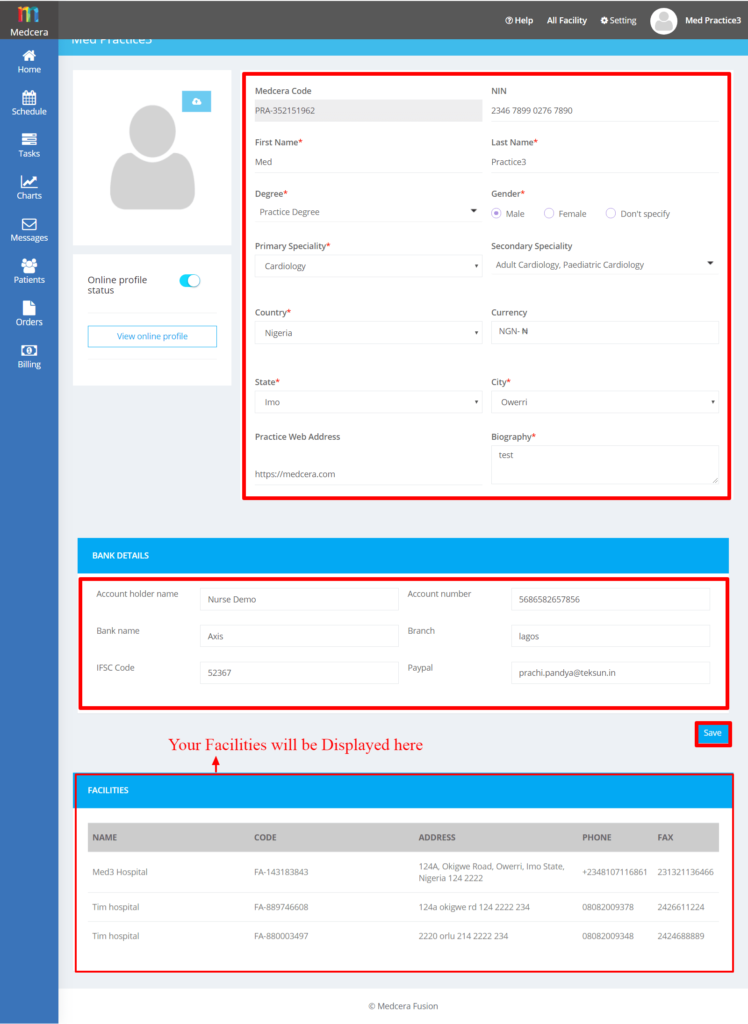
25.3.2 Practice Details
- Click on “Practice Details” to Edit Contact Info and Identifiers as shown in below screen:
25.3.2.1 Personal Details
- By clicking on Practice Details below screen will be displayed, Enter your personal Details and identity and click on “Save” button as shown in below screen:
- List of your Facilities will be shown below:
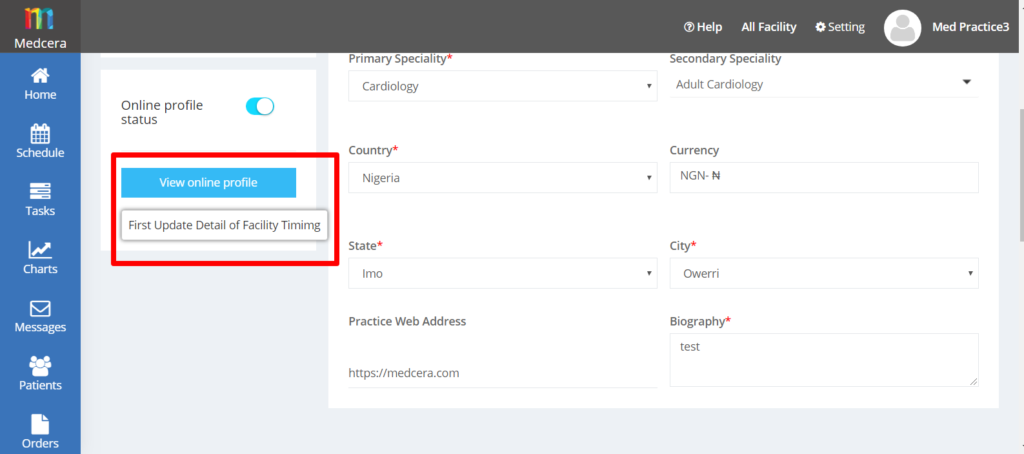
25.3.2.2 Online Profile Status
- Enable your online status as shown in below screen, when you will disable your status your profile will not be available to Patient and they won’t be able to find you online.
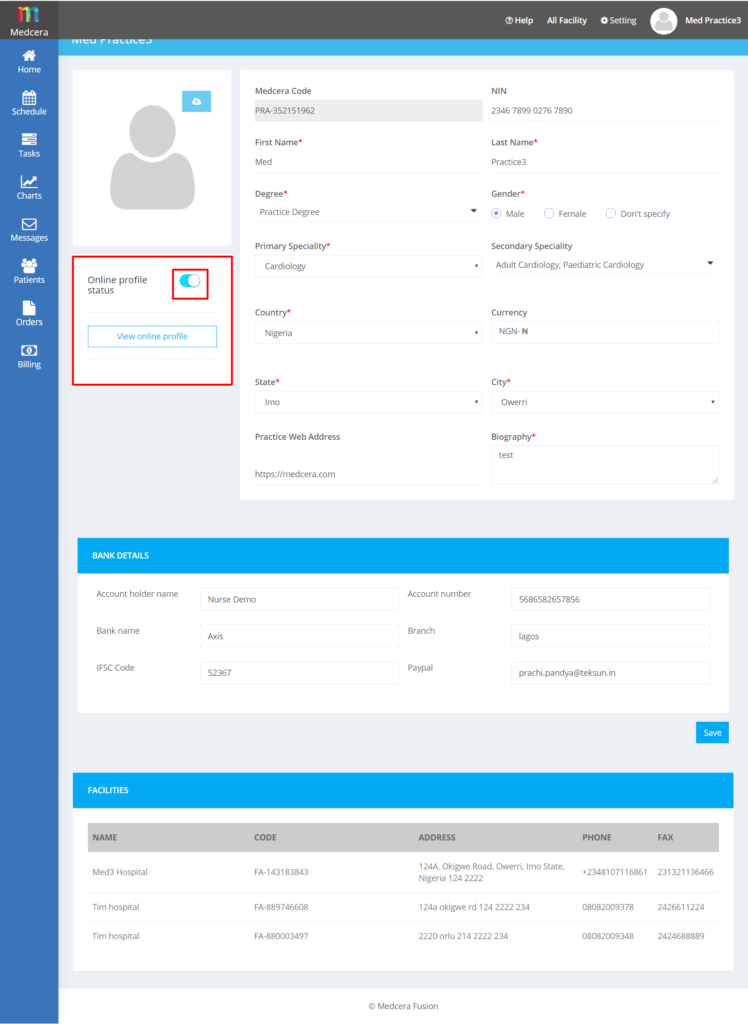
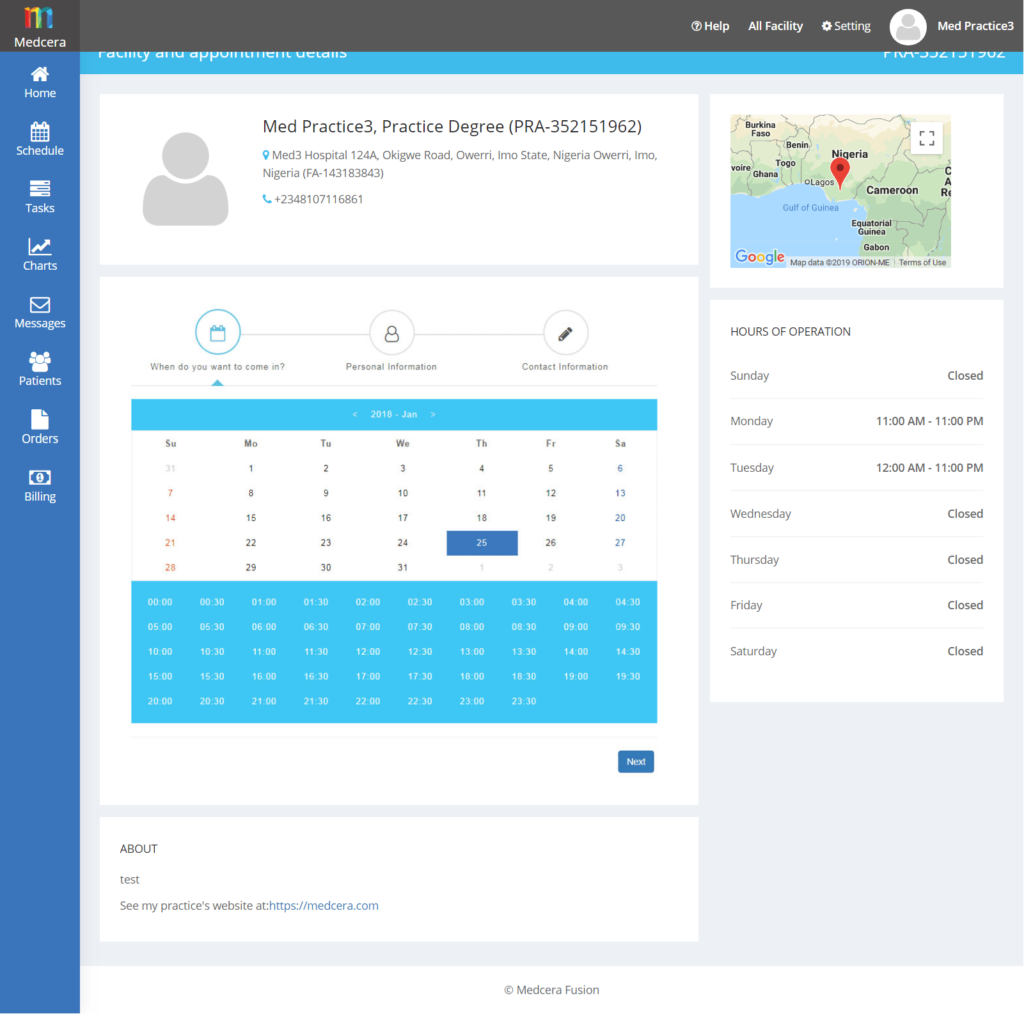
- Click on “View Online Profile” button to have a look of your available profile to patient.
25.3.3 Users
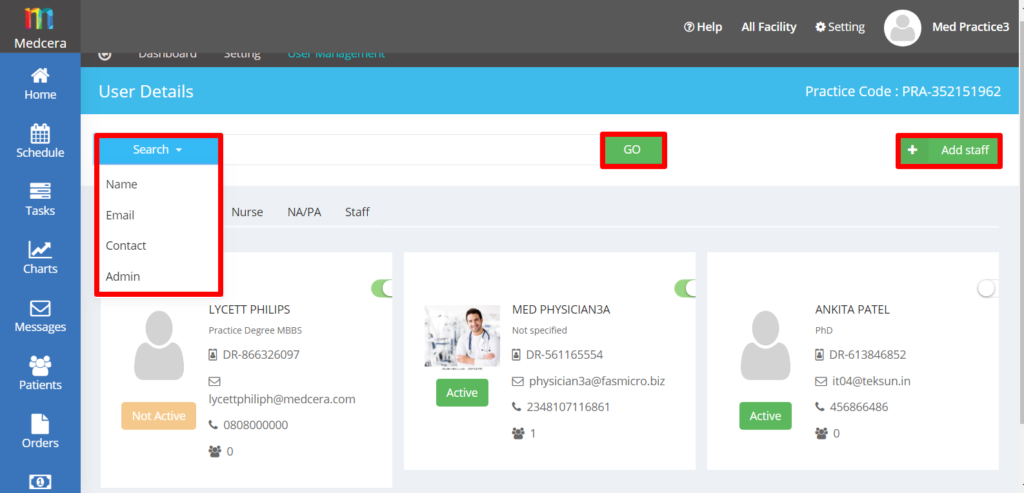
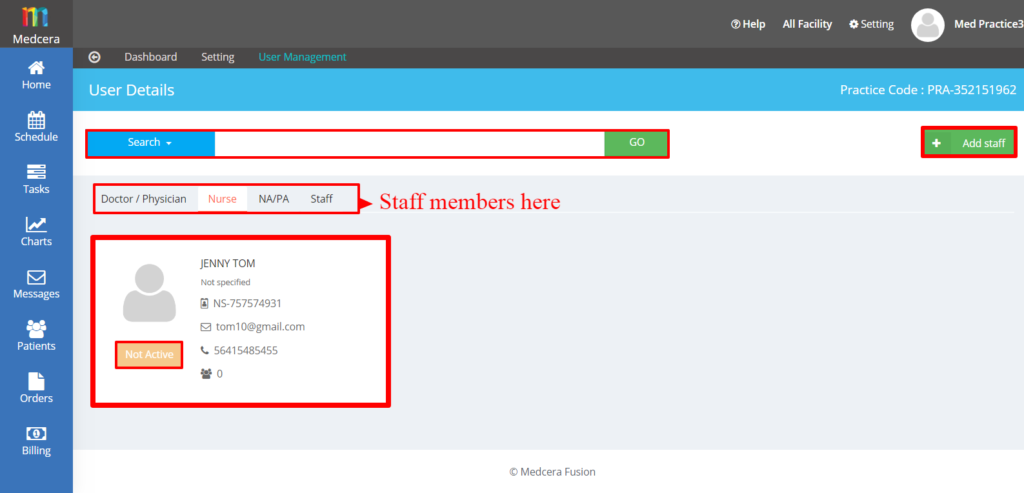
- Click on “Users” from Practice Setting card to search or set your users or staff members as shown in below screen:
- By clicking Users below screen will be displayed, where you can Search your existing staff member.
- Click on “Add staff” button to add new staff member in your Facility.
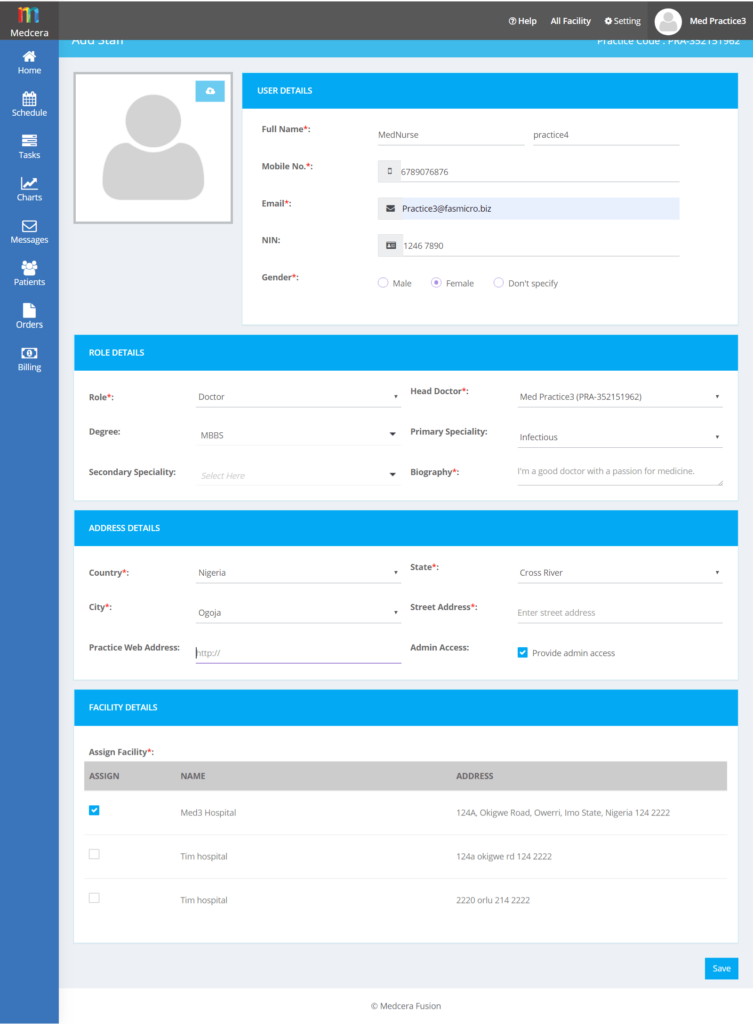
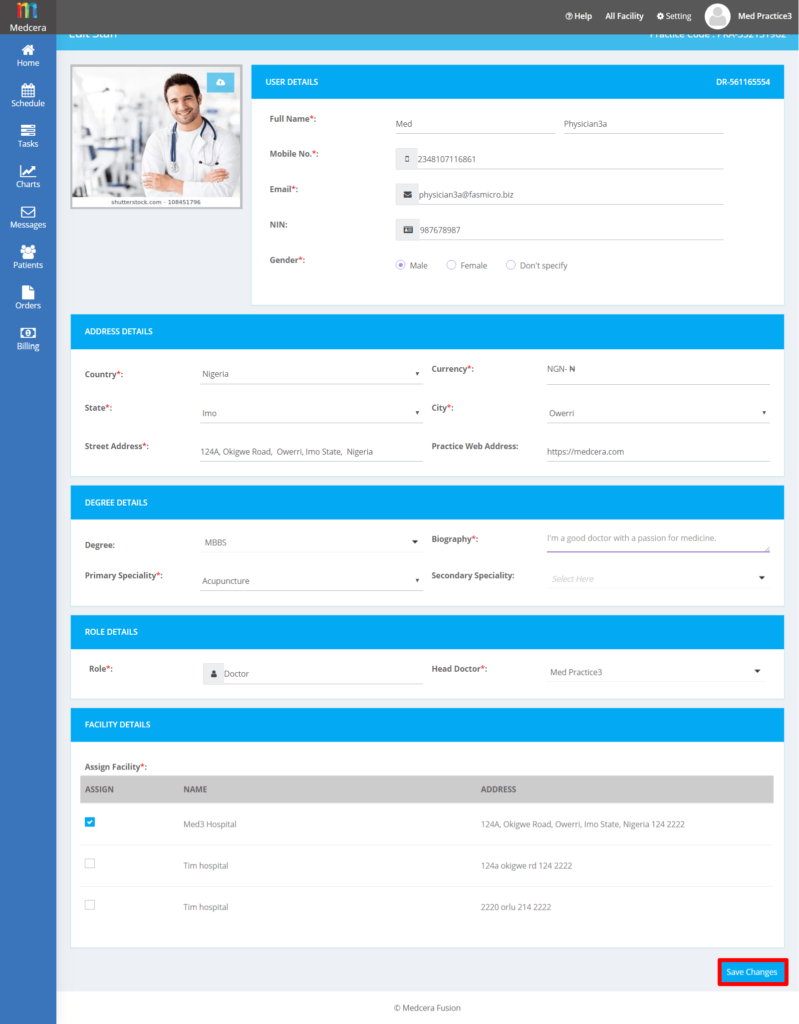
- You can add members to your Facilities by clicking on “Add Staff” and below screen will be displayed:
- Add User Details, Define his/her Role and add Role Details, Add Address Details and associated facility details as shown in below screen:
- Click on “save” button and User will be added to your Staff.
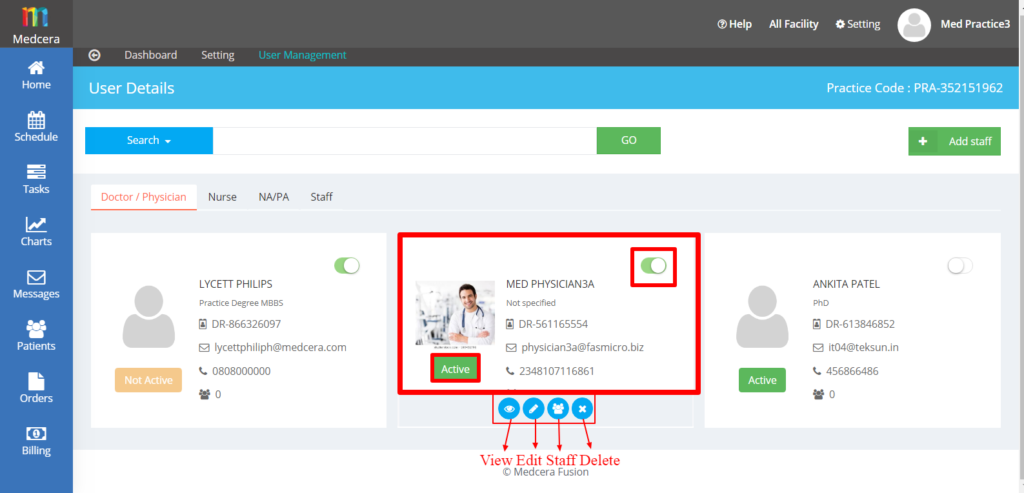
- You can Edit your Existing staff member details.
- Click on “Active/Inactive” status to Active or Inactive user’s profile, Activation status suggest online availability of that user as shown in below screen:
- You can enable Admin access to provide admin rights, or can disable it as per requirement as shown in below screen:
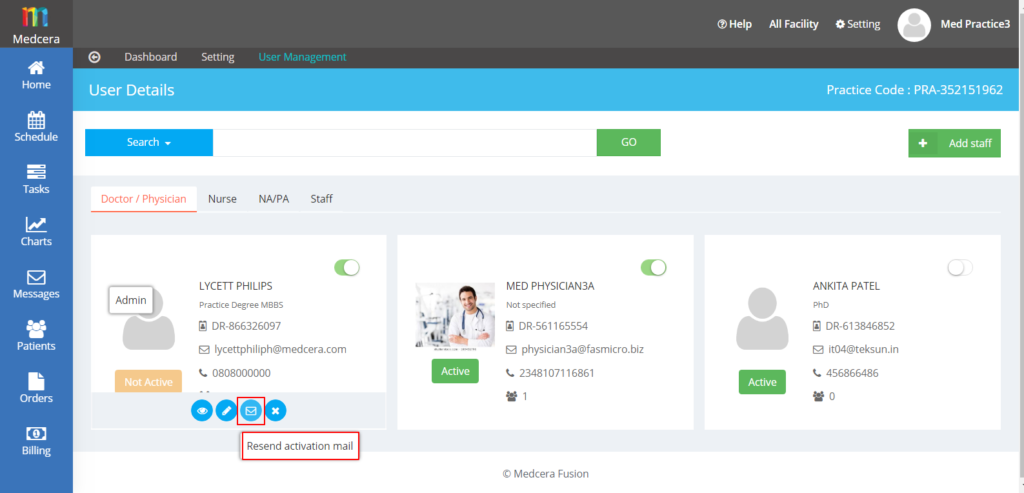
- You will find various options by hover over profile such as view, edit, staff, and delete as shown below:
25.3.3.1 View Staff Detail
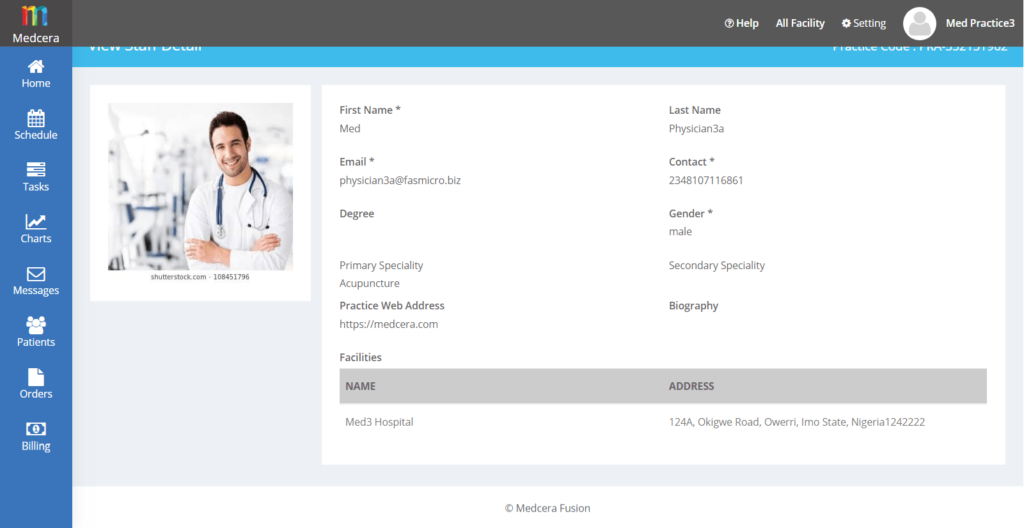
- Click on “View” button to view the user profile as shown in below screen:
25.3.3.2 Edit Staff detail
- Click on “Edit” to edit User Profile as shown in below screen and click on “Save Chages” button as shown in below:
25.3.3.3 Staff
- Click on “Staff” icon to know the details of staff members related user, you can add staff member in your user’s profile and can view, edit or delete it.
- Send activation mail to newly added member ass shown in blow screen:
25.3.3.4 Delete
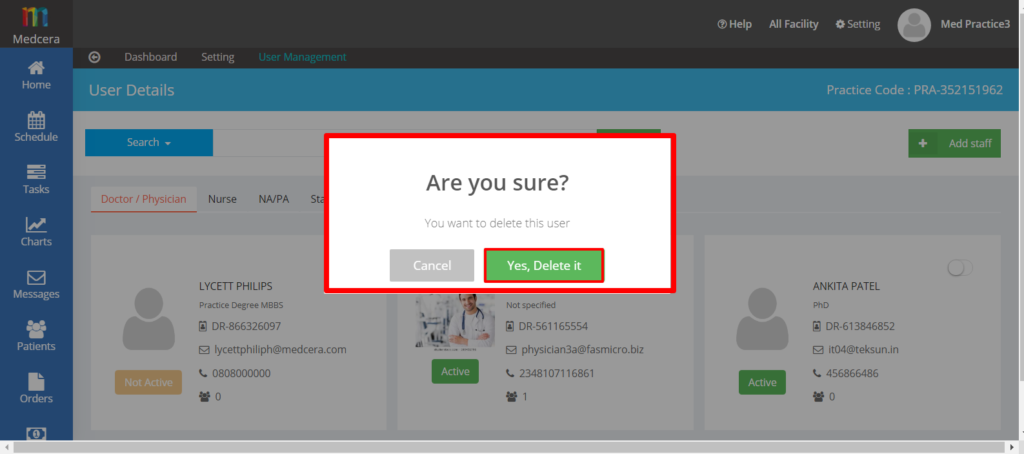
- Click on “Delete” to delete profile , by clicking on delete below pop up will be displayed:
- You can send Activation Mail to the user who have Inactivated his/her account.

25.3.4 Address Book:
- To Create an Address book click on “Address Book” from Practice Settings as shown in below screen:
- By clicking on the address book below screen will be opened.
- There will be two types for creating Address Book.
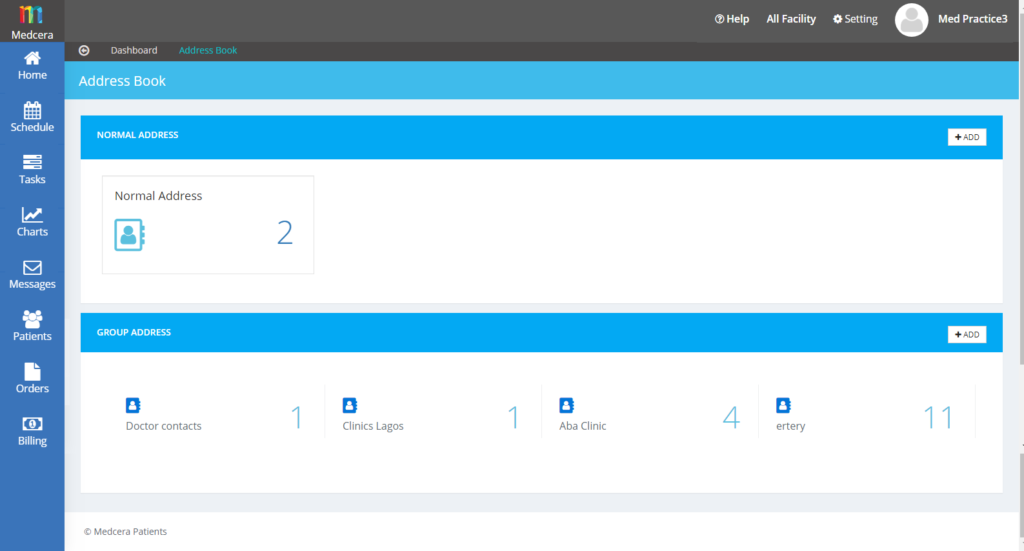
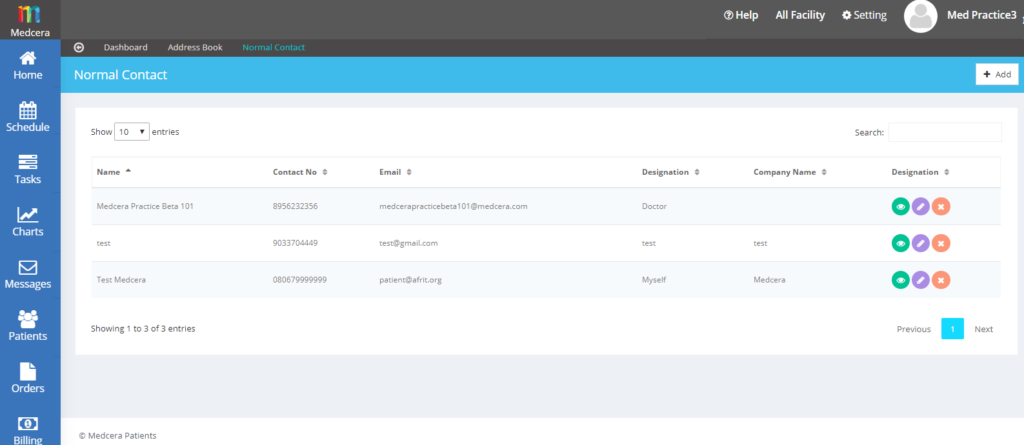
25.3.5 Normal Address:
- Click on “Add” Button to add an address to the Normal List that you want to save for reference.
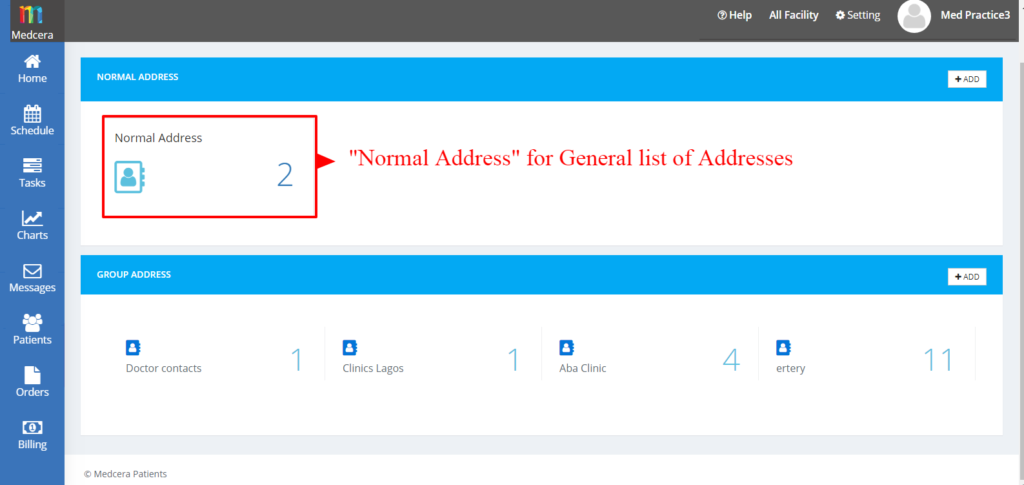
- By clicking on “Add” button below screen be displayed, add your relevant details and click on “Add” button.

- Adding an address to the Normal Address list, a list as below will be generated.
25.3.6 Group Address:
- You can categorize various Addresses in a Group in order to allocate a specific category to specific classifications especially the list includes multiple records.
- As below the group of various categories will be shown, each category includes a list of specific Addresses.
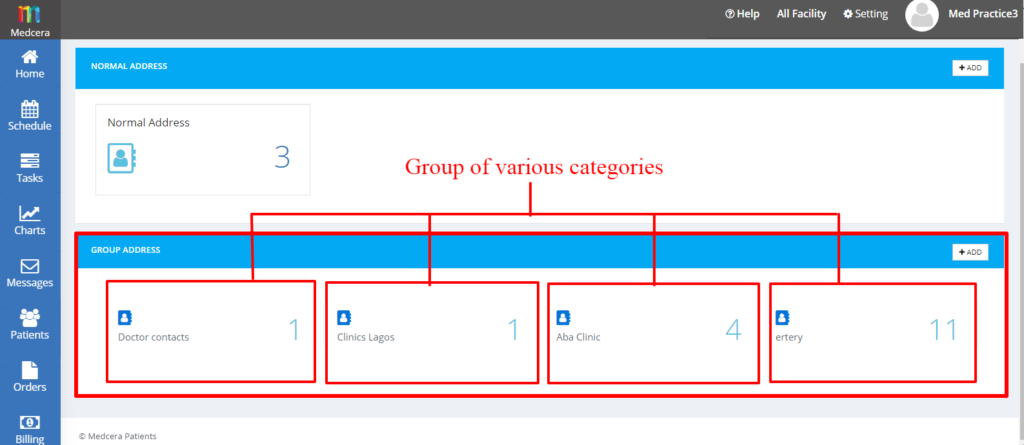
- By clicking on any category the list as shown below will be displayed.
- Click on “Add” button to add another address in the list or “Remove All Members” to delete the records.
- The address can be viewed, Edited, or deleted as per requirements.

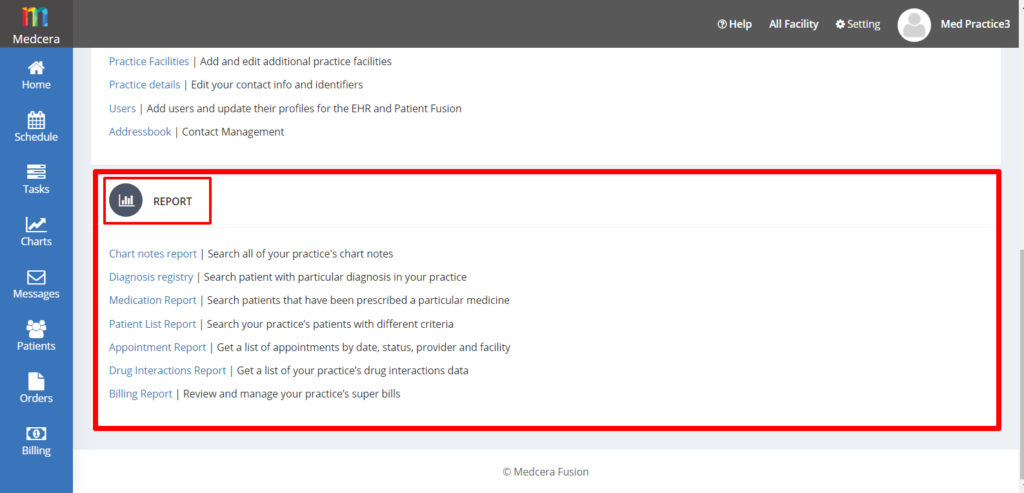
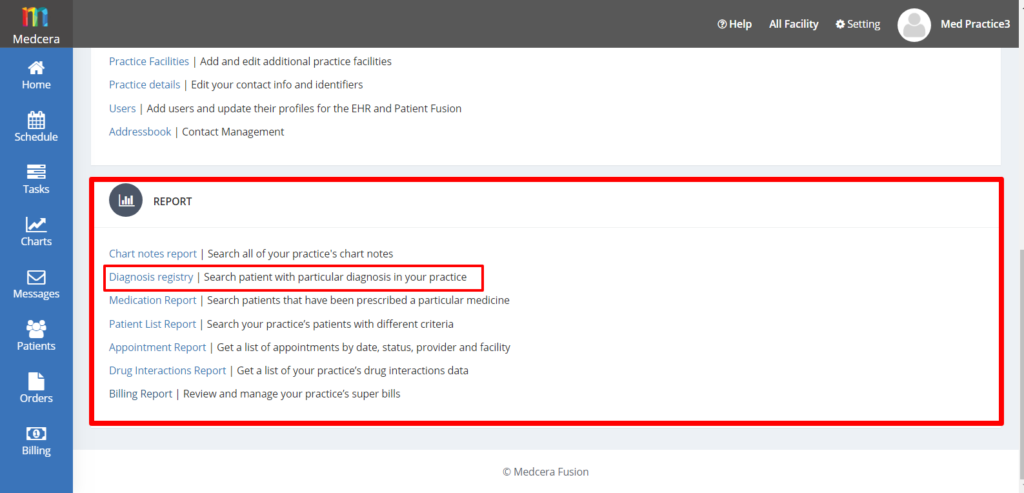
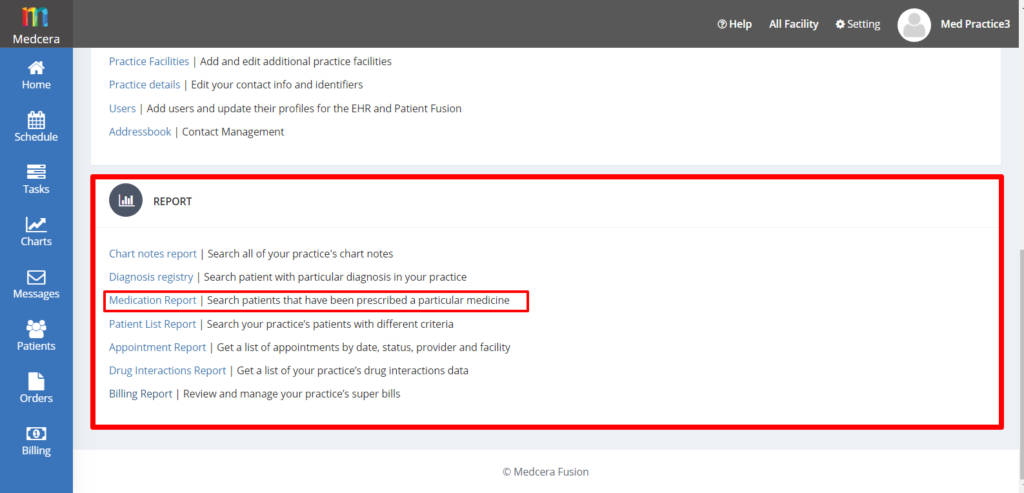
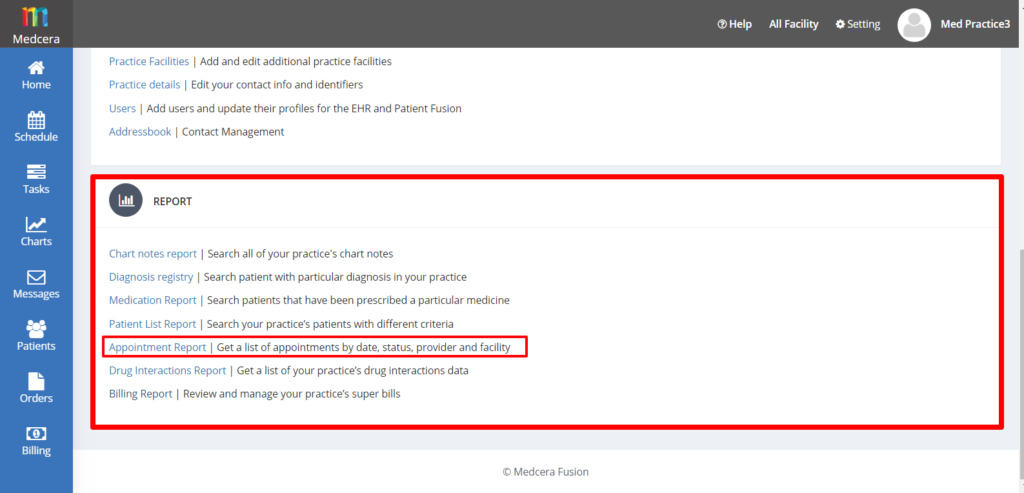
25.4 REPORT
- Report card contains various report details as shown in the screen below.
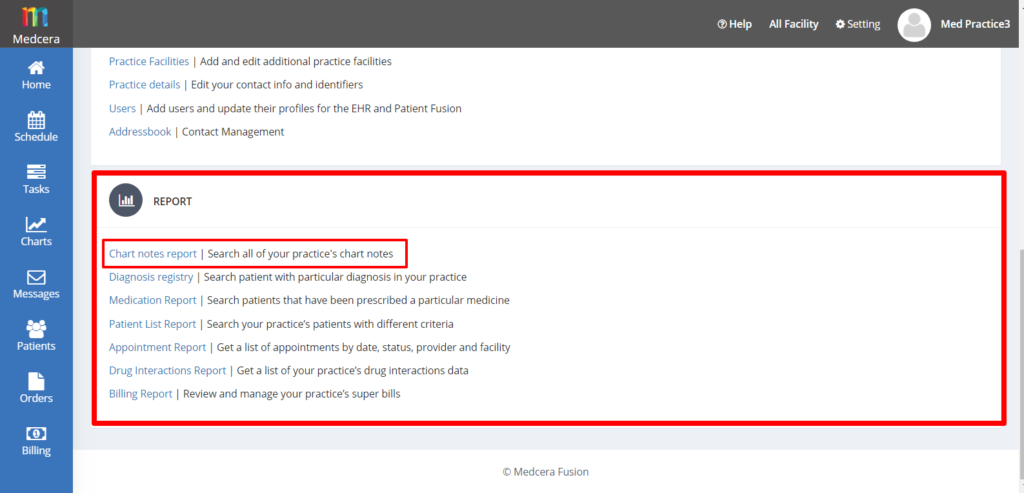
25.4.1 Chart Notes Report
- Click on “Chart Notes Report” to search your Patient’s chart notes from report card as shown below.
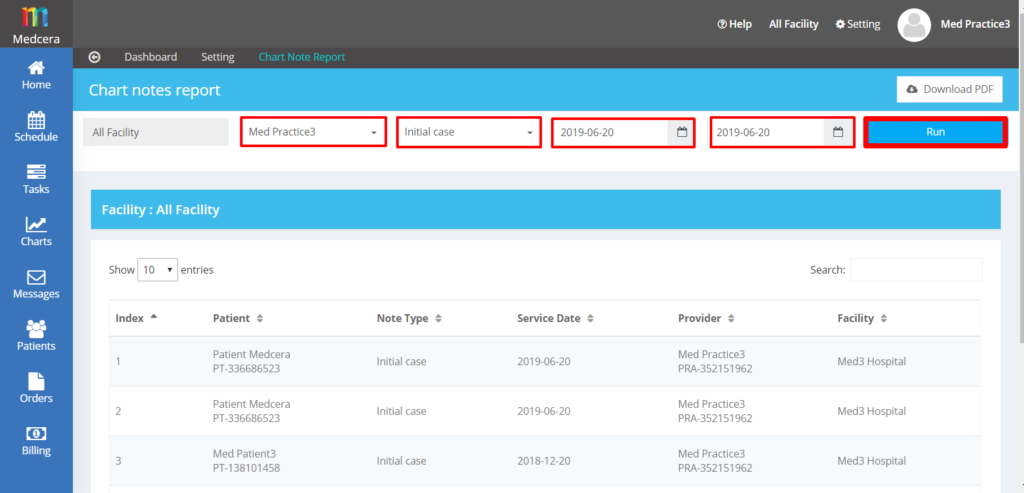
- Filter Search by Provider, Chart Type, and duration as displayed below.
- Click on “Run” button to get specific filtered output.
25.4.2 Diagnosis Registry Report
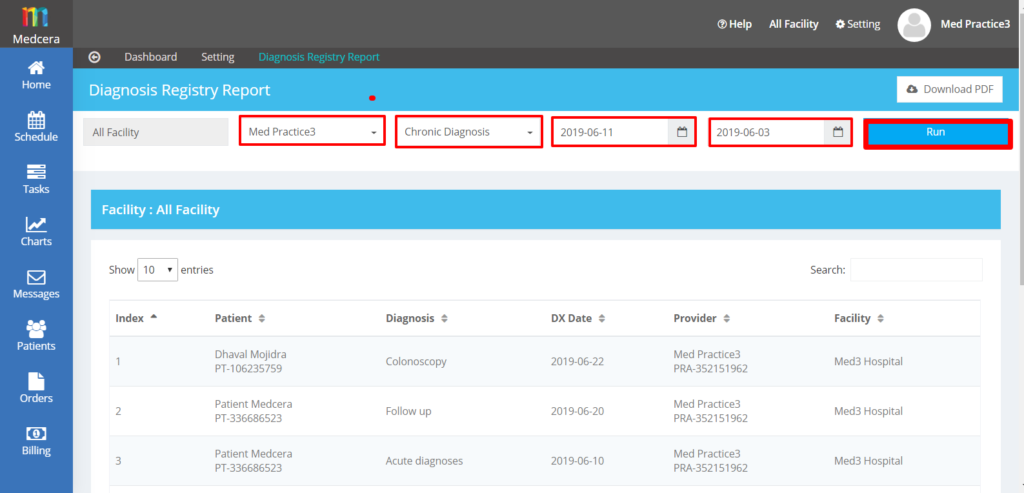
- Click on “Diagnosis Registry Report” for searching your Patient’s Diagnosis Registry Report as shown in below screen:
- By clicking “Diagnosis Registry Report” below screen will be displayed containing Diagnosis Registry Report as shown in below screen:
- You can filter Search by Provider, Diagnosis Type, and duration as shown in below screen:
- Click on “Run” button to get specific filtered output.
25.4.3 Medication Report
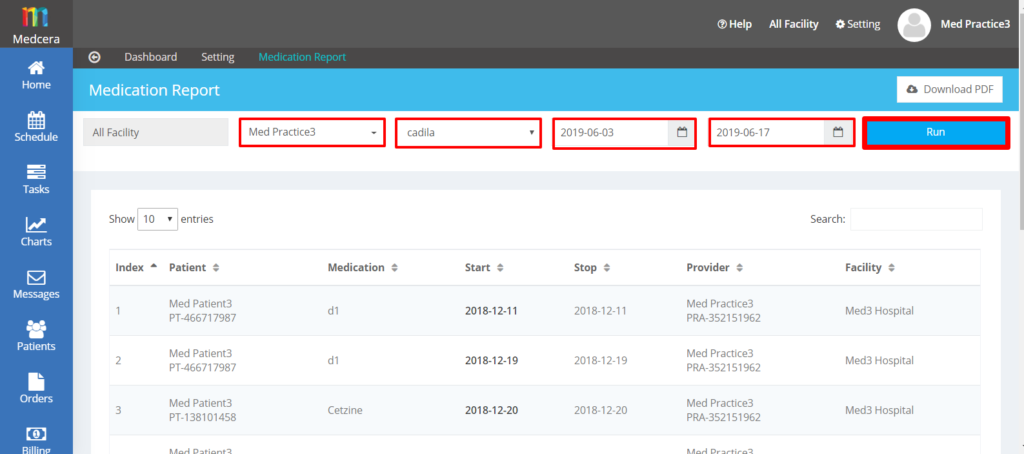
- Click on “Medication Report” to search your Patient’s Medication Report as displayed below.
- Filter Search by Provider, Drug Type, and duration as shown in below screen:
- Click on “Run” button to get specific filtered output.
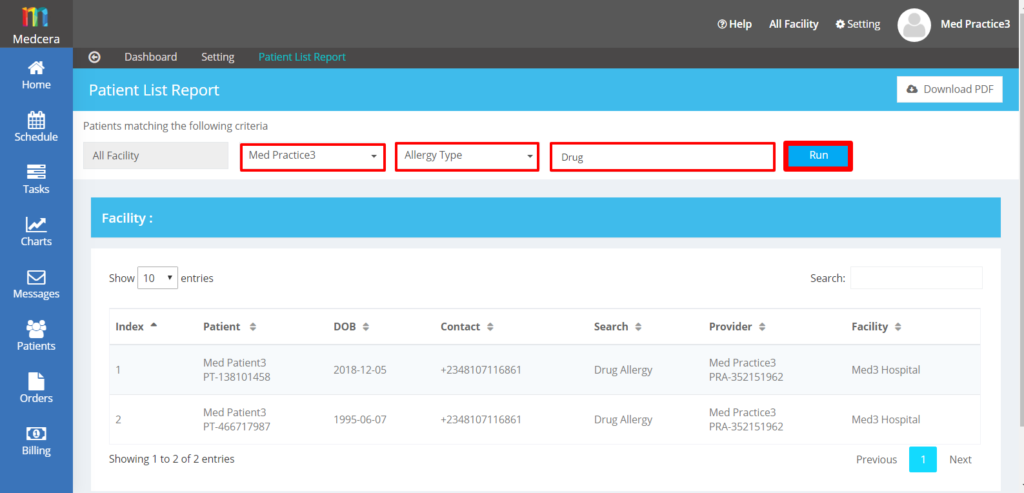
25.4.4 Patient List Report
- Click on “Patient List Report” to search your Patient’s List Report as shown below.

- A click on “Patient List Report” will displayed patient matching criteria Report as shown in the screen below.
- Filter Search by Provider, Start new Query as shown in below screen:
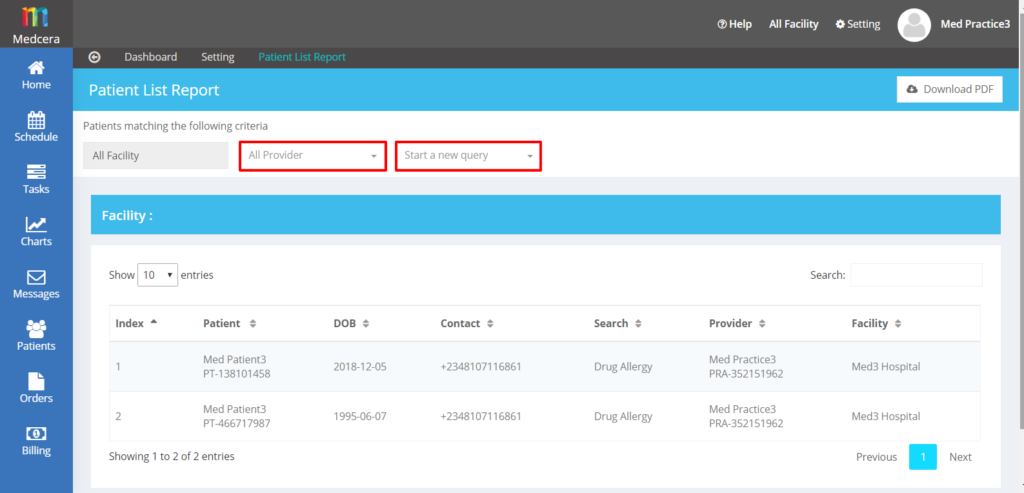
- Select your query from the drop down to apply filter search.
- Click on “Run” button to get specific filtered output.
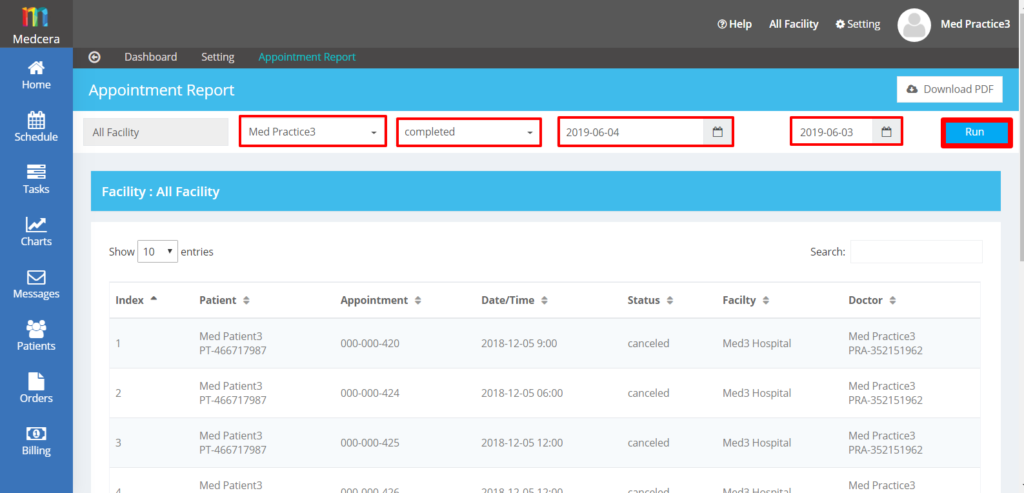
25.4.5 Appointment Report
- Click on “Appointment Report” to search your Appointment Report as shown in the screen below.
- Filter Search by Provider, Appointment status, and duration as shown in below screen.
- Click on “Run” button to get specific filtered output.
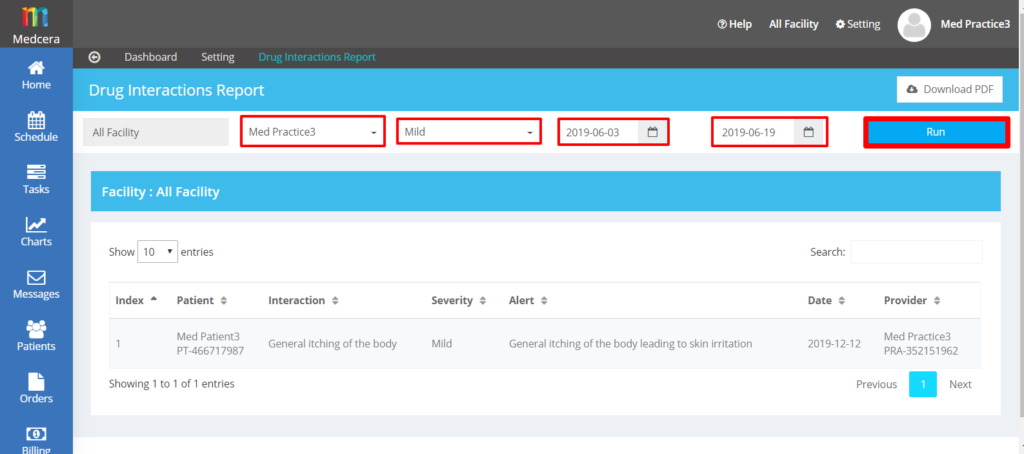
25.4.6 Drug Interactions Report
- Click on “Drug Interactions Report” to search your Drug Interactions Report as shown in the screen below.
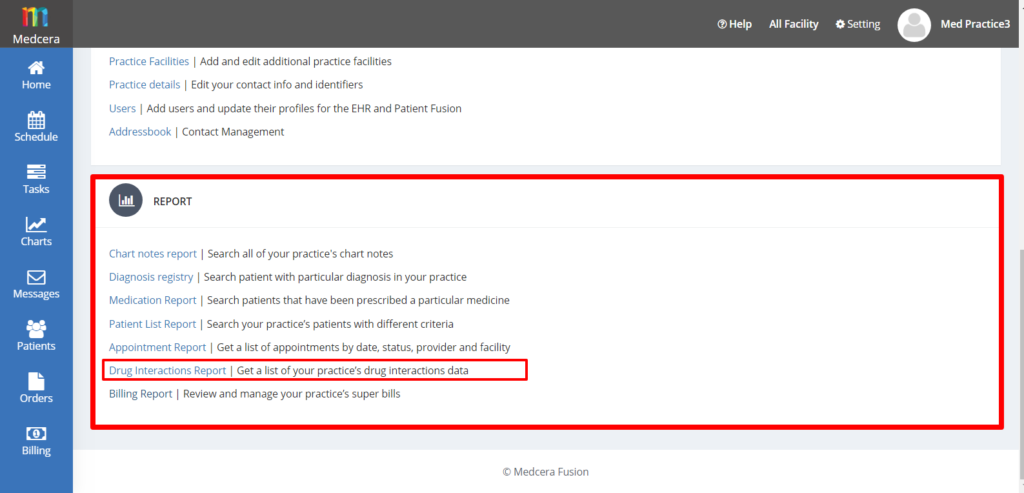
- Filter Search by Provider, Alert Level, and duration as shown in below screen.
- Click on “Run” button to get specific filtered output.
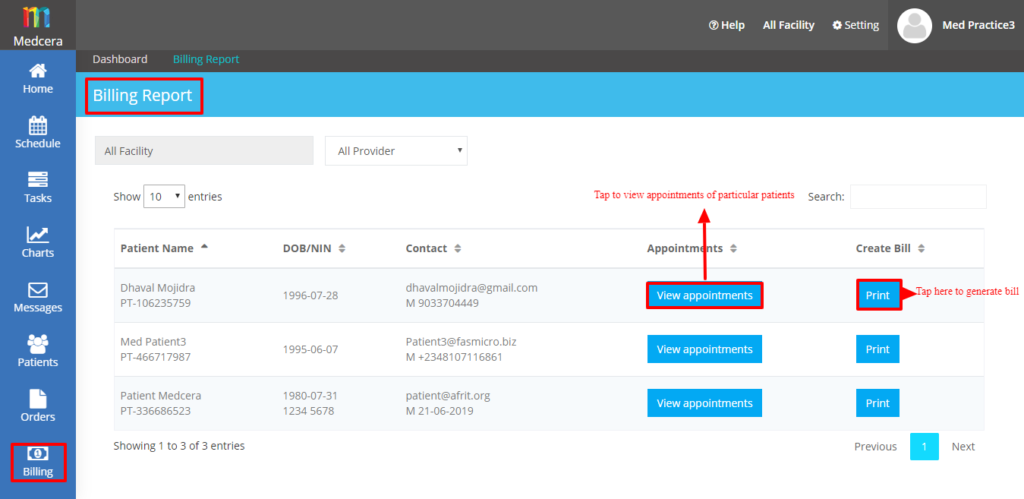
25.4.7 Billing Report
- Click on “Billing Report” to search your Billing Report as displayed below.
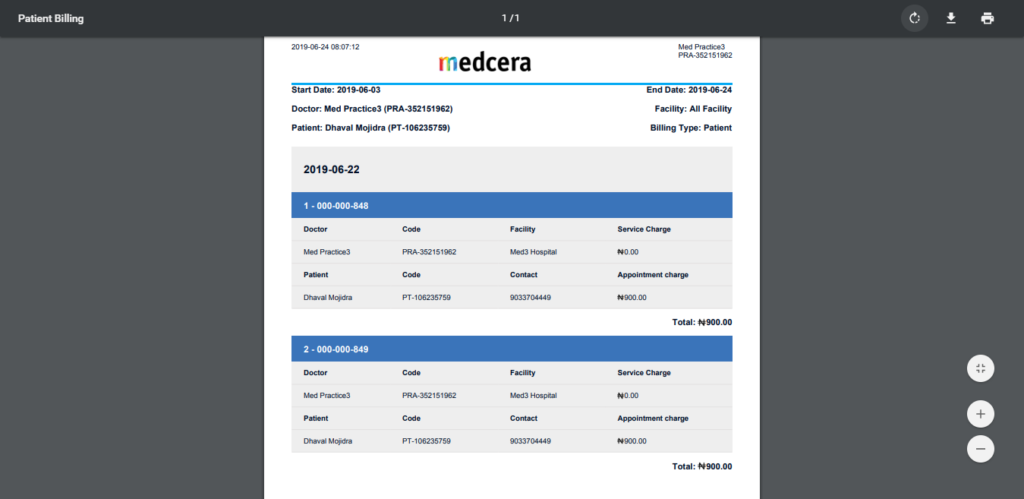
- Click on “Print” button to print patient bill.
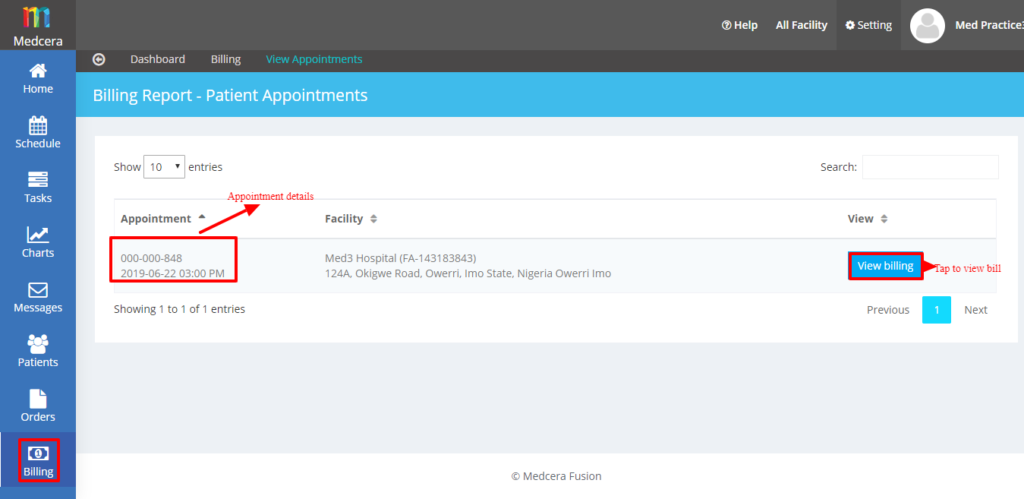
- Click on “View Appointment” to view appointment billing details.
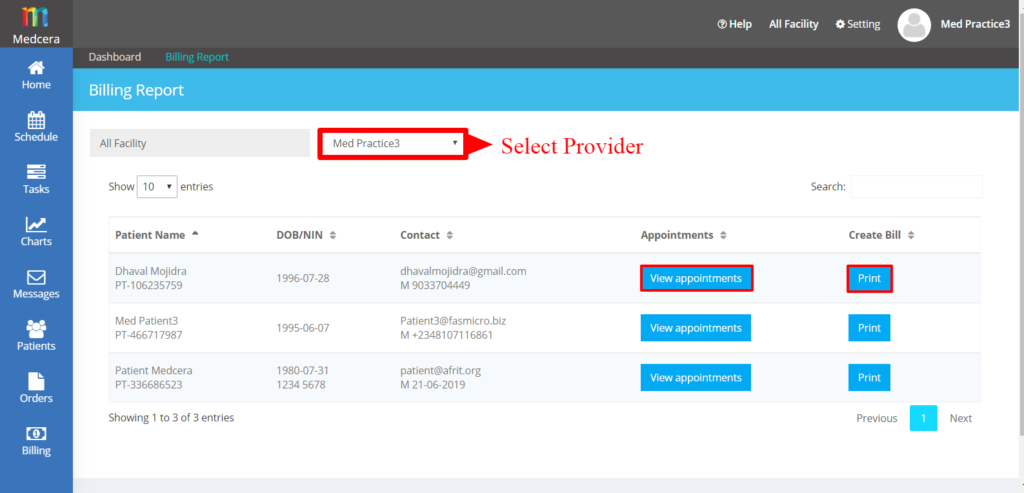
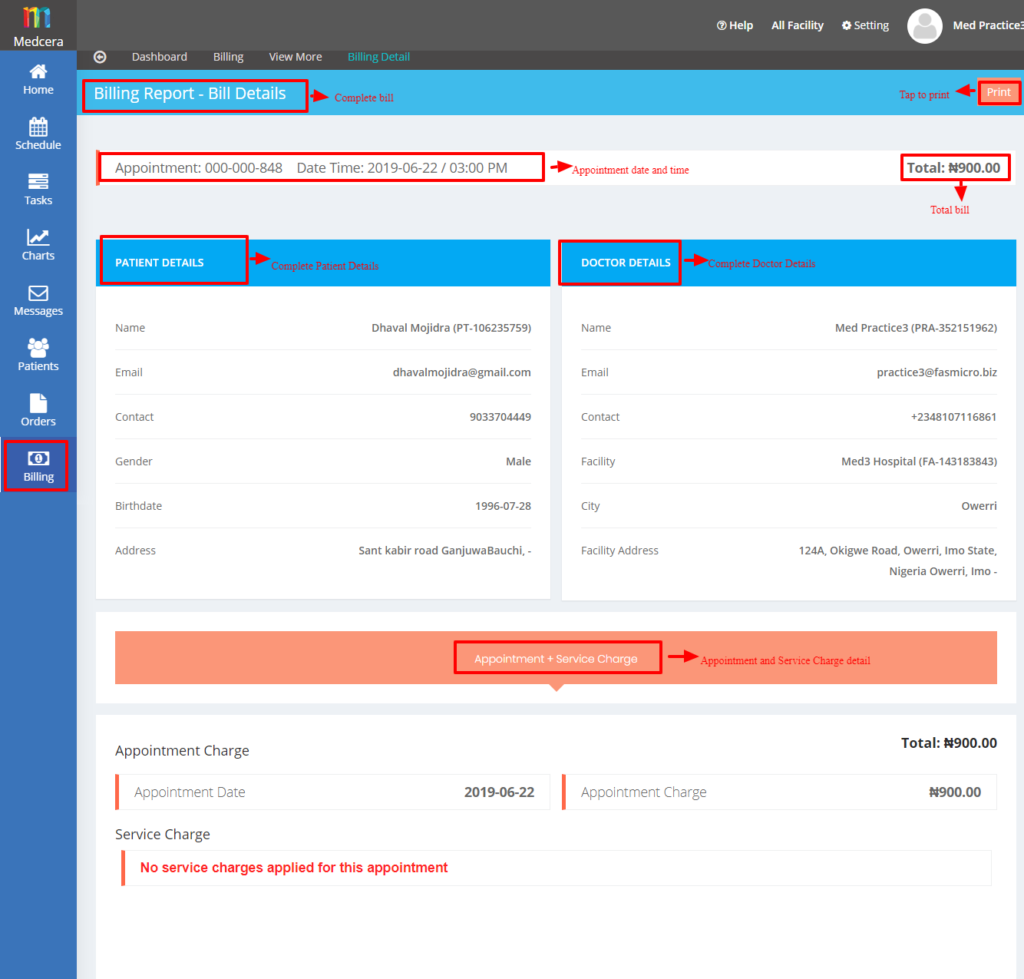
- Click on “View Billing” button to view details.
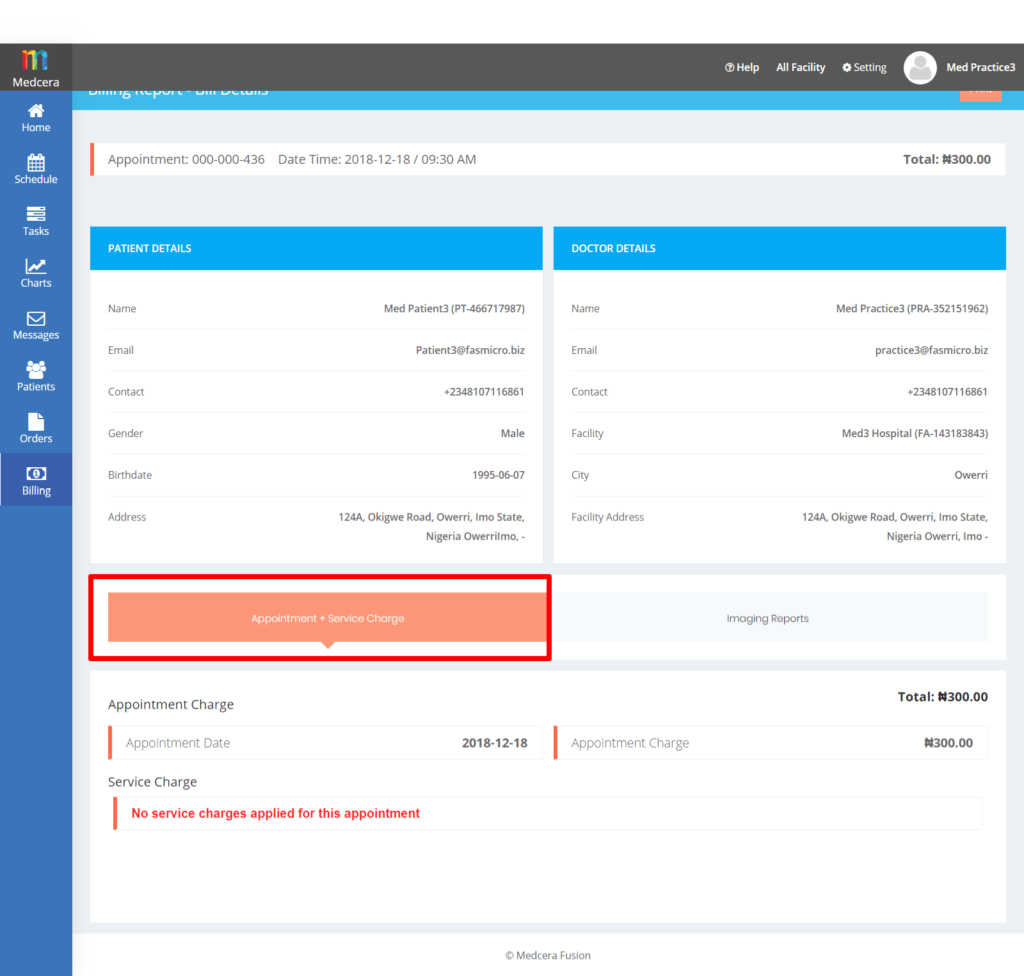
- A click on “View details” will display all billing related details.
- Click on “Appointment + Service charge” to view Appointment and service charges.
- Click on “Print” to print bill copy.
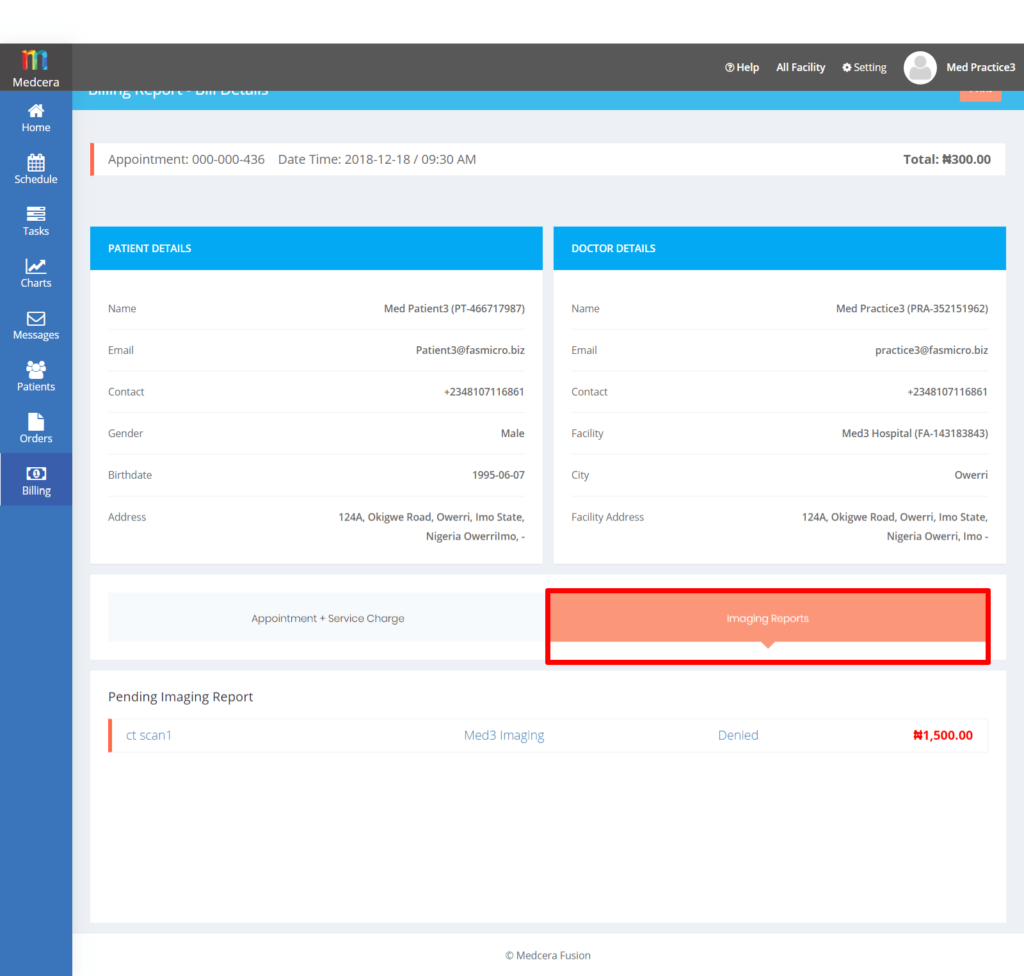
- Click on “Imaging Report” to view Imaging center charges as shown below.
- Click on “Print” to print bill copy.
· Medcera fusion is a free electronic health record (EHR) system which has nodes for physicians, health insurers, labs, imaging centers, pharmacists, and patients.
· It is a transition from patient’s paper chatting to digital version.
· It is a pioneering integrated EHR system which means that once a patient has his/her record in one hospital, that record is available in all approved clinics, at the same time, under the highest patient privacy rights and digital security. The patient can lock that data, releasing it to only clinics/physicians it wants through Medcera Practice Access Management.
· Fusion makes it easier for physicians to have access to medical histories of patients as they administer care.
· Fusion improves productivity, advance patient outcomes and accelerate medical innovations.
· It Streamlines administrative tasks and enhances billing efficiency.
· Medcera fusion is fast, user friendly, intuitive, flexible and interoperatable.
· It comes with tack benefits of templates, dictation, multimodal input, bank level security and lots more.
· Click on this link to open fusion portal https://fusion.medcera.com
2.1 Login
- Open fusion portal by clicking on this link https://fusion.medcera.com/
- It will show the page below:
2.2 Registration
- Click on “Register/Login”button to register or to login.
- Once user clicks on the “Register/Login”button, shows the screenshot below.
- If you are a new user, click on register as a “Practice or Connect Partner” and for new patient, click on “Sign up free”
- Fill out the mandatory fields as shown in the screenshot below:
- After successful registration, the message below props up.
- An email will be sent to the registered email address.
- In order to activate your account you have to click on above shown URL.
- Now reset your password, and confirm your password.
- On successful password setting your account will be activated and you will able to see below screen.
2.3 Log In
Once after account activation, you will able to log in from https://login.medcera.com/
- On successful login, the user will be redirected to Medcera Fusion dashboard.
- On the top right corner of the dashboard, you can see “Med3 Hospital “as the practice or main hospital while “Tim hospital” is a branch of the main hospital
- User logging for the first time, will have to fill their additional personal details clicking on “Account Configuration” in the side bar menu. For this, you can click on the top right corner on your dashboard. Here will see basic details with registered Name and given Medcera Code (i.e. generated default while creating an account e.g. PT-*********).
- By clicking on a drop-down menu from a profile, you will able to see below three options:
-
- Account Configuration
- Change Password
- Logout
-
- Click on “Account Configuration” from the drop down.
- You can change/reset the password by clicking ‘Change Password’under the profile tab. Enter a new password, confirm the password and submit by clicking the ‘Submit’ button as shown below:
- By Clicking ‘Log Out’ from drop-down menu Partner can log out from the account as shown below:
- In the dashboard as shown in the above screen, “Lab Center” shows the list of all Labs that are connected to Medcera.
- Click on “Connect Lab Center” button under the Lab Center tab and search for your preferred lab in Medcera using lab name.
- Select specimen collection mode and connection type.
- Click on “ADD” button as shown in the above screen.
- Click on “Yes, Connect to Lab Center” in the dialog box to add new lab.
- User can disconnect their practice from existing lab center by clicking “Disconnect” button.
- Click on “View Existing Connections” button to view existing lab connected to a practice as seen below.
- A click on “Connect to more labs” button will redirect user to the page “Connect your labs”
- User can disconnect their practice from existing lab by clicking “Disconnect” button. See screenshot below.
- In the dashboard as shown in the above screen, “Imaging Center” shows the list of all Labs that are connected to Medcera.
- The dashboard shows the list of all imaging centers in Medcera.
- Click on “Connect Imaging Center” button under the Imaging Center tab and search for your preferred Imaging in Medcera using Imaging name.
- Select specimen collection mode and connection type.
- Click on “ADD” button as shown in the above screen.
- Click on “Yes, Connect to Imaging Center” in the dialog box to add new lab.
- User can disconnect their practice from existing Imaging center by clicking “Disconnect” button.
- Click on “View Existing Connections” button to view existing Imaging center connected to a practice as seen below.
- A click on “Connect to more Imaging” button will redirect user to the page “Connect your Imaging”
- User can disconnect their practice from existing imaging by clicking “Disconnect” button. See screenshot below.
- In the dashboard you will see “Pharmacy Center” as shown below:
- This dashboard will showthe list of all Pharmacy centers in Medcera.
- This will help you to connect with this Pharmacycenters and connecting it will be shown in “View Existing Connections”
- After clicking on “ADD” button you will get below message
- After clicking on “View existing connections” you will able to see below screen:
- If you click on “Connect to more pharmacies” button you will be redirected to the page “Connect your Pharmacy” page.
- Once you tap on button “Disconnect” you will get below message:
- In the dashboard you can see “Payment Reconciliation” ” which shows the appointment payment details of doctors.
- It is divided into two parts and by default you can see payment reconciliation of current month.
- Patient Portal: In this part, the appointment fees will have to be pay to the admin and after that admin will pay these fees to fusion.
- Note:Here the Patient Portal = IMP
- Direct Portal:Here in this part the appointment fees will have to be pay to the fusion as the patient pays fees directly to the fusion.
- Note: Here the Direct Portal = OMP
- Total Reconciliation (It is a total payment from all two parts i.e. Patient Portal, and Direct).
- ”Approve Patient Payment” has three sections: Approve Paypal, Approve Bank Transfer and Patient Payment (OMP)
- Approve PayPal: In this payment option, payment for fusion appointment or connect partner order goes directly to recipient.
- A click on payment takes patient to paypal.me (This link will be generated from Account Configuration)
- Click on the activation link in registered Email to activate your paypal accounted.
- Upon account activation, a transaction Id will be generated.
- Upload the ID into Upload Receipt in Patient Portal.
- Tap on “Approve” button to complete payment as shown below.
- Bank Transfer: In this payment option, patient pays through the bank. After payment, he/she will get a receipt from the bank to upload. Connect partner then confirms and approves the payment.
- Click on “Approve”button to complete payment:
- Patient Payment (OMP) This section will help you to view all the appointment status of patients
- Note that only current month record status will be shown.
- Once you tap the “Sent” button, you will receive the message below:
“Mail has been successfully send to the respective patients for pending payment”
- Received Patient Payment will show the records of all received payment with mode of payment.
- The status of all refund payments can be viewed under this tab.
- Click on “PayPal” button to access PayPal link for a refund of the payment.
- Click on “Bank Transfer” button to access “Patient Bank Transfer Details” which have an option “Details Noted”.
- Click “Details Noted” button to generate “Upload Receipt”. refer to the screenshot below for more details:
- Click on “Upload Receipt” button to complete the process a shown inthe screenshot below below.
- Go to the dashboard and tap on “Search Medcera Patients” where you can search for patients using their Medcera Patient Code, Patient NIN, Patient Name, and Patient Birth date.
- Click on “Add Patient by Appointment” to be redirected to the “Book new appointment” page to book an appointment. See below screen:
- Click on “Next” button and fill out the fields as shown below.
- Note that you must check emergency option to attend to patients who are not for future appointment.
- Tap on “Next” button to move to the next stage as shown below.
- Click on “Next” button to get to payment page as seen in the screen below:
- Appointment charges + Emergency Charges= Total Charge
- When you tap on “Bank Transfer” button you will see below option:
- Once you Confirm Appointment, you will be directed to the “Schedule” page as shown below in screen.
- You will see “Schedule” section in more detail later.
- If you opt for “PayPal” payment method, the message below props up.
- If you opt for “Cash” payment method, the message below props up:
- Once you tap on “View Appointment” button, you will be redirected to the “Appointment Order Detail” page where you can view complete details of appointment order.
- Go to the dashboard and tap on “Rejected Orders” to view rejected orders from connect partners.
- Click on “Relocate” button to relocate order as shown below.
- Go to the dashboard and click on “Patient Timeline” to track patient medical activities such as medical reports, imaging reports, pharmacy reports (drugs and vaccines).
- Refer to the screenshot below for more information.
- Tracking patient by their e-Prescription shows all the list of e-Prescription records during encounter from inception to date. See sscreenshot below.
- Tracking patient by “Encounter” shows all records of patient encounters from inception to date.
- Tracking patient by “Lab Order” shows all records of Lab Orders of that particular patient from inception to date.
- When patient timeline is tracked by “Imaging Order”, it will show all records of Imaging Orders of that particular patient till date.
- Tracking patient timeline by “Pharmacy Order” shows all records of Pharmacy Orders of that particular patient till date.
- When patient timeline is tracked by “Lab Result” it will show all records of Lab results of that particular patient from inception to date.
- Tracking patient by “Imaging Result” shows all records of Imaging results of the patient till date.
- Tracking patient timeline by “Services” shows all records of all services which have been used by that particular patient.
- Go to the dashboard and click on “e-Prescription” to view e-prescriptions of patients.
- refer to the screenshot below for more details on patient e-prescription.
- A click on “View” button takes you to the screen below.
- Go to the dashboard and locate “Your Practice.”
- Click on “View” button to see “Facility and Appointment Details” as shown below.
- Click on “Edit ” button to Edit Facility as shown below.
- Click on “Next” button takes you to practice “Hours of Operation” where you can edit the hours and also notify the staff members through mail.
- “Notify time changes to staff” button is for informing the staff members as shown below.
- A click on “Next” button takes you to “Appointment Schedule” where you can edit appointment schedule as shown below.
- Click on “Next” button to see “Appointment Charges” where you can edit appointment charges as shown below.
- Click on “Clock ” icon after edit button to “Add Appointment timing.”
- Tap on “Save Time” and the message, “Appointment Timing Saved” props up.
- Go to the dashboard and locate “EMR USERS” where you can add and search more users including staff, Doctors/Physician, Nurse and NA/PA/.
- To add Doctor/Physician, tap on “EMR USERS.”
- Click on “Add Staff” and fill out the mandatory fields.
- Select Doctor/Physician from the drop down button under Role Details.
- Click on “Save” tab to complete the process.
- See below Doctors/ Physicians details.
- You can change the role of a particular user by clicking on the green button and the message, “This user successfully changed in Practice Non Admin” props up as seen in the above screenshot.
- To add Nurse, tap on “EMR USERS.”
- Click on “Add Staff” and fill out the mandatory fields.
- Select Nurse from the drop down button under Role Details.
- Click on “Save” tab to complete the process.
- See Nurse details below.
- To add NA/PA, tap on “EMR USERS.”
- Click on “Add Staff” and fill out the mandatory fields.
- Select NA/PA from the drop down button under Role Details.
- Click on “Save” tab to complete the process.
- See NA/PA details below.
- To add Staff, tap on “EMR USERS.”
- Click on “Add Staff” and fill out the mandatory fields.
- Select Staff from the drop down button under Role Details.
- Click on “Save” tab to complete the process.
- See Staff details below.
- A Click on “Add staff” button, shows the screen below to be filled out.
- Go to the vertical Menu bar in the dashboard and click on “Schedule” to see the schedule of all appointments and status as shown below.
- A click on “Book New Appointment” displays the page below.
- To book an appointment for a new patient, click on “New Patient” and fill out the mandatory fields.
- To book an appointment for an existing patient, click on the “+” icon and fill out the mandatory fields.
- Click on “Next” button and populate ‘the reason for the visit’ as shown in the screenshot below.
- A tap on “Next” button takes you to the screen below.
- Click on “Next” button to get to payment payment page as shown below.
- Appointment charges + Emergency Charges= Total Charge
- Click on any of the preferred payment options and confirm payment to complete the process.
- Go to the vertical Menu bar in the dashboard and tap on “Task.”
- Click on “New Task” tab to assign a new task to either self or other user.
- All tasks show the list of tasks assigned by a user to other users including admin, fusion, connect partners and patient.
- My Tasks: These are tasks assigned to fusion user by other users.
- Myself Tasks: These are tasks assigned to self.
- Due Task: These are tasks that should be executed immediately.
- Status: Task status can be either open or complete. The screenshot below shows a complete task status which can also be changed to open where necessary.
- To change task status, tap on status and change to either open or complete as shown in the screenshot below.
- New Task: click on “New Task” to assign a new task to either self or other user.
- Go to the vertical menu bar in the dashboard and tap on “Charts” to view all the confirmed appointments of a particular patient as shown below.
- Click on “Encounter” button to view Patient charting.
- Note that only doctor can view the Past Encounters of any patient unless admin give access to any nurse.
- Click on “Appointment” to see appointment details as shown below.
- In charts section, user can add new record if that user has been given access control to add.
- Similarly user can add new records in all the fields as shown in Summary-Go To.. Tab
- In “Charts”you can see “Lab” where you can view Lab Timing and give orders to particular Lab also as shown below:
- Here you can view Lab timing for particular Lab as shown below:
- Let’s have look on to below screen shot to know how you can give Lab Order here.
- Note: Same way you can give order and view timing for Pharmacy and Imaging centers also.
- In charts there is “Services”where you can add new practice service and also can apply existing services as shown below:
- To add your new practice service see below screen:
- Once you tap on “Edit” Button you will get below message:
- Once you tap on “Delete” Button you will get below message:
- In chart you can see the “Finish”where you can view the short summary of appointment
- Note: if the appointment is still pending, you can “Book follow up Appointment”which redirects you to the “Book New Appointment” page and you have to follow the process which you had follow in booking new appointment .
- In chart you can see “Timeline” which tracks the timeline of all the orders. You have to tap on the particular order to view the timeline.
For e.g. If we select “Services” then you will able to all services which have been encounter as shown below:
- Go to the vertical Menu bar in the dashboard and tap on “Messages” button.
- Click on “Compose” to send multiple messages to users fusion had previous interface with, select recipient and tap “Send” tab.
- Click on “Sent Item” to view sent Messages.
- “Message has been sent successfully”will be displayed at the top of the screen.
- Go to the vertical Menu bar in the dashboard and tap on “Patients” to view the list of patients as shown below.
- Click on “Status” button to change patient status to either active or inactive as shown below.
- Click on “Appointments” to view “Appointment Order Detail” as shown below.
- Go to the vertical Menu bar of the dashboard and click on ”Orders” to view patient order details for Lab, Imaging and Pharmacy as shown below.
- Click on “View” to see the order details of a particular patient as shown below.
- See orders views of Imaging Centers.
- A tap on “Re-request” button takes you to the screen below.
- See pharmacy orders view below.
- Tap on the vertical Menu bar in the dashboard and click on ”Billing” to generate and print patient bill, Lab bill, Imaging center bill, Pharmacy Center bill as shown below.
- Tap on “Create Patient Bill” to generate patient bills as shown below.
- Click on “View more” to generate more billing reports as shown below.
- Tap on “View Appointments” and click on “View Billing” to see bills of a particular patient.
- A click on “View billing” shows the screenshot below.
- The “News” tab is at the bottom of the Dashboard where Medcera related and health news is posted by Medcera admin and can be read by users. See screen below.
- A click on the search symbol takes you to the page below.
- Click on “Setting” tab to maintain settings in Fusion portal.
- There are 4 (four) types of setting as displayed in the screen below.
-
-
- Billing
- Partner Connection
- Practice Settings
- Report
-
25.1 BILLING
- Settings related Billing will be available in “Billing” as shown in the screen below.
25.1.1 Admin Appointment Payment
- Click on “Admin Appointment Payment” to view the Admin payment status of appointment charges for fusion as shown below.
- Add Doctor Name and Time fields to filter specific search and click search button as shown in screen below.
- Payment made by patient will be sent to Medcera Admin first for approval.
- Status will be shown as “Pending” until admin Approves payment as shown below.
- Click on “All” button to view payment records as shown in the screen below.
- Click on “pending” button to view pending payment records as displayed below.
- Click on “Received” button to view Approved payment records as shown in below:
- Click on “Reconciliation” button to view Reconciliation records of payments as shown below.
25.1.2 Admin Practice Service Payment
- Click on “Admin Practice Service Payment” to display admin payment status according to practice service charges as shown in screen below.
- Add Doctor Name and Time fields to filter specific search, and click search button as shown in the screen below.
- Payment made by patient will be sent to Medcera Admin first for approval.
- Status will be shown as “Pending” until admin approves payment as shown below.
- Click on “All” button to view payment records as shown in the screen below.
- Click on “pending” button to view records of pending payments as shown below.
- Click on “Received” button to view Approved payments as shown below.
Click on “Reconciliation” button to view Reconciliation records of payments as shown in the screen below.
25.1.3 Service Charge
- A Click on “service charge,” displays service charges as shown below.
- Select either from the list of Existing services or add New service.
- Click on the Services Name drop-down and Select service Name from the list, input charge for it, and click Add button to add that service.
- If the service is not available in the drop down, select “Add New Service” and add new service. See screen below.
- The Status of the Service Charges will be displayed as shown below.
- Requested service Charges that have not been Approved by Medcera Admin will be stated as “Requested” as shown below.
- Request that has been approved by admin will be displayed as “Approved” as shown below.
- You can edit service Charges by clicking on Edit ( ) button as shown in the screen below.
- Update your details and Click on Update Button a shown in the Pop-Up below.
- To edit Approved Services, user will request again and Medcera Admin will approve for new updates.
- Click on “Delete” Button to delete existing service (s).
- Click on “All” to display all records for Service Charges.
- Click on “Requested” to display all requested service charges records.
- Click on “Approved” to display all Approved service charges records.
- Click on “Rejected” to display all Rejected service charges records.
- Click on “Modified” to display all Modified service charges records.
25.1.4 Practice List
- Click on “Practice List” from billing card of a dashboard as shown in below screen:
You can change activation status as below to active or inactive the status.
- Click yes to change activation status as shown in below screen:
25.2 PARTNER CONNECTION
- Go to fusion setting and click on “Partner Connection” card to maintain setting for connect partners.
- There are 3 (three) connect partners as seen below.
- Imaging Connections
- Lab Connections
- Pharmacy Connection
25.2.1 Imaging Connections
- Click on Imaging Connections to review your practice’s existing connections or connect with additional imaging centers as shown in the screenshot below.
- Click on “Imaging Connections” to review existing Imaging Centers that are connected to your practice as seen below.
- Fusion user can Connect New Imaging Center with their Practice or can Disconnect existing Imaging Center.
- Click on “Disconnect” button to disconnect Imaging Center as shown below.
Click on “Connect Imaging Center” button to connect with new Imaging Center as shown in the screenshot below.
- Click on “Connect Imaging” to view list of Imaging Centers connected to your practice.
- Filter search to connect with specific Imaging Center as shown below.
- Click “Test Performed” to view test that are performed by the Imaging Centers as shown below.
- Click “Add” Button to added new Imaging Center to your practice as seen below.
25.2.2 Lab Connections
- Click on Lab Connections to review your practice’s existing connections or connect with additional lab centers as shown in the screenshot below.
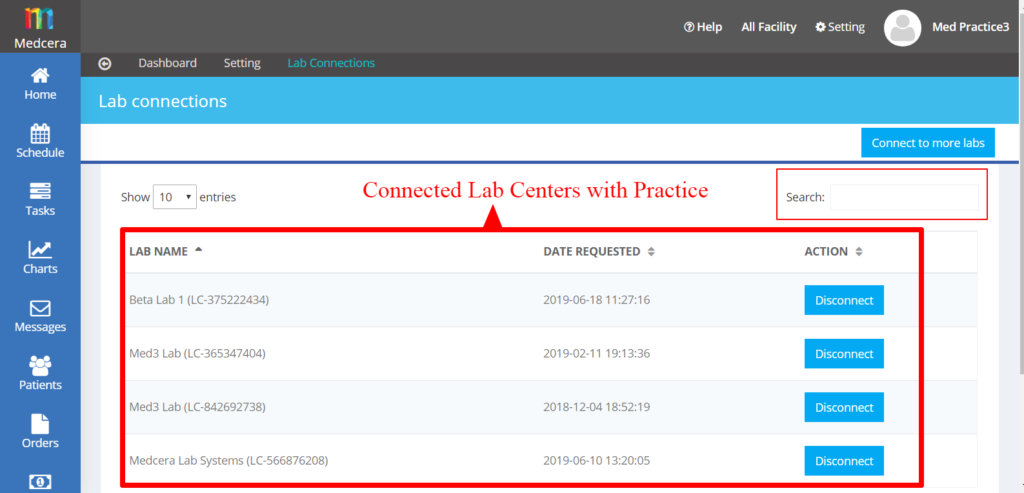
- Click on “Lab Connections” to review existing Lab Centers that are connected to your practice as seen below.
- Fusion user can Connect New Lab Center with your Practice or Disconnect existing Lab Center.
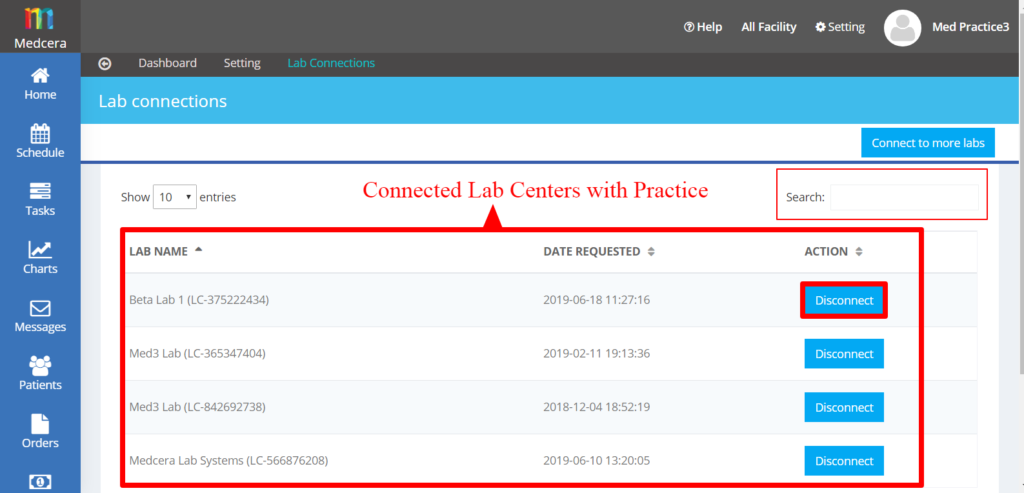
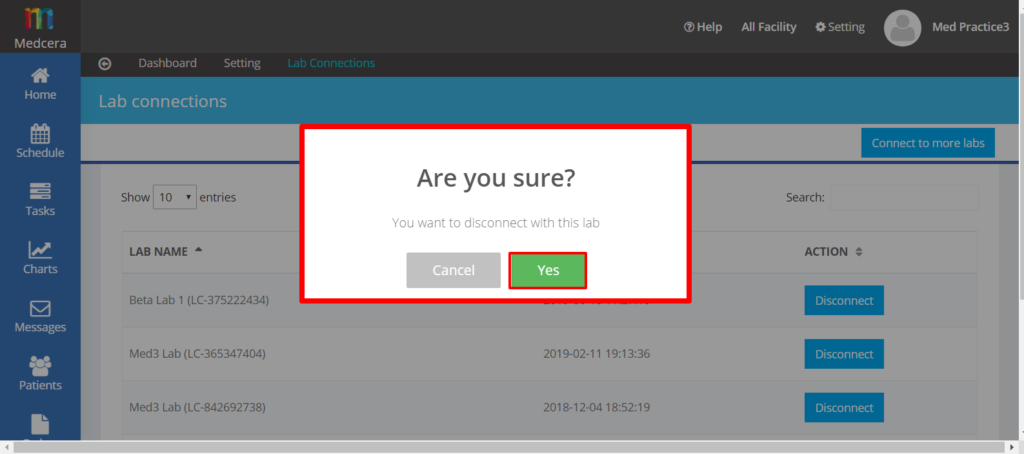
- Click on “Disconnect” button to disconnect Lab Center as shown below.
- Click on “Connect Lab Center” button to connect with new Lab Center as seen below.
- Click on ” Connect Lab” to view list of Lab Centers as shown below.
![]()
- Filter search to connect with specific Lab Center as seen below.
![]()
- Click on “Test Performed” to view the list of test performed by lab centers connected to your practice as shown below.
- Click on “Add” Button to add new lab to existing Lab Centers in your Connections as shown below.
25.2.3 Pharmacy Connections
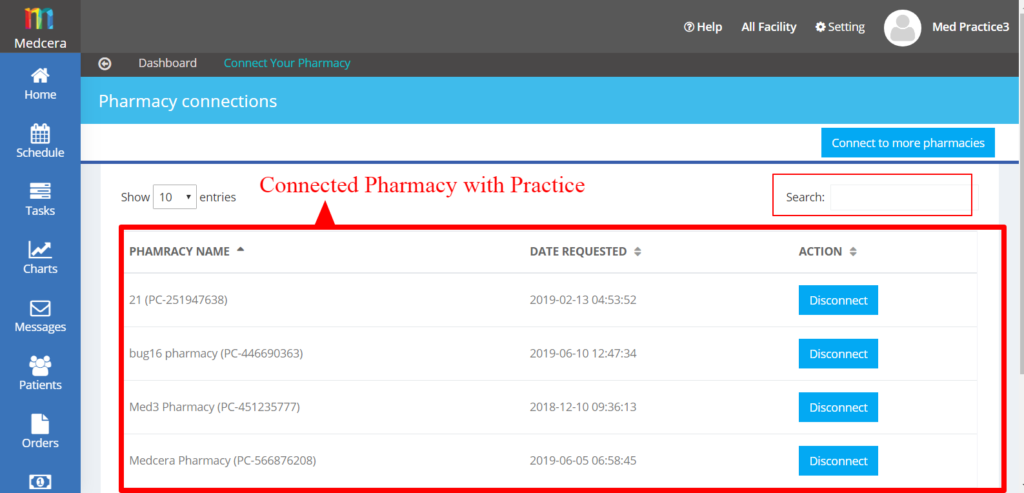
- Click on pharmacy Connections to review your practice’s existing connections or connect with additional pharmacy centers as shown in the screenshot below.
- Click on “Pharmacy Connections” to review existing Pharmacy Centers that are connected to your practice as seen below
- Fusion user can Connect New Pharmacy Center with your Practice or can Disconnect existing Pharmacy Center.
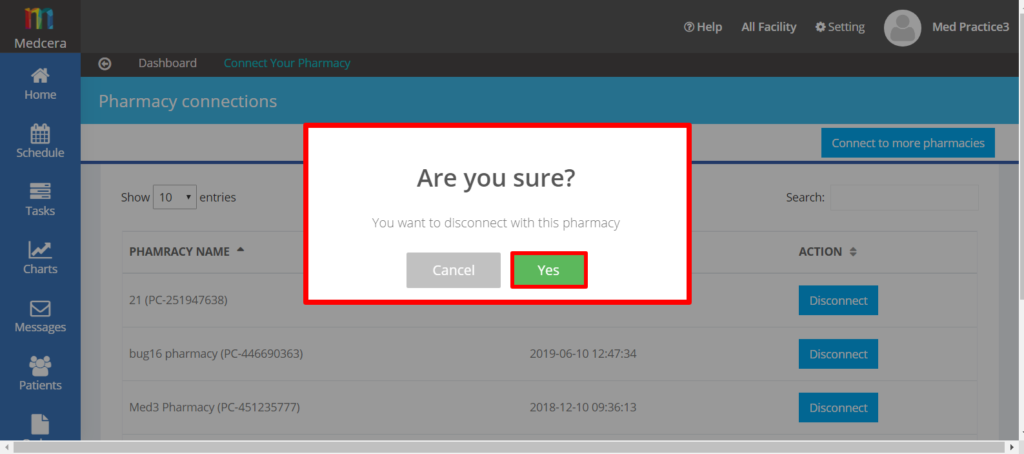
- Click on “Disconnect” button to disconnect Pharmacy Center as shown below.
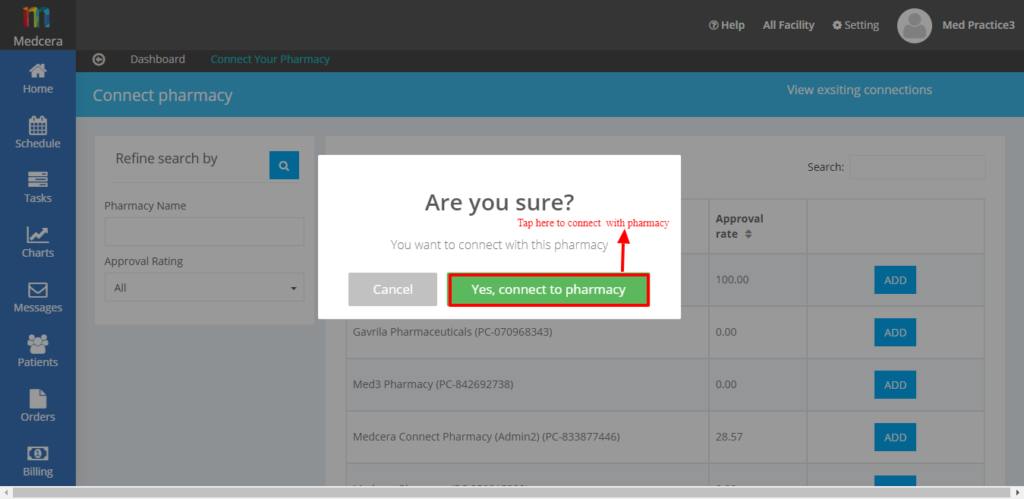
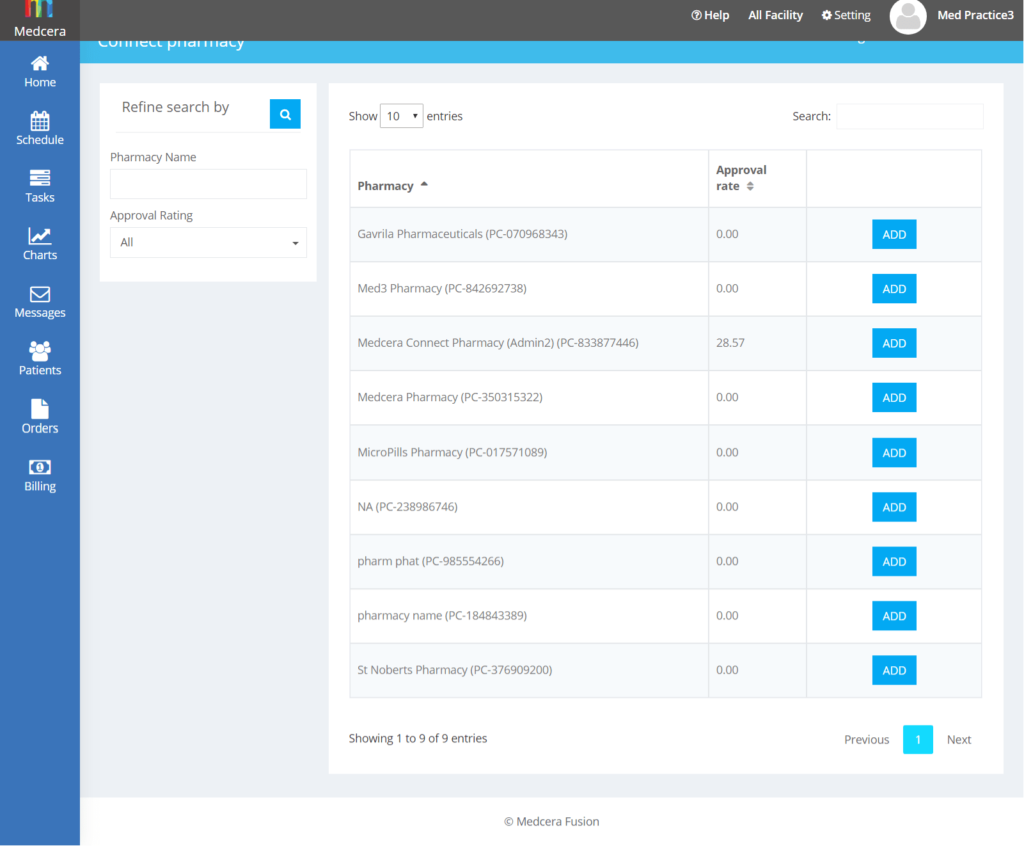
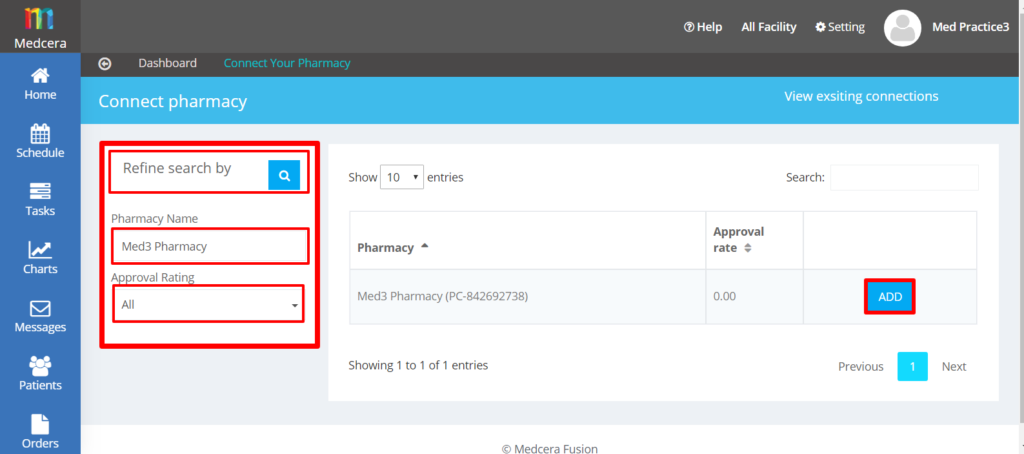
- Click on “Connect Pharmacy Center” button to connect with new Pharmacy Center as shown in below screen:
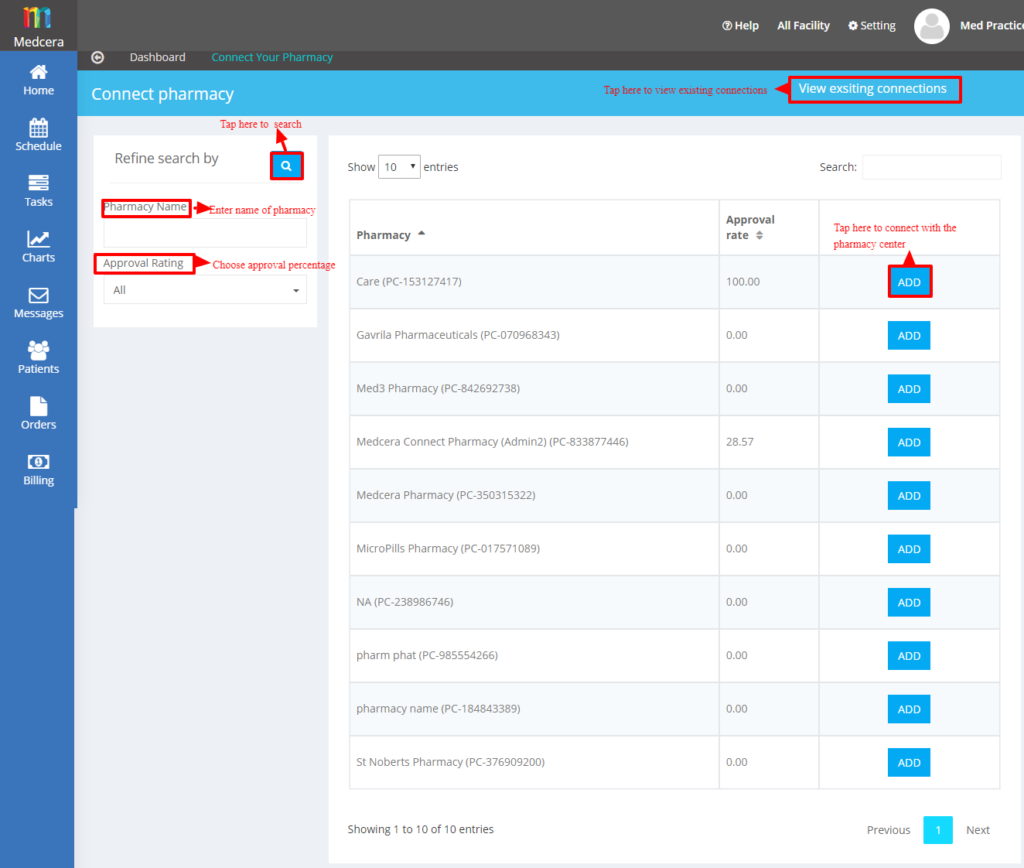
- Click on ” Connect Pharmacy” to view list of pharmacy Centers as shown below.
Filter search to connect with specific Pharmacy Center as shown in the screen below.
- Click on “Add” Button to add new pharmacy to existing pharmacy Centers in your Connections as shown below.
25.3 PRACTICE SETTINGS
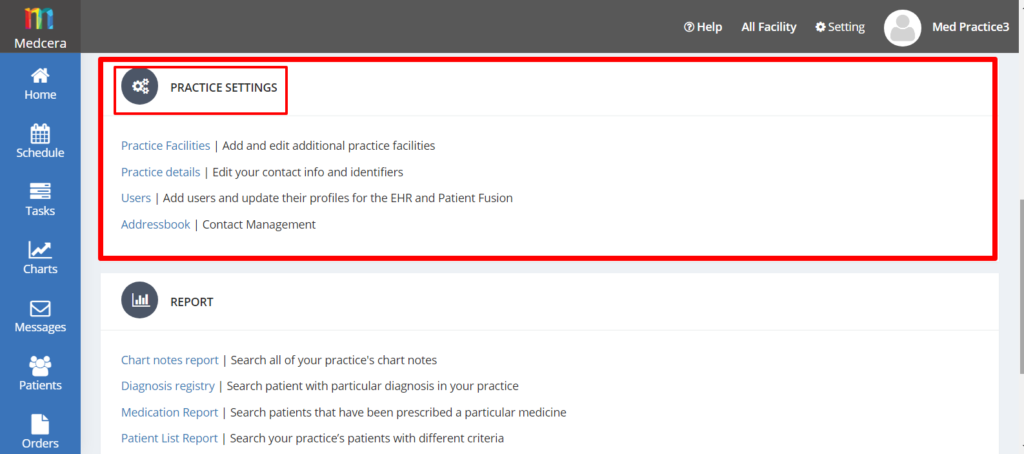
- Go to fusion setting and click on “Practice Settings” card.
- There are four (4) types of Practice Settings as seen below.
-
-
- Practice Facilities
- Practice details
- Users
- Address book
-
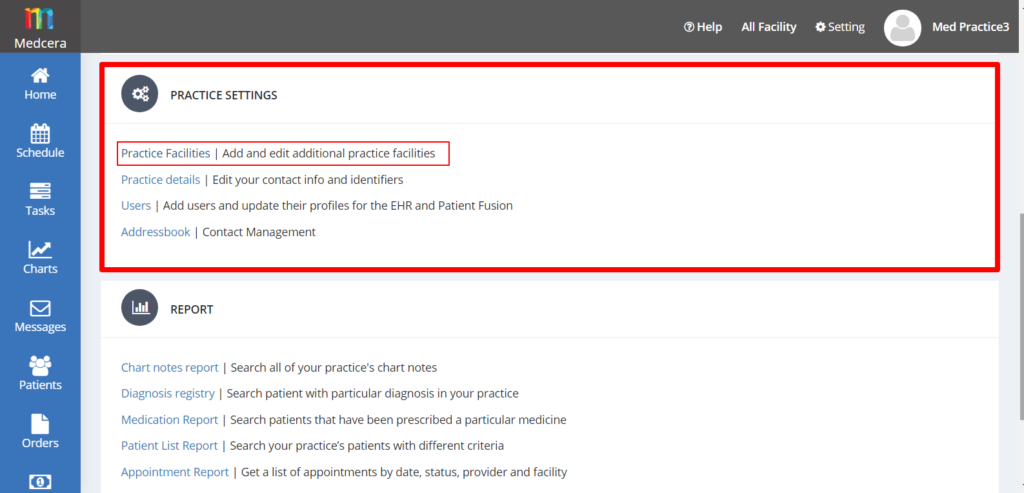
25.3.1 Practice Facilities
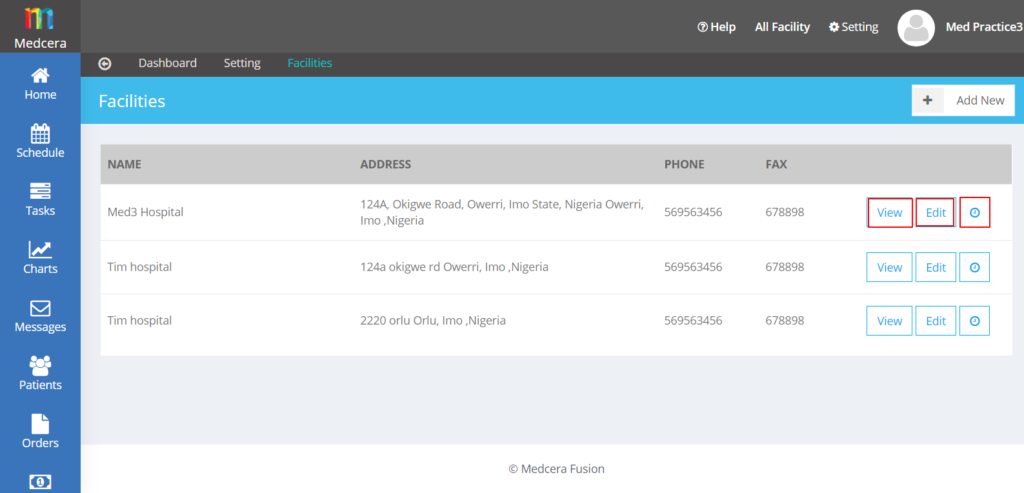
Click on “Practice Facilities” to add or Edit additional practice Facilities as shown below.
- Fusion user can view, edit or set time for Appointment as seen below.
25.3.1.1 View Appointment Details
- Click on “View” to view details of Facility appointment as shown in the screen below.
25.3.1.2 Edit Facility
- Click on “Edit” button to edit facility details as shown as seen below.
- Edit Facility Address and click on “Next” button.
- A click on “Next” button displays Hours of Operation as shown below. Edit Hours of Operation for your facility and click next button to save time changes made.
- Click on ‘Save Time” to save Hours of Operations changes.
- Notify time changes to your staff where necessary by filling out the details accordingly.
- Click “Next” to schedule Appointment time as shown below.
- Click on “Next” to view Appointment Charges and edit charges for Appointment where necessary.
- Click on “Submit” as shown below to complete the process.
25.3.1.3 Add Appointment Timing
25.3.1.4 Add New
- Click on “Add New” button to add new Facility as shown in the screen below.
- Add Facility Address and click on “Next” button.
- A click on “Next” button displays Hours of Operation as shown below. Edit Hours of Operation for your facility and click next button to save time changes made.
- Notify time changes to your staff where necessary by filling out the details accordingly.
- Click “Next” to schedule Appointment time as shown below.
- Click on “Next” to view Appointment Charges and edit charges for Appointment where necessary.
- Click on “Submit” as shown below to complete the process.
25.3.2 Practice Details
- Click on “Practice Details” to Edit Contact info and Identifiers as shown below.
25.3.2.1 Personal Details
-
-
-
- Click on “Practice Details,” enter your personal Details and identity and click on “Save” button as shown below.
- View your Facility details below.
-
-
25.3.2.2 Online Profile Status
-
-
- Click on the tab under the “Online Profile Status” Enable your online status as shown in below screen.
- Note that when your online status is disabled, your practice profile status will not be visible to Patients and they will not be able to find your facility online.
-
- Click on “View Online Profile” button to see your available profile to patients.
25.3.3 Users
- Click on “Users” from Practice Setting card to search or create your users or staff members as shown in below screen.
- Click on “Users” to Search your existing staff member as seen below..
- Click on “Add staff” button to add new staff member in your Facility.
- Add User Details, Define their Role and add Role Details, Add Address Details and associated facility details as shown in screen below.
- Click on “save” button and User will be added to your Staff list.
-
-
- Practice can edit their Existing staff members details.
- Click on “Active/Inactive” status to Active or deactive user’s profile. Activation status shows online availability of that user as seen in the screen below.
- Practice can enable Admin access to provide admin rights or can disable it as per requirement as shown below.
- You will find various options by hovering over profile such as view, edit, staff, and delete as shown below.
-
25.3.3.1 View Staff Detail
- Click on “View” button to view the user profile as displayed below.
25.3.3.2 Edit Staff detail
- Click on “Edit” to edit User Profile as shown in below screen and click on “Save Chages” button as shown in below:
25.3.3.3 Staff
-
-
- Click on “Staff” tab to know the details of staff members related user. You can add staff member in your user’s profile and view, edit or delete it.
-
-
-
- Send activation mail to newly added member as shown in screen below.
-
25.3.3.4 Delete
- Click on “Delete” to delete profile by clicking on “Yes” in the pop-up as seen below.
-
- Send Activation Mail to the user whose account has been deactivated.
25.3.4 Address Book:
-
- Click on “Address Book” to create Address book from Practice Settings as displayed in screen below.
- There are two types of address book: Normal Address Book and Group Address Book.
25.3.5 Normal Address:
- Click on “Add” Button to add an address to the Normal List that you want to save for reference.
-
- Click on “Add” button to add your required details and click on “Add” button as shown below.
-
- Adding an address to the Normal Address list, a list as below will be generated.
25.3.6 Group Address:
-
-
- The addresses can be categorized groups in order to allocate a specific category to specific classifications especially where the list includes multiple records. see screen below.
-
- Click on “Add” button to add another address to the list or “Remove All Members” to delete the records.
- The address can be viewed, Edited, or deleted as per requirements.
25.4 REPORT
- Report card will contain various report details as shown in below screen:
25.4.1 Chart Notes Report
- Click on “Chart Notes Report” for searching your Patient’s chart notes from report card as shown in below screen:
-
- By clicking “Chart notes report” below screen will be displayed containing chart notes reports as shown in below screen:
- You can filter Search by Provider, Chart Type, and duration as shown in below screen:
- Click on “Run” button to get specific filtered output.
25.4.2 Diagnosis Registry Report
- Click on “Diagnosis Registry Report” for searching your Patient’s Diagnosis Registry Report as shown in below screen:
-
- By clicking “Diagnosis Registry Report” below screen will be displayed containing Diagnosis Registry Report as shown in below screen:
- You can filter Search by Provider, Diagnosis Type, and duration as shown in below screen:
- Click on “Run” button to get specific filtered output.
25.4.3 Medication Report
- Click on “Medication Report” for searching your Patient’s Medication Report as shown in below screen:
-
- By clicking “Medication Report” below screen will be displayed containing Medication Report as shown in below screen:
- You can filter Search by Provider, Drug Type, and duration as shown in below screen:
- Click on “Run” button to get specific filtered output.
25.4.4 Patient List Report
- Click on “Patient List Report” for searching your Patient’s List Report as shown in below screen:
-
- By clicking “Patient List Report” below screen will be displayed containing patient matching criteria Report as shown in below screen:
- You can filter Search by Provider, Start new Query as shown in below screen:
-
- By selecting Query related tab will be enabled, select your query from the drop down to apply filter search:
- Click on “Run” button to get specific filtered output
25.4.5 Appointment Report
- Click on “Appointment Report” for searching your Appointment Report as shown in below screen:
-
- By clicking “Appointment Report” below screen will be displayed containing Appointment Report as shown in below screen:
- You can filter Search by Provider, Appointment status, and duration as shown in below screen:
- Click on “Run” button to get specific filtered output.
25.4.6 Drug Interactions Report
- Click on “Drug Interactions Report” for searching your Drug Interactions Report as shown in below screen:
-
-
- By clicking “Drug Interactions Report” below screen will be displayed containing Drug Interactions Report as shown in below screen:
- You can filter Search by Provider, Alert Level, and duration as shown in below screen:
- Click on “Run” button to get specific filtered output.
-
25.4.7 Billing Report
- Click on “Billing Report” for searching your Billing Report as shown in below screen:
-
-
- By clicking on “Billing Report” below screen will be displayed containing Billing report of Patients.
- Click on “Print” button to print the bill of patient.
- Click on “View Appointment” to view appointment billing details.
-
-
-
- By clicking on “View Appointment” below screen will be displayed, containing list of Appointments.
- Click on “View Billing” button to view details.
-
-
- By clicking on “View details” below screen will be displayed containing whole details related billing.
- Click on “Appointment + Service charge” to view Appointment and service charges.
- Click on “Print” to print bill copy.
-
- Click on “Imaging Report” to view Imaging center charges as shown in below screen:
- Click on “Print” to print bill copy.