- Medcera Lab portal enables Lab centers to connect with fusion effortlessly.
- It helps Lab centers to place test orders and reports from their portal on behalf of Patient.
- Medcera Lab portal makes it easy for lab centers to check status of placed orders.
- Payment history for orders placed by Lab center and patient can easily be viewed in their portals.
- It allows Lab centers assign specific Tasks and send Messages to other Medcera Users.
- Medcera Lab portal makes it possible for patient to place test order and request reports online.
- Click on the link below to access Lab portal .
- https://connect.medcera.com/
2.1 Log In
- Click on this link to open Lab portal https://connect.medcera.com/
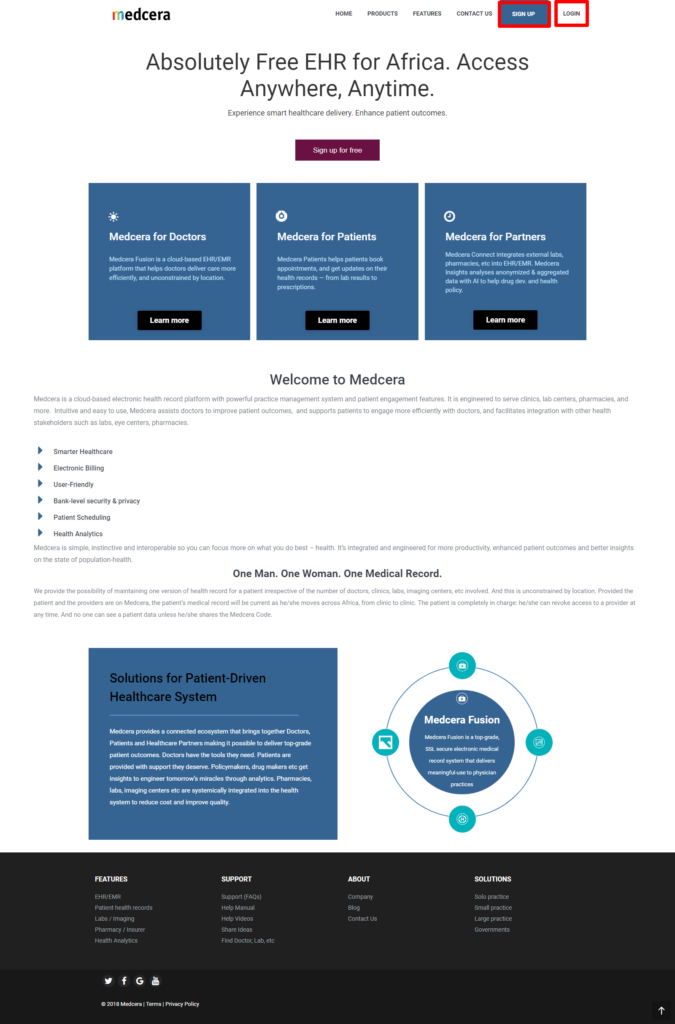
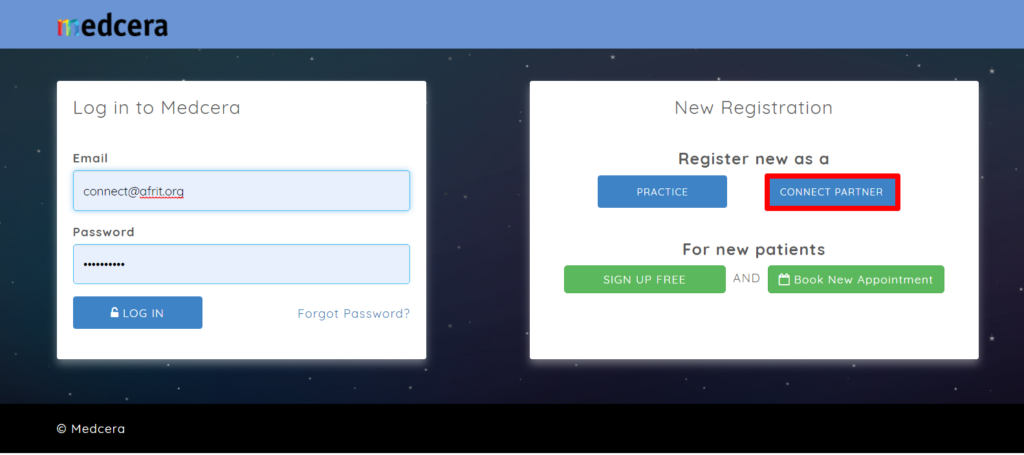
- Click on “Sign up/Login” button to sign up or Login as shown below.
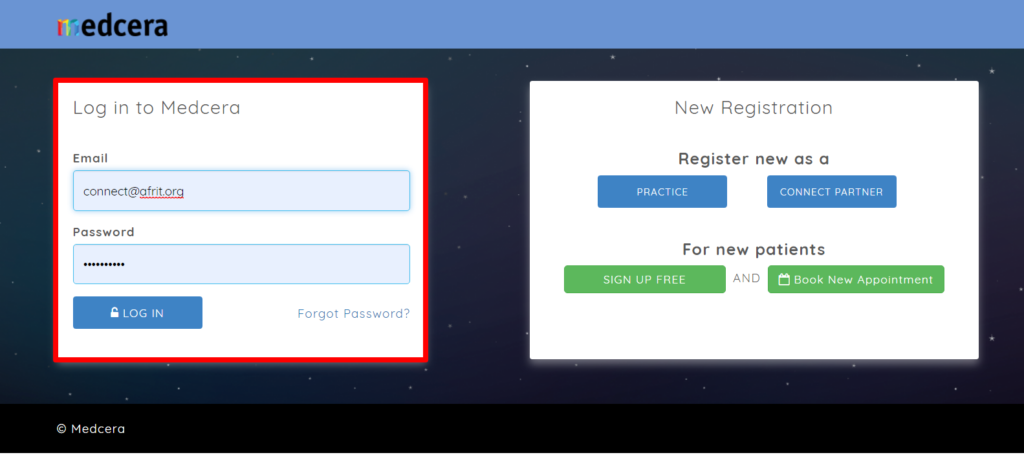
- If you are an existing user, Login with your valid username and password as shown below.
- On successful login, Lab Center dashboard will display.
2.2 Registration
- If you are a new user, click on “Register new as a” CONNECT PARTNER button.
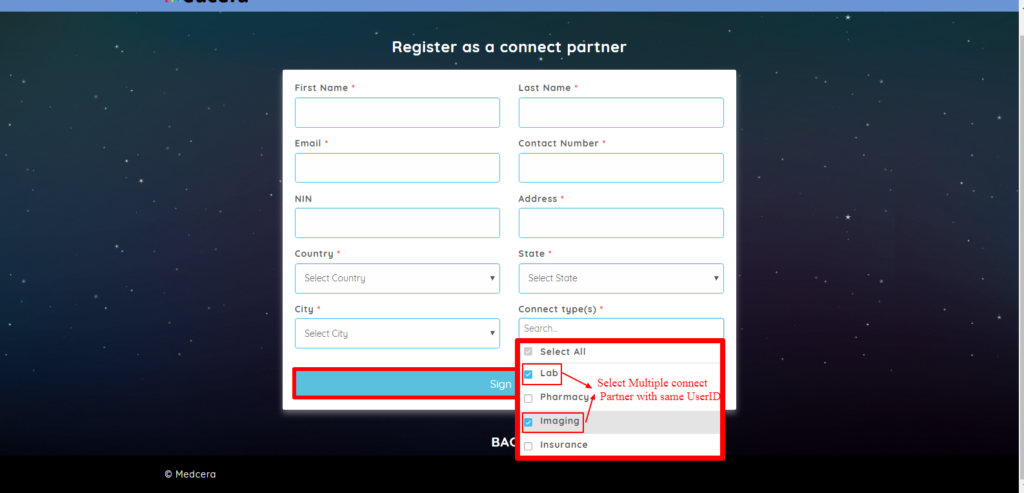
- Fill out the mandatory fields as shown below.
- In the screen below, select “Lab” as Connect Type. There is an option to choose multiple roles: Pharmacy, Lab, Imaging and Insurance with same user ID.
- Click on “Sign Up” button to continue.
- On successful registration, the message in the screen below displays.
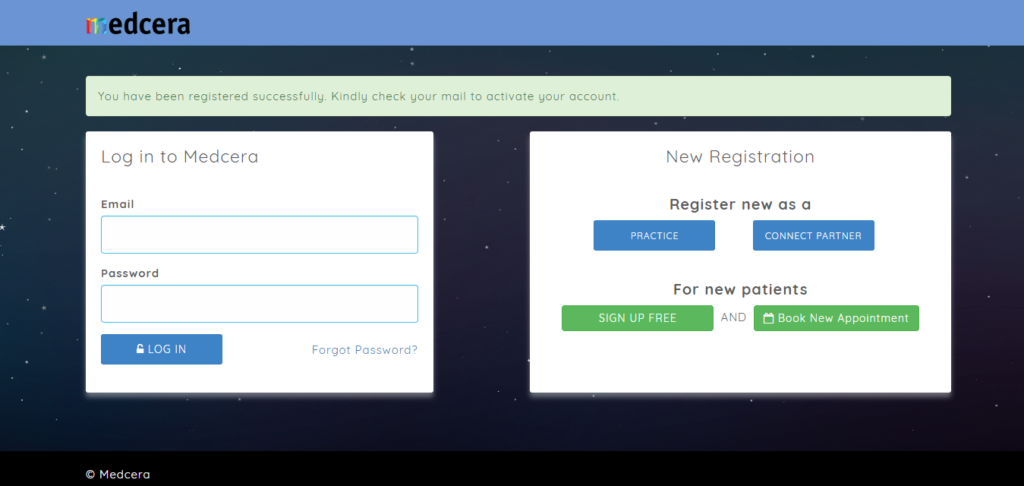
- An Email will be sent to your registered email ID for account activation.
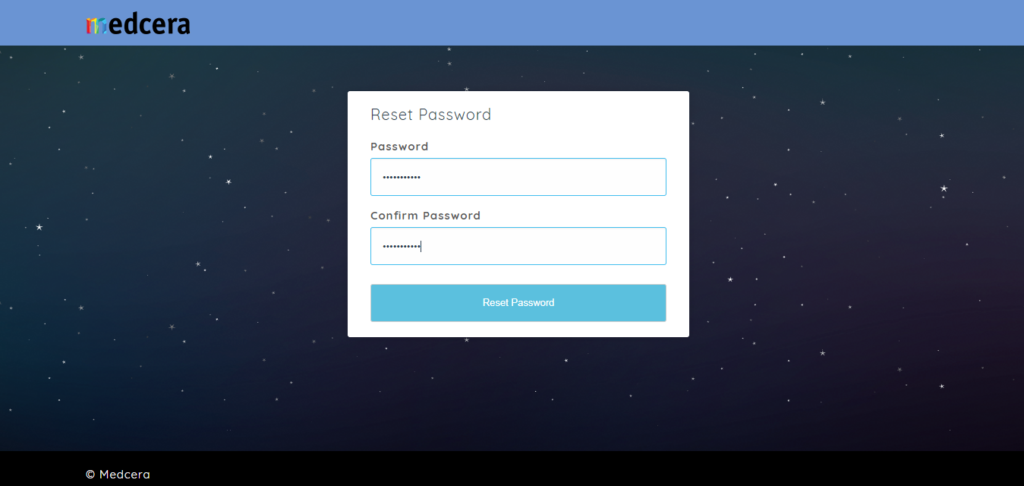
- Click on the link received in mail to activate your account.
- Reset your password and confirm password.
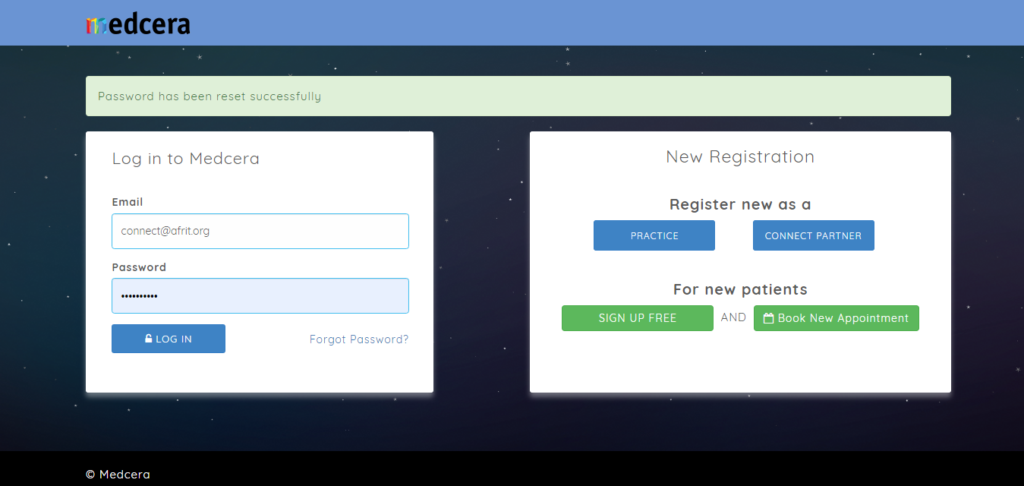
- On successful password reset, your account will be activated as shown below.
- Login to your account with valid User ID.
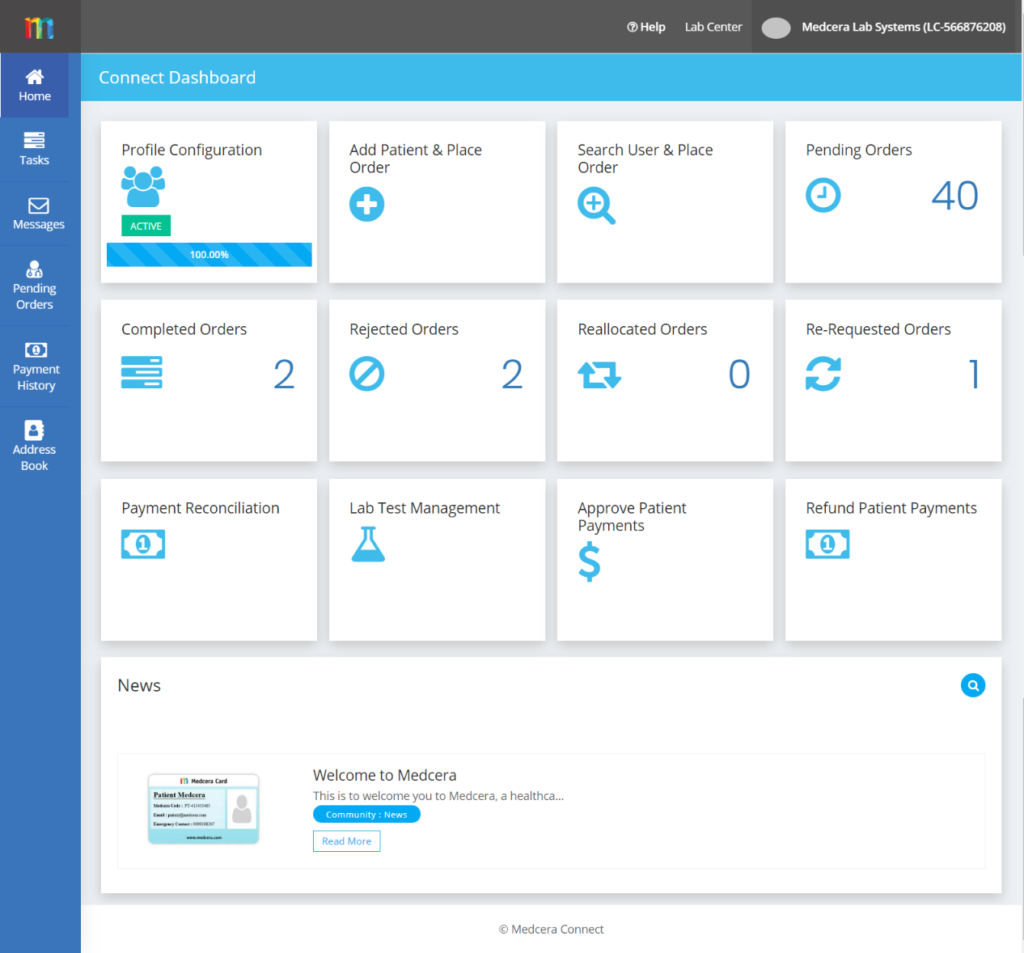
- On successfully Login, user will be redirected to Medcera Lab center dashboard as shown below.
- The dashboard contains various order cards placed by Lab, status of the orders and payments.
- Click on the side bar tab on the dashboard to view other menu such as tasks, Messages, pending orders, Payment History, Address book etc.
- The “News” card is at the bottom of the Dashboard.
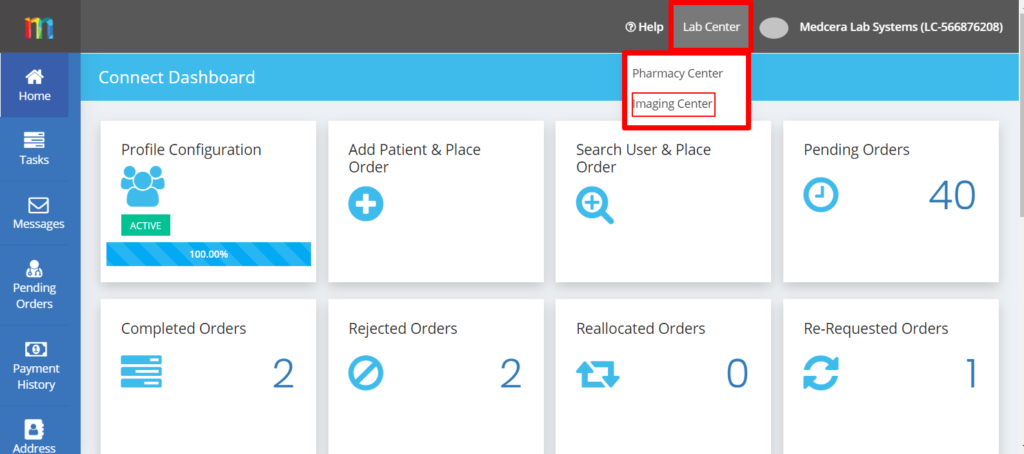
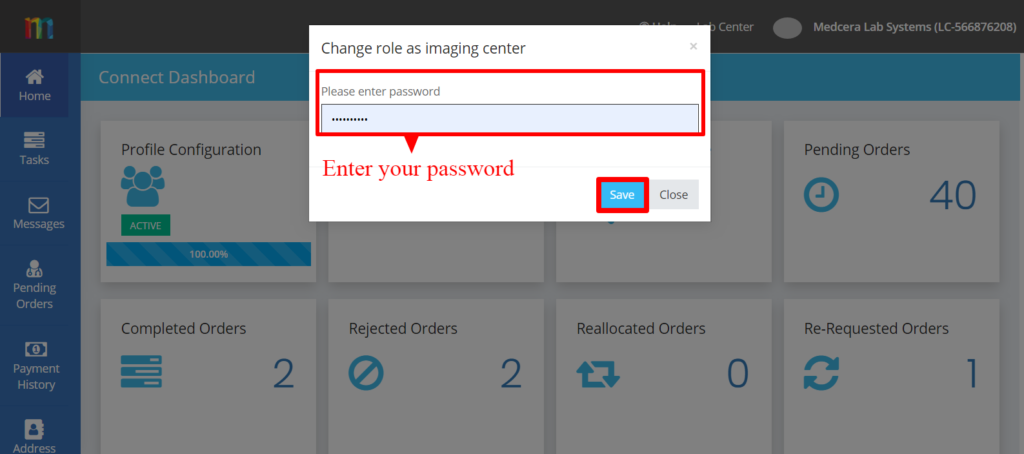
- By default you will be logged in to “Lab center” account, if you have multiple connect partner accounts.
- If you want to switch to your another connect partner account, click on “Lab center”, and log in to another connect partner account by entering your account password as shown in below screen.
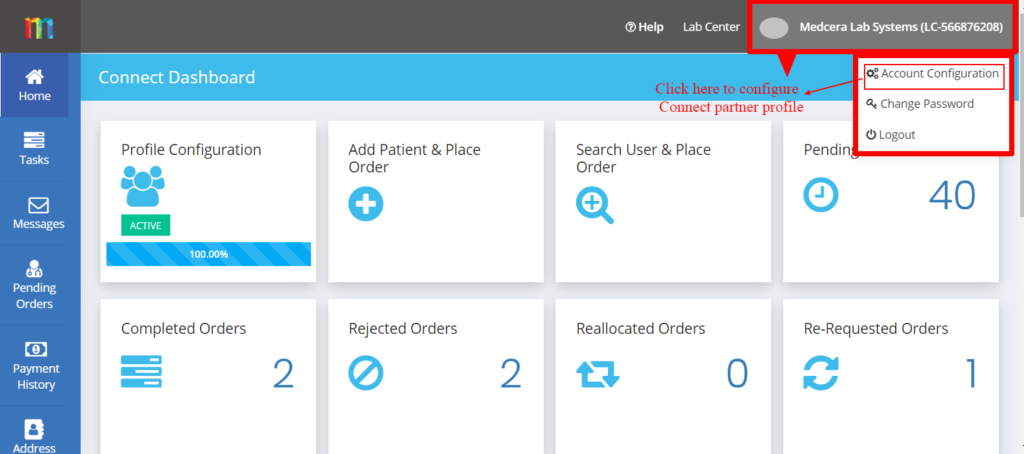
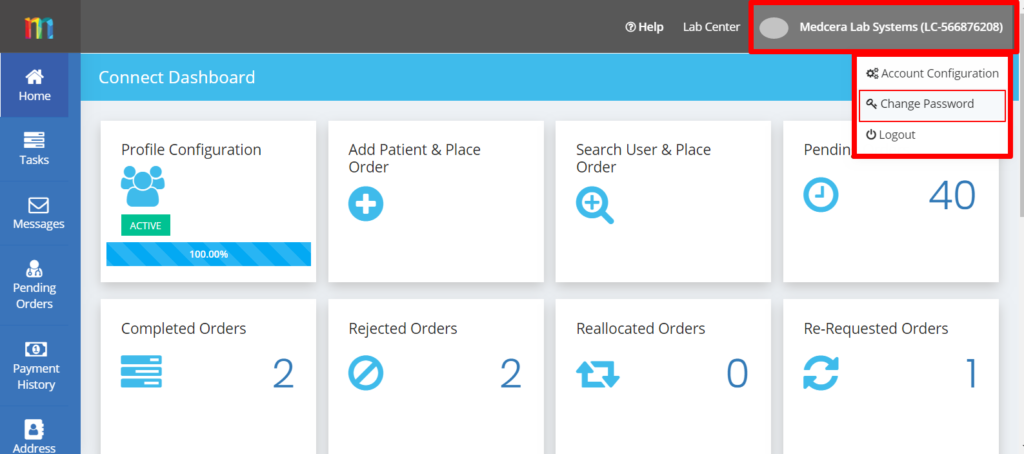
- Users logging in for the first time will have to fill out their further personal details by clicking on “Account Configuration” menu at the top right corner on your dashboard.
- A click on profile drop-down menu displays the three options below.
- Account Configuration
- Change Password
- Logout
4.1 Account Configuration
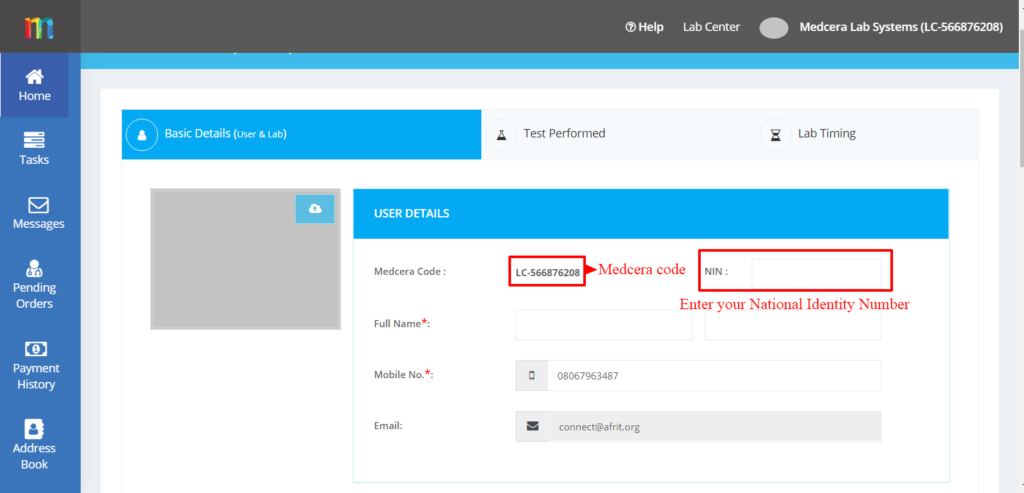
- Click on “Account Configuration” from the drop down to configure your account.
4.1.1 Step 1: Basic Details:
- Fill out your basic details as seen below.
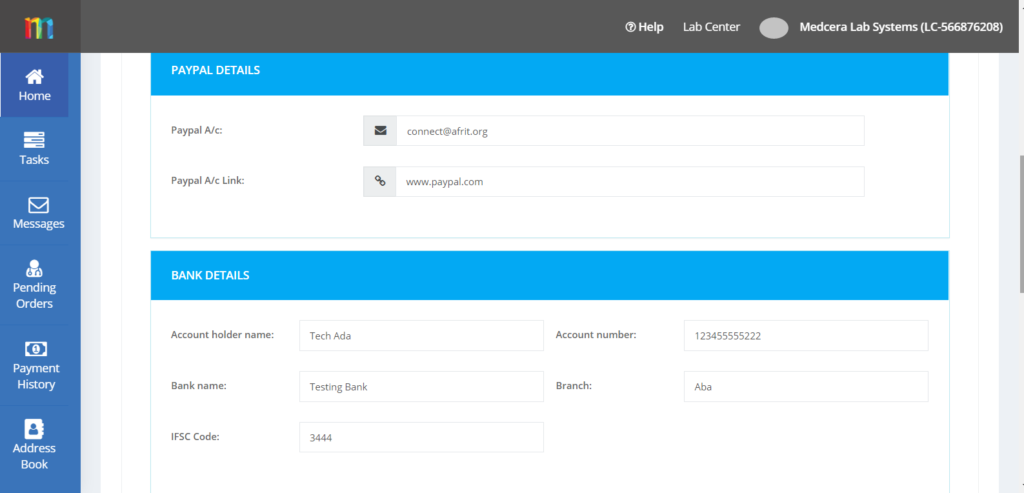
- Fill out your Bank and Paypal Details for Payment as shown below.
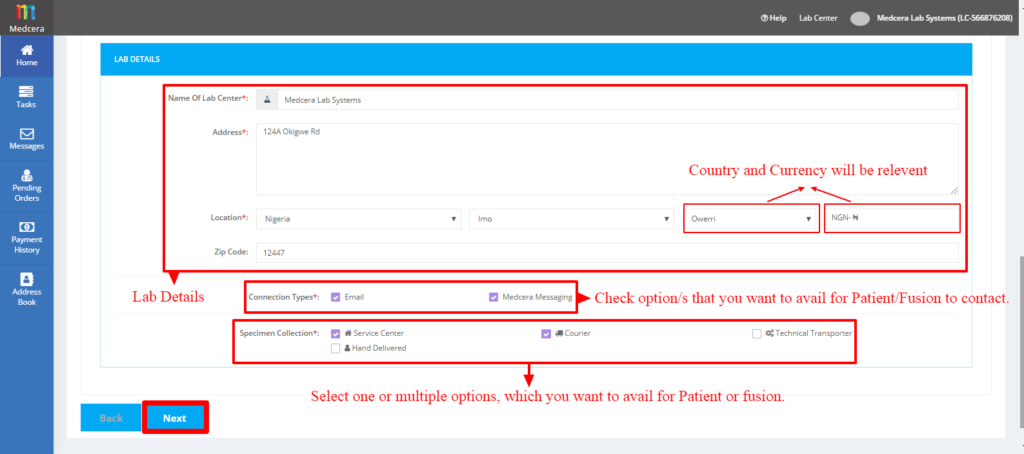
- Enter your Lab details containing lab address, Connection types, and Specimen Collection method.
- Currency will be displayed in line with the selected country for Lab address.
- In Connection type and Specimen collection method, only check the options that you want to make available to Patient or Fusion.
Click on “Next” Button to continue Account Configuration process.
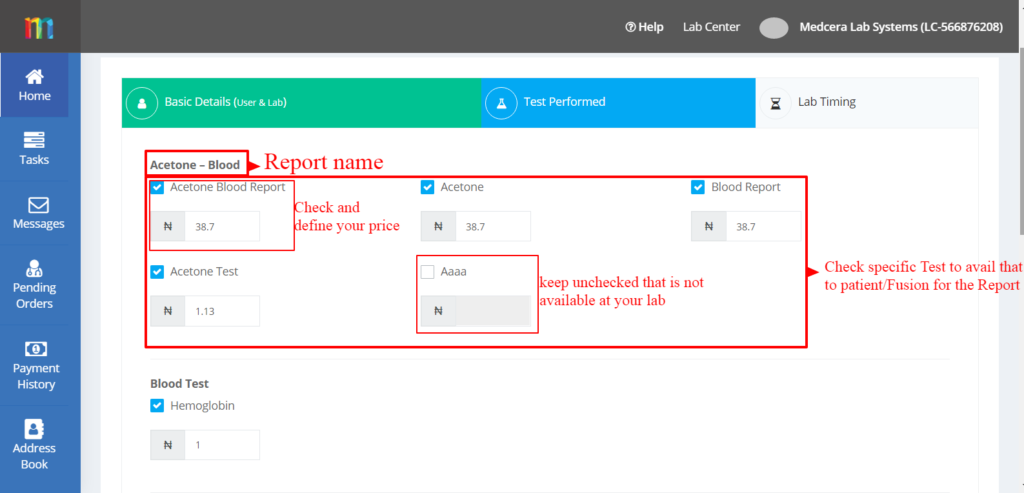
4.1.2 Step 2: Test Performed:
- Click “Next” to be redirected to the second step “Test Performed” as shown below.
- From the list of the Reports check the relevant test(s) which you want to make available to Patient/Fusion.
- Fix price for each selected test performed (Currency will be default as per registered Country).
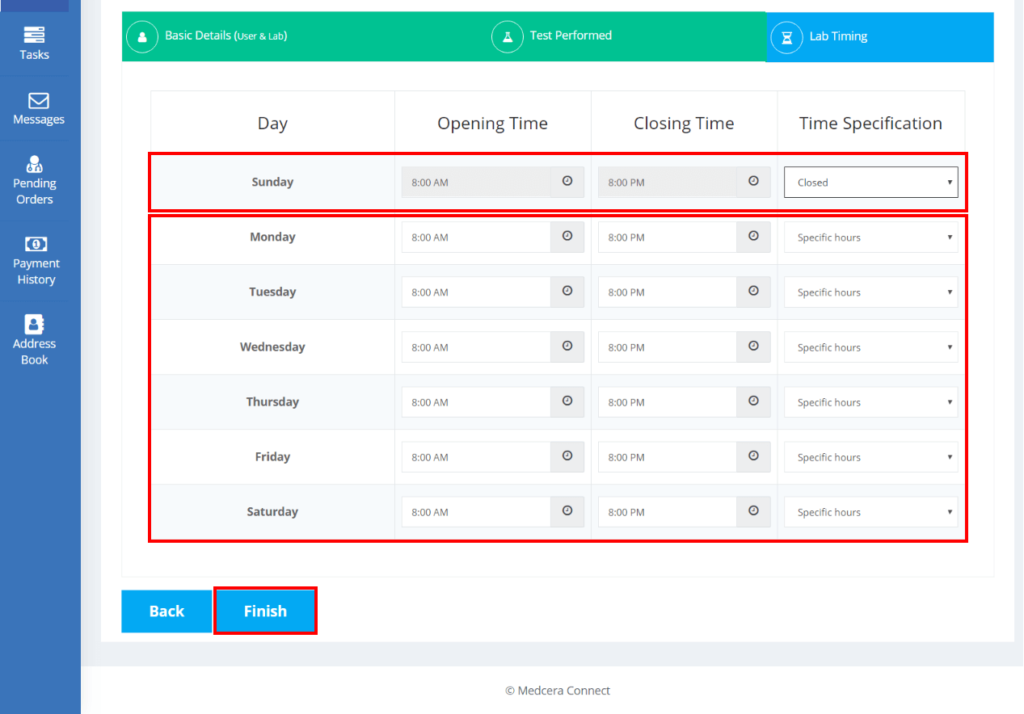
4.1.3 Step 3: Lab Timing
- Specify your lab timings for opening and closing hours.
- Define closed for week off or other specific day, when lab is not opened.
4.2 Change Password
- Click on “Change password” to change the password of your account from drop down menu by clicking on profile tab on top right corner of the dashboard as shown below screen:
- A click on “Change Password” redirects user to the page as shown below.
- Change your password and confirm it, click on submit to update the password.
- Password will be changed for all connect partners which are registered with same user ID such as Lab, pharmacy, imaging etc.
4.3 Logout
Click on “Log out” to Log out from your account as shown below.
- user logging in for the first time will have to fill out their further personal details by clicking on “Account Configuration” menuat the top right corner of your dashboard.
- A click on profile drop-down menu displays the three options below.
1. Account Configuration
2. Change Password
3. Logout
2. Change Password
3. Logout
- Click on “Account Configuration from the drop-down.
- Fill out the mandatory fields and click “Next” button to continue.
- Select Lab all the lab test being offered by your Lab Center from the lab test list and fix price for each.
- Click “Next” button to set up your Lab Timing
- Click on “Finish” to complete the process.

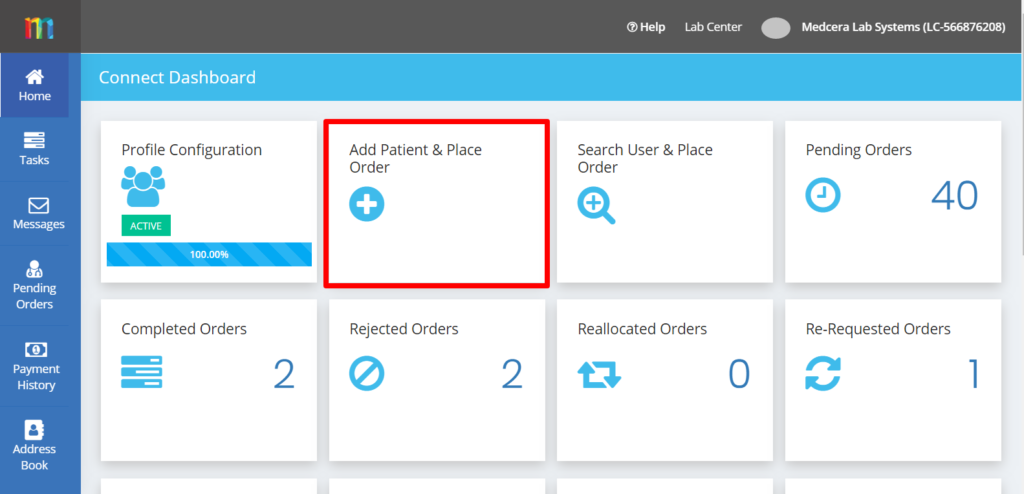
- Click on “Add Patient & Place order” card on the dashboard to register a new patient as shown below.
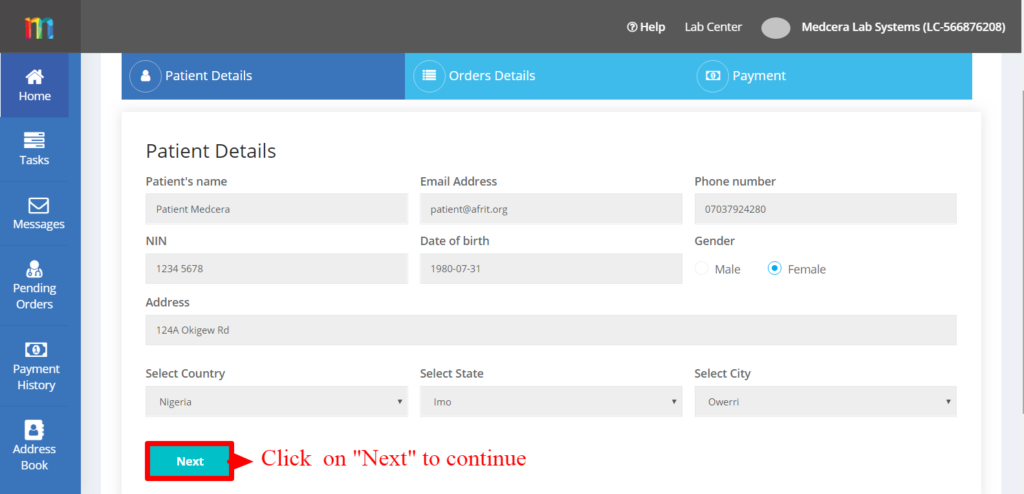
6.1 Step 1: Patient Details
- Fill out Patient’s personal details and click on “Next” button to continue Registration as shown below.
- Currency will be displayed at the time of Payment as per patient country of resident.
- Click on “Next” Button to continue Account Registration process.

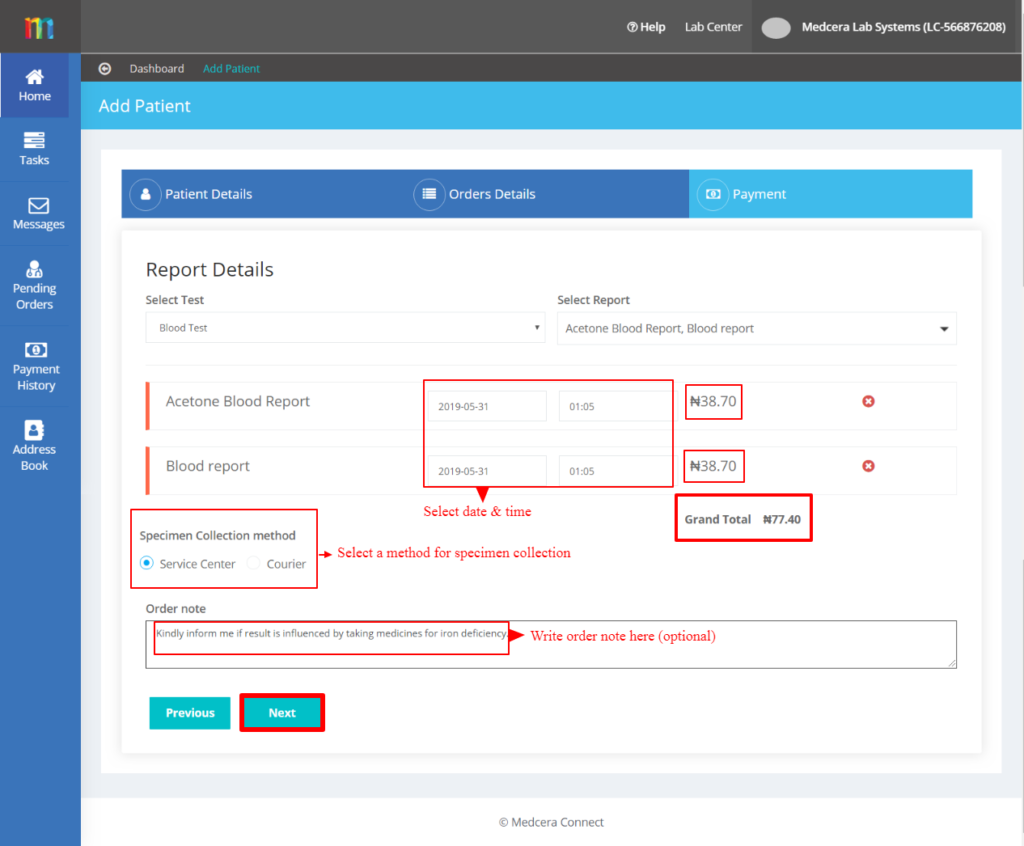
6.2 Step 2: Orders Details
- Lab Center can place order(s) on behalf of patient at the time of registration from their account.
- Select required test from “Select Test“ drop down menu as per Patient’s requirements.
- Select Report(s) from the “Select Report” drop-down which will be displayed according to selected Test.
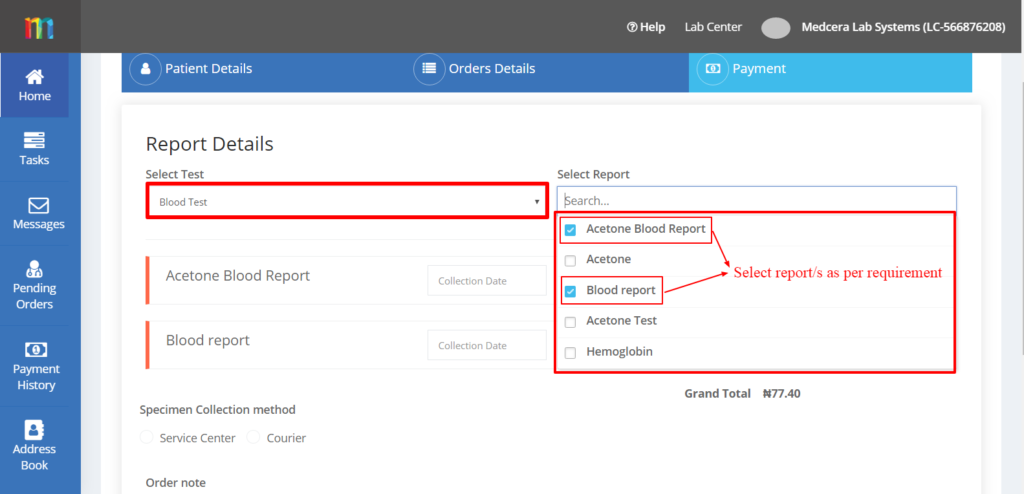
- Upon selection of Specific Test and corresponding reports, the price and total amount of selected test(s) will be displayed as shown below.
- Select date & time for the selected test(s) as per patient’s convenience.
- Select any Specimen Collection method from available services.
- State order note as per patient’s needs or queries.
- Click on “Next” button to continue patient registration.

6.3 Step 3: Payment
- A click on “Next” displays the screen below.
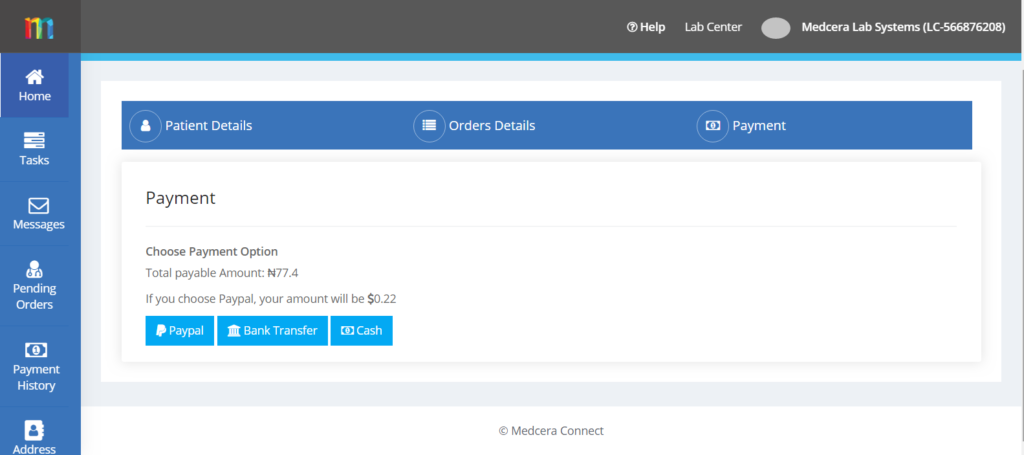
There are three options for payment method:
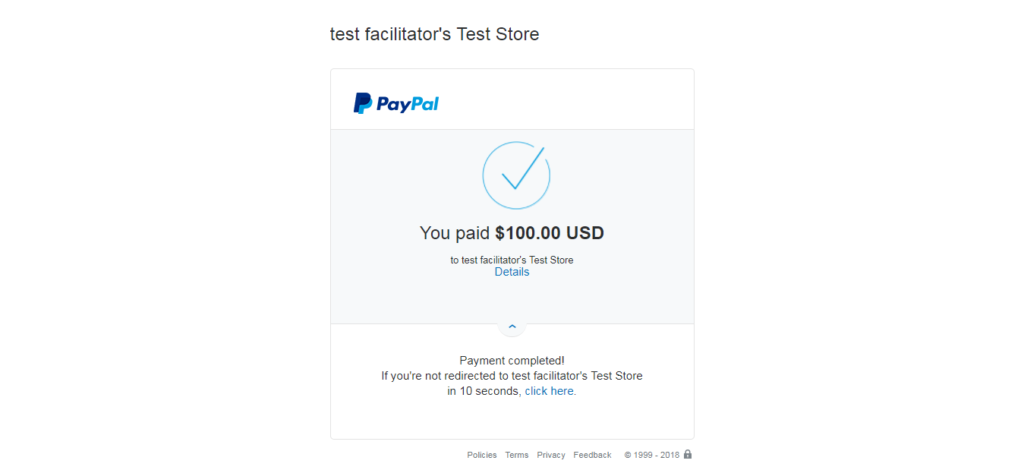
6.3.1 PayPal
- Click on “PayPal” option for the amount to be deducted from patient’s PayPal account.
- Payment amount will be converted into dollar from your currency as shown in the screen below.

6.3.2 Bank Transfer
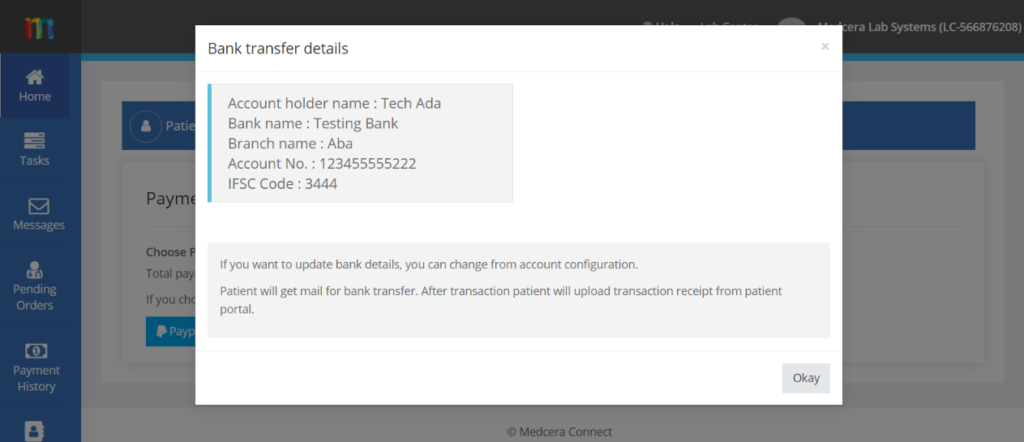
- A click on “Bank Transfer” option displays a popup showing bank details as seen below.
- Take note of the bank details and click on “okay” to confirm patient’s order.
- Money will be transferred to Lab Center bank account from patient’s bank account.
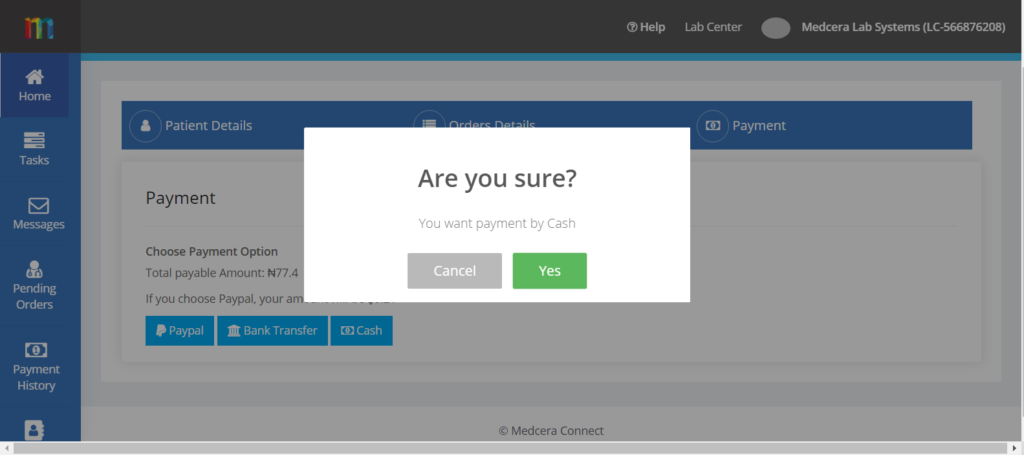
6.3.3 Cash
- A click on “Cash” option displays a pop up as shown below.
- Click “Yes” to confirm order.

- Upon confirmation of patient’s order, user will be redirected to the dashboard and the order will be accepted. (As the order does not need to be verified for acceptance when it is placed from Lab Center account on behalf of patient.
- Click on “Search User & Place order” card on the dashboard to register an existing patient on medcera as shown below.
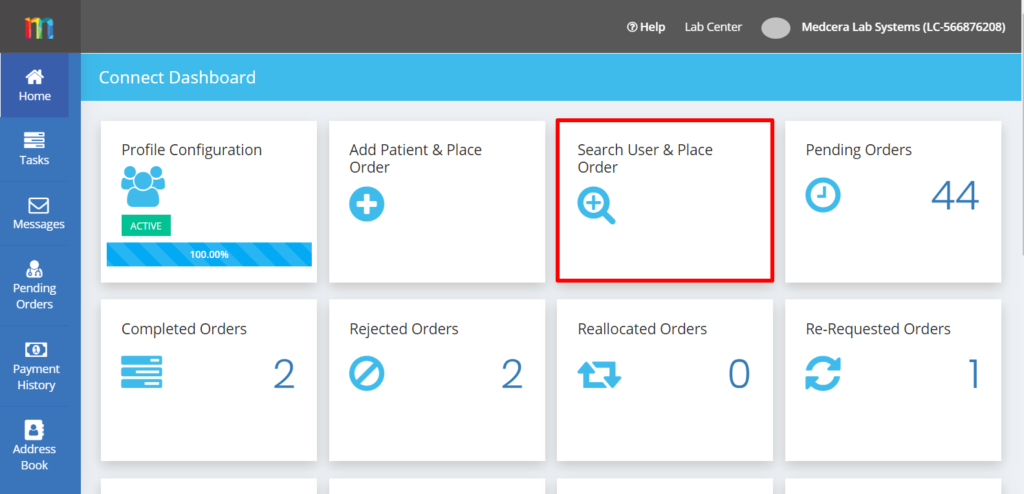
- A click on “Search user & Place order” displays the screen below.
- Two options to search for patient.
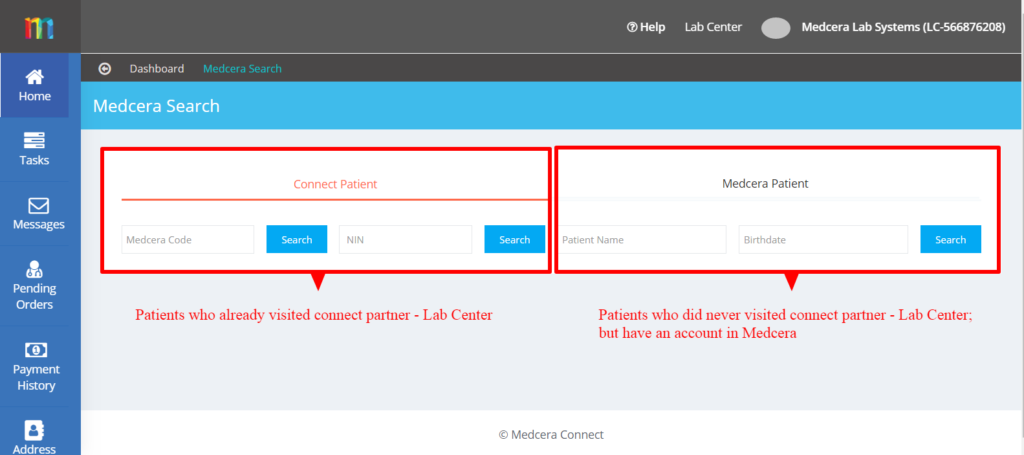
7.1 Connect Patient
- Search in “Connect Patient” for patient who has already visited Lab center and placed order(s).
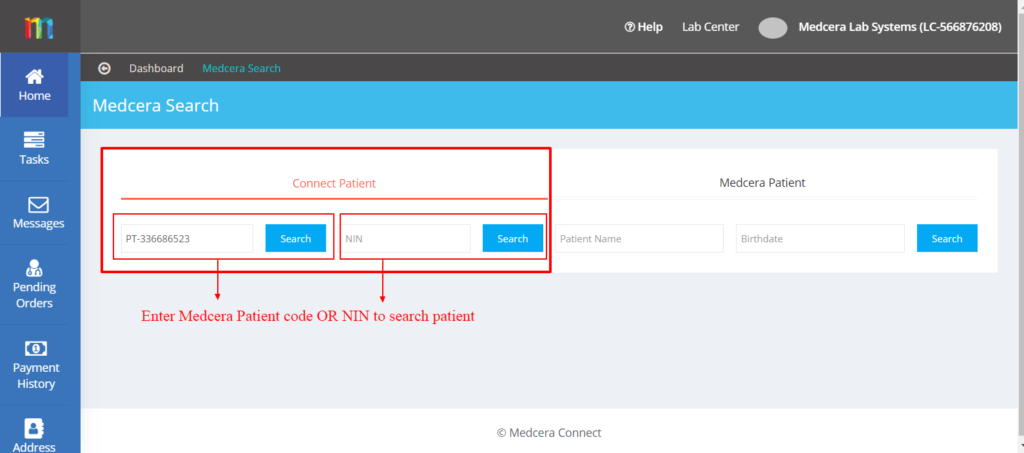
- Key in Medcera patient code or patient’s NIN (national Identity Number) to search whether the patient has already visited your lab center or not.
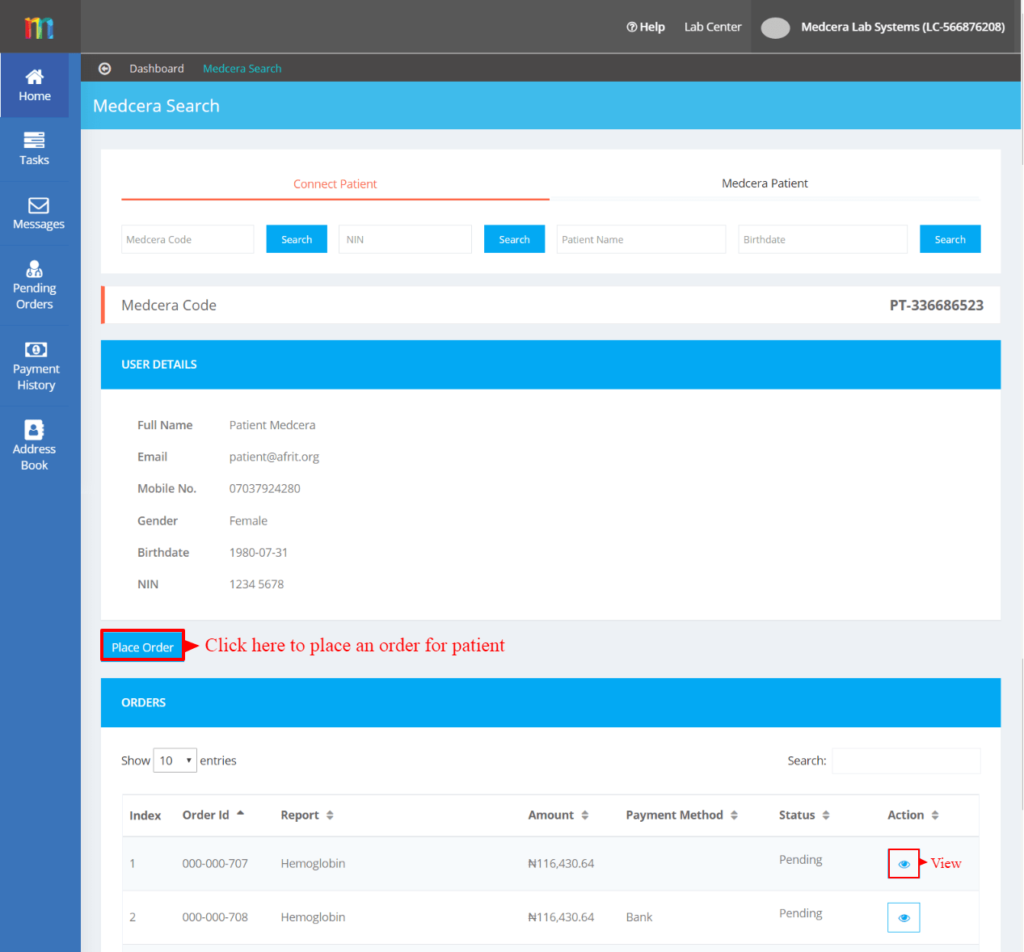
- If the patient you have searched for visited your Lab center previously, the screen below displays.
- It shows patient’s lab test/report history in your Lab Center.
- Click on view icon to view order detail.
- Click on “Place Order” button to place a new order.
7.1.1 Place Order: Step 1 Patient Details
- A click on “Place Order” dispplays the screen below showing patient details.
- Patient’s Details will be spooled by default from Medcera registered patient data base which is not editable.
- Click on “Next” button to continue.
7.1.2 Place Order: Step 2 Orders Details
- Lab Center can place order on behalf of patient from their account.
- Select required test from “Select Test “drop down menu as per Patient’s requirement.
- Select Report(s) from the “Select Report” drop-down which will be displayed according to selected Test.

- Selection of Specific Test and corresponding report displays the price and total amount of selected report(s).
- Select date & time for the selected reports as per patient’s convenience.
- Select any Specimen Collection method from the available options.
- State order note as per patient’s needs or queries.
- Click on “Next” button to continue patient registration.
7.1.3 Place Order: Step 3 Payment
- A click on “Next” button displays the screen below.

7.1.3.1 PayPal
- Click on “PayPal” option for the amount to be deducted from patient’s PayPal account.
- Payment amount will be converted into dollar from your country currency as shown as shown below.
7.1.3.2 Bank Transfer
- A click on “Bank Transfer” option displays a popup showing bank details as shown below.
- Take note of the bank details and click on “okay” to confirm patient’s order.
- Money will be transferred to Lab Center bank account from patient’s bank account.

7.1.3.3 Cash
- By clicking on “Cash” a pop up will be opened as shown below:
- Click “Yes” to confirm order.

- By confirming patient’s order, you will be redirected to the dashboard and the order will be accepted by default. (Because the order does not need to be verified for your acceptance, when it is placed from your account on behalf of patient.)
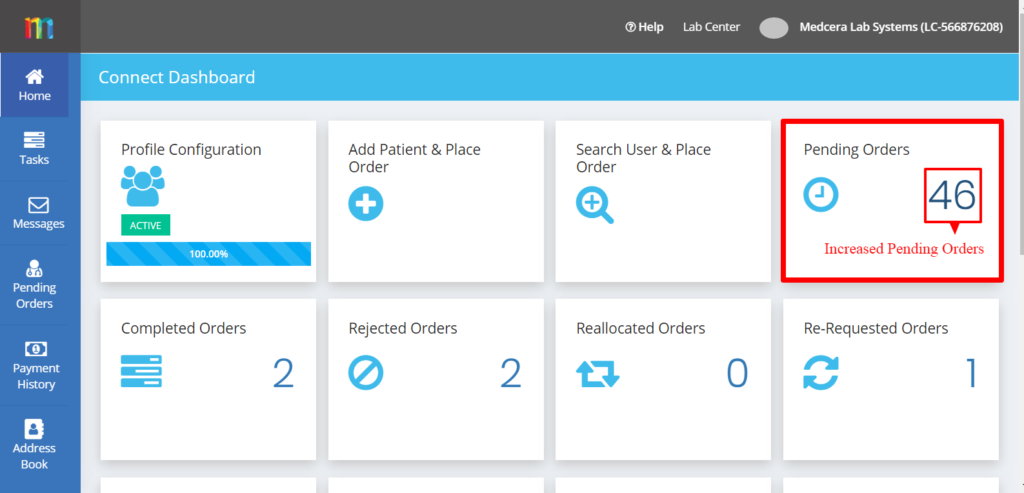
- You will see increased pending orders after placing order/s.
7.2 Medcera Patient
- Search in “Medcera Patient” for patient who has never visited your Lab center but has a Medcera account.
- Key in Medcera patient code or patient’s NIN (national Identity Number) to search whether the patient has a Medcera account or not.
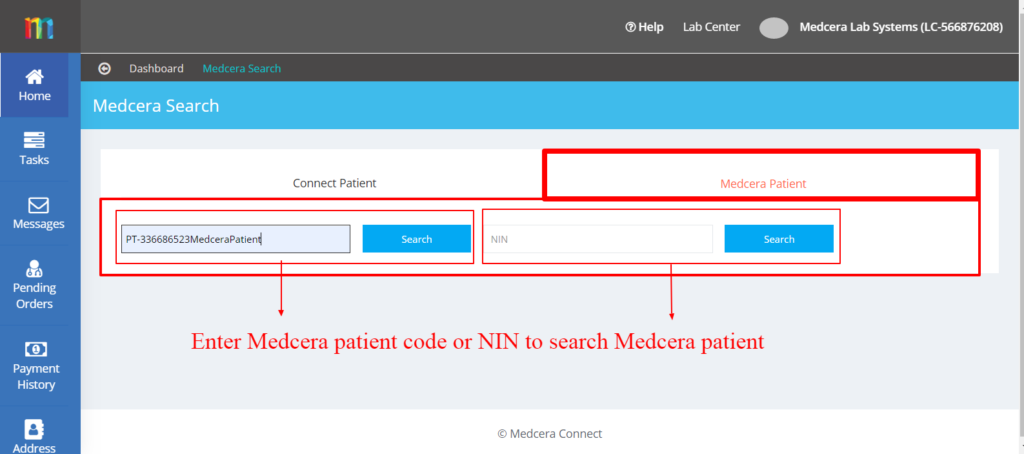
- If the patient you have searched for has an existing Medcera account, the account detail would display as seen below.
- It shows patient’s tests/reports history in other Lab centers
- Click on view icon to view order detail.
- Click on “Place Order” button to place a new order.

7.2.1 Place Order: Step 1 Patient Details
- A click on “Place Order” displays the screen below showing patient details.
- Patient’s Details will be spooled by default from Medcera registered patient data base which is not editable.
- Click on “Next” button to continue.

7.2.2 Place Order: Step 2 Orders Details
- Select required test from “Select Test “drop down menu as per Patient’s requirement.
- Select Report(s) from the “Select Report” drop-down which will be displayed according to selected Test.

- Selection of Specific Test and corresponding reports displays the price and total amount of selected report(s) as shown below.
- Select date & time for selected reports as per patient’s convenience.
- Select preferred Specimen Collection method from the available options.
- Place order note as per patient’s needs or queries.
- Click on “Next” button to continue patient registration.

7.2.3 Place Order: Step 3 Payment
- A click on “Next” button displays the screen below.

7.2.3.1 PayPal
- Click on “PayPal” option for the amount to be deducted from patient’s PayPal account.
- Payment amount will be converted into dollar from your country currency as shown below.

7.2.3.2 Bank Transfer
- A click on “Bank Transfer” option displays a popup showing bank details as shown below.
- Take note of the bank details and click on “okay” to confirm patient’s order.
- Money will be transferred to Lab Center bank account from patient’s bank account.

7.2.3.3 Cash
- A click on “Cash” displays a pop up as shown below.
- Click “Yes” to confirm order.
- Confirmation of patient’s order redirects user to the dashboard and the order will be accepted by default. (Because the order does not need to be verified for your acceptance when it is placed from your account on behalf of patient.)
Pending orders count increases after placing an orders.

- Click on “Pending Orders” card to view the pending orders placed by either Fusion or Patient that are yet to be accepted Lab Center as shown below.
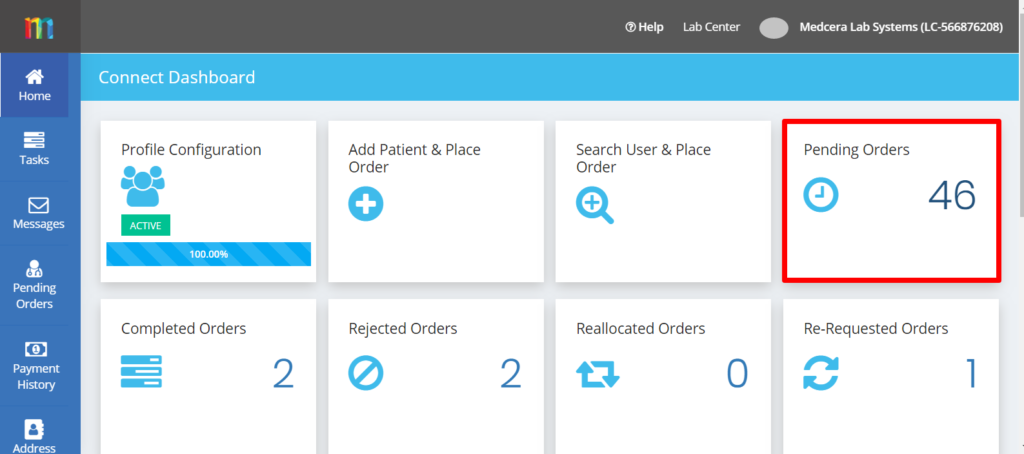
- A click on “Pending Orders” card displays a screen containing two categories of pending order: order placed by Fusion and orders placed by patient as shown below.
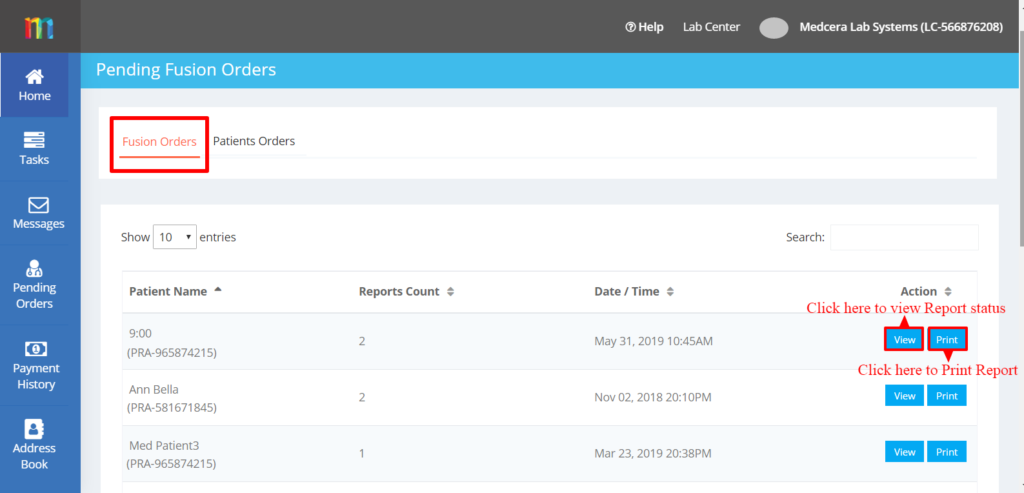
8.1 Pending Fusion Orders:
- A click on “Fusion Orders” displays the screen below.
- Fusion orders are those orders placed by Fusion to Lab Center.
- Click on “View” button to view report summary and report status.
- Click on “Print” button to print out report copy.
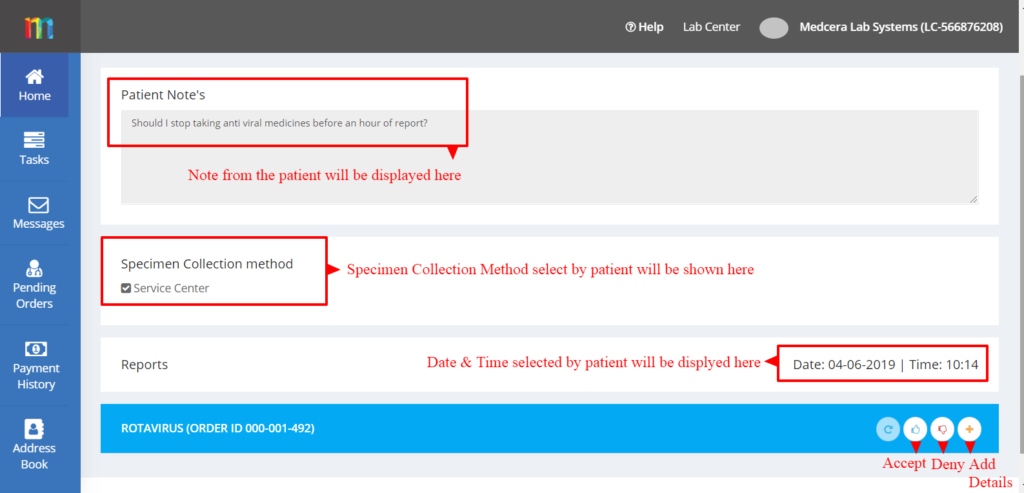
- A click on “View” displays the screen below containing Report status.
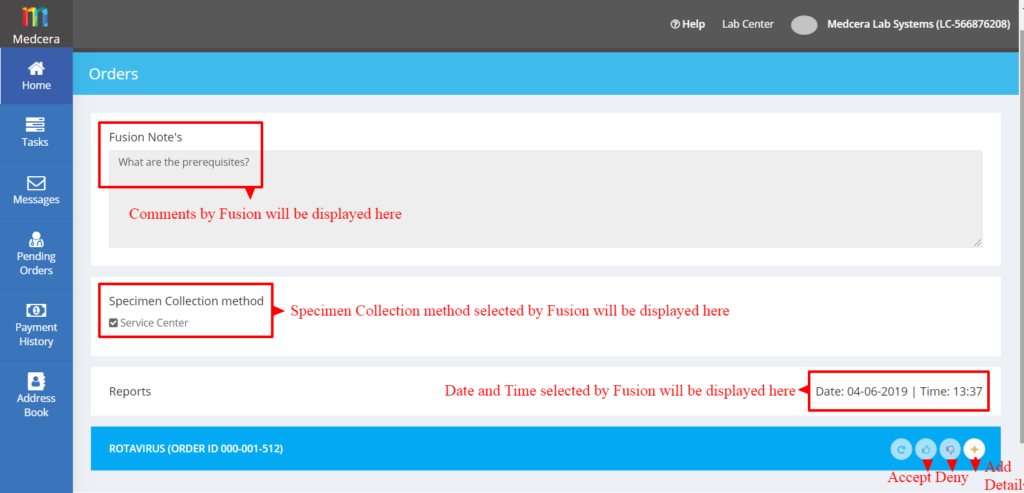
- A click on ( ) button displays pop up for confirmation.
- Click on “Yes, accept it!” button and order will be accepted by Lab Center.

- A click on ( ) button displays pop up to reject order as shown below.
- State the reason for report rejection and click on “Yes, deny it!” button and order will be rejected by Lab Center.

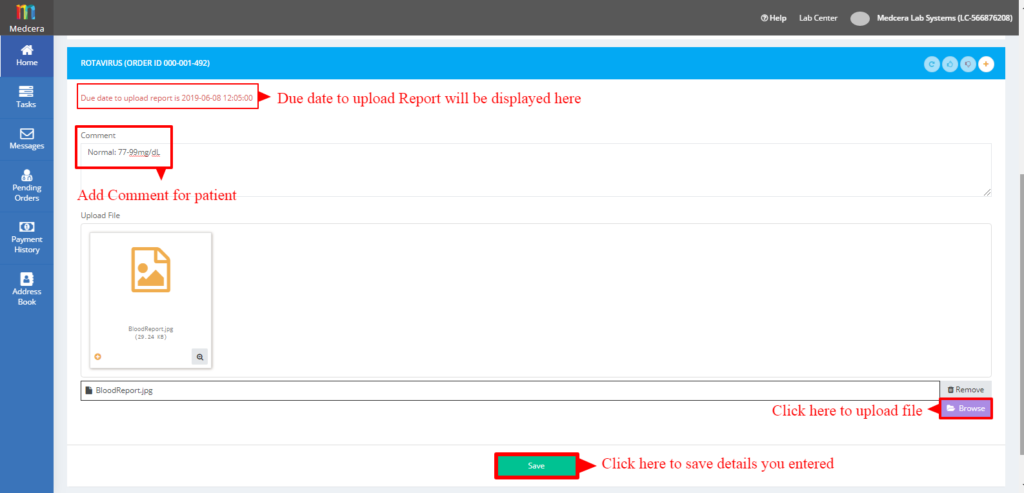
- To add order details or report(s of the order, click on ( ).
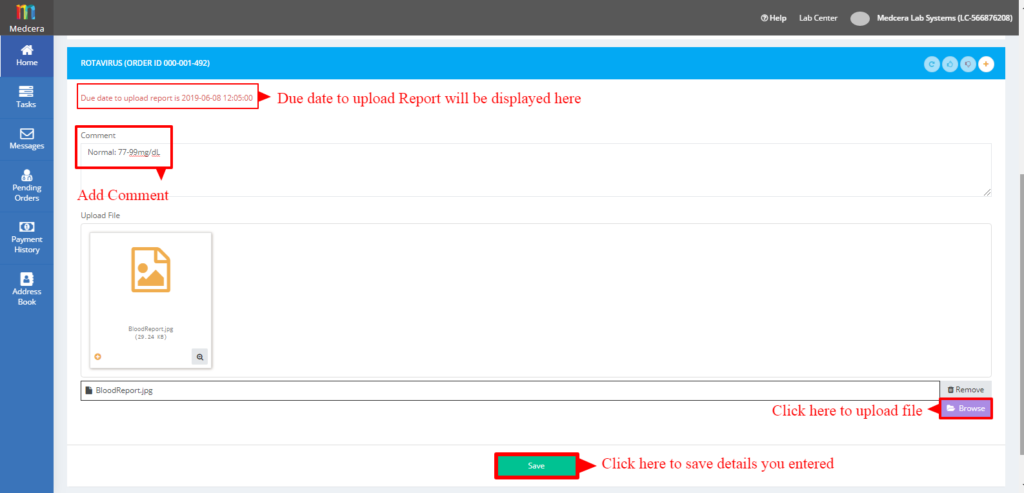
- You cannot add any details until Report is rejected.
- Click on add button to access the drop down as shown below.
- Check the due date to upload the report at the top.
- Add Note in comment area if you need to add any comment regarding the Report.
- Click on “Browse” button and upload report.
- Tap on “Save” to save the details but this will not be sent to the Fusion.
- Click on “Send to Fusion” button to send it to Fusion.
- A clicking on “Send it to Fusion” displays a pop up for confirmation. Click on “Yes” to confirm.
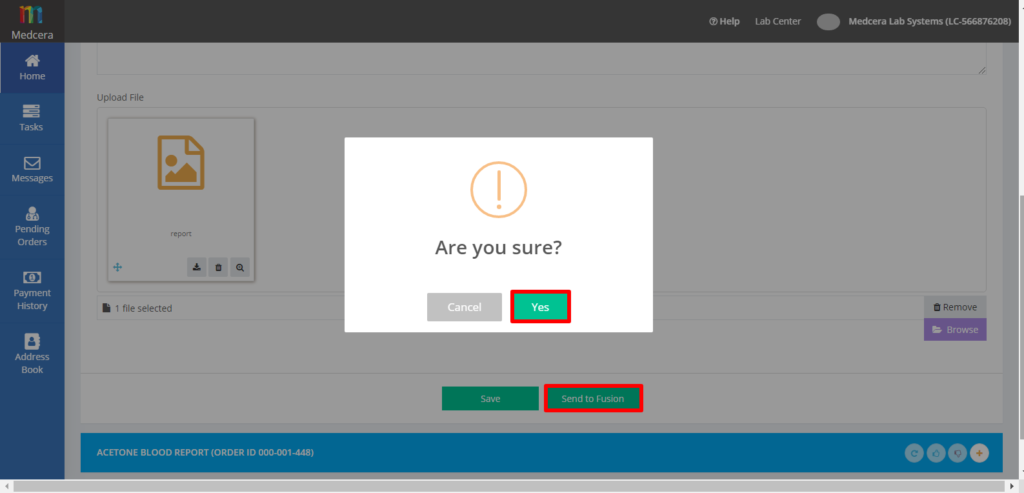
- After sending report to Fusion, a message will pop up at the bottom of the screen “Your report is submitted to Fusion”.
- When Fusion accepts the order, then it leaves “Pending Fusion Order” card.
- If Fusion rejects the order, it will remain in “Pending Order” card.
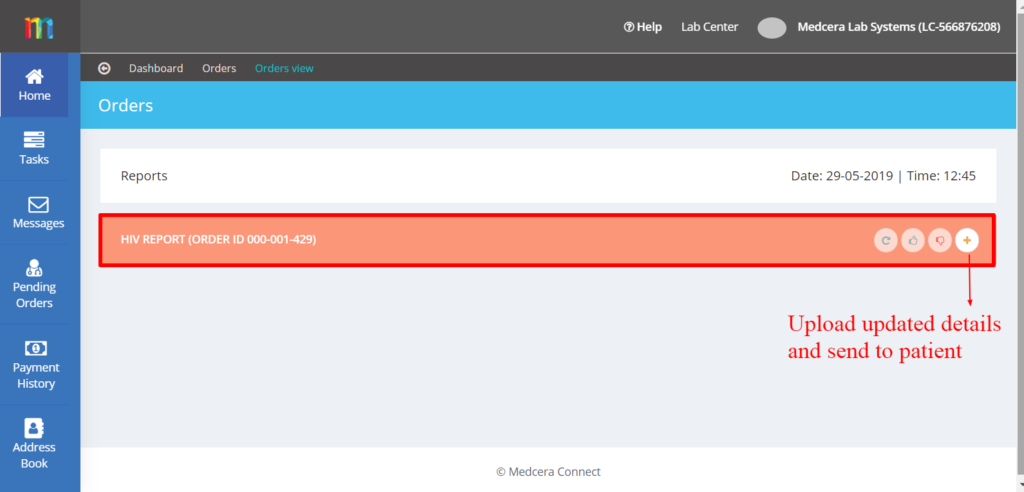
- Click on ( ) button to view reason for rejection by Fusion and upload updated details to again.

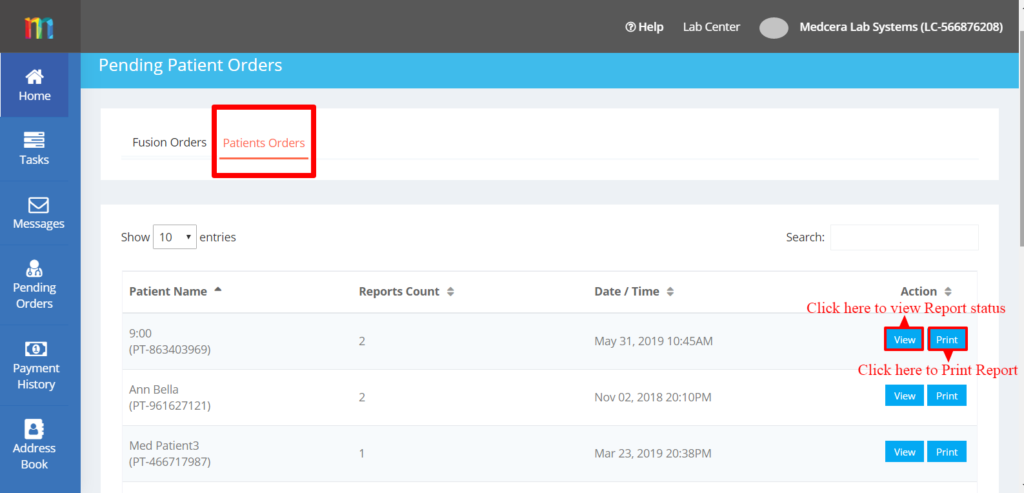
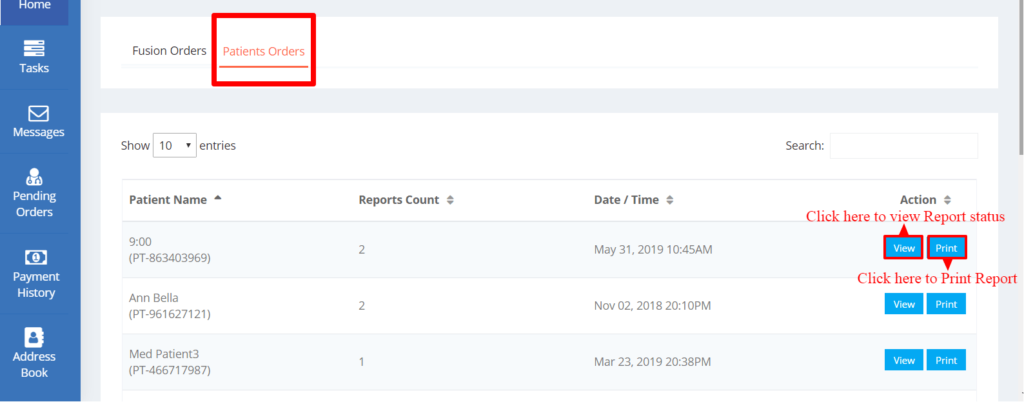
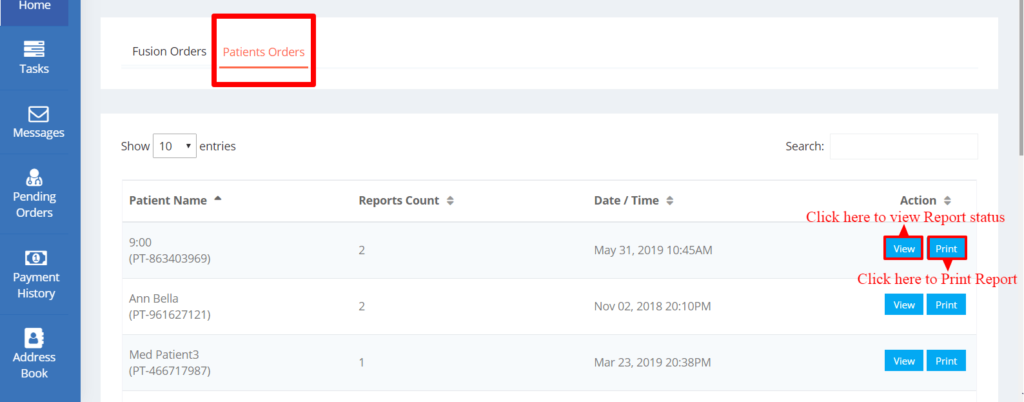
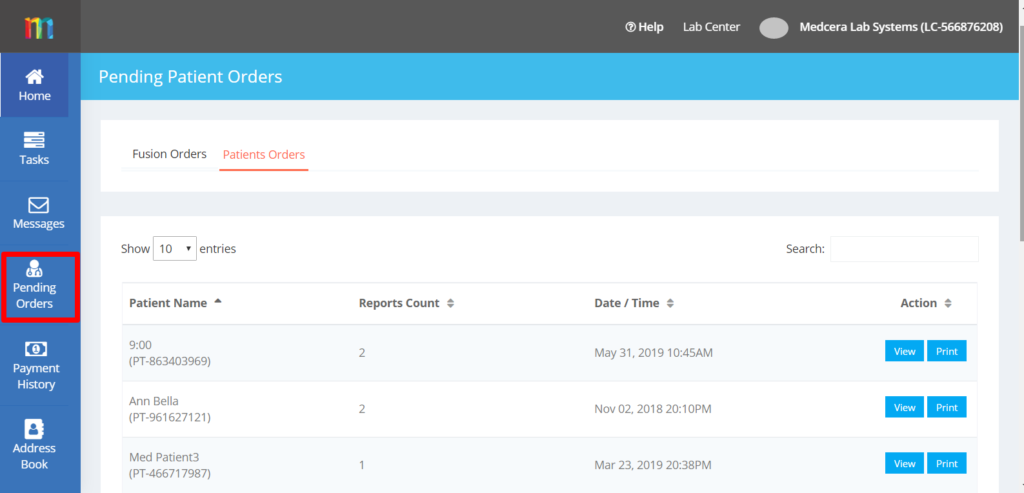
8.2 Pending Patient Order
- A click on “Patient Orders” displays the screen below.
- Patient orders are those orders placed by Patient to Lab Center.
- Click on “View” button to view the report summary and report status.
- Click on “Print” button to print out report copy.
- Click on “View” to view report status as shown below.
- A click on ( ) button displays a pop up for confirmation.
- Click on “Yes, accept it!” button and order will be accepted by Lab Center as seen below.
- A Click on ( ) button displays a pop up rejection of order.
- State the reason for rejection of the report and click on “Yes, deny it!” button and order will be rejected by Lab Center.

- To add order details or report/s of the order, click on ( ).
- You cannot add any details until you reject Report.
- Check due date to upload the report at the top.
- Add a Note in comment area if you need to add any comment regarding Report.
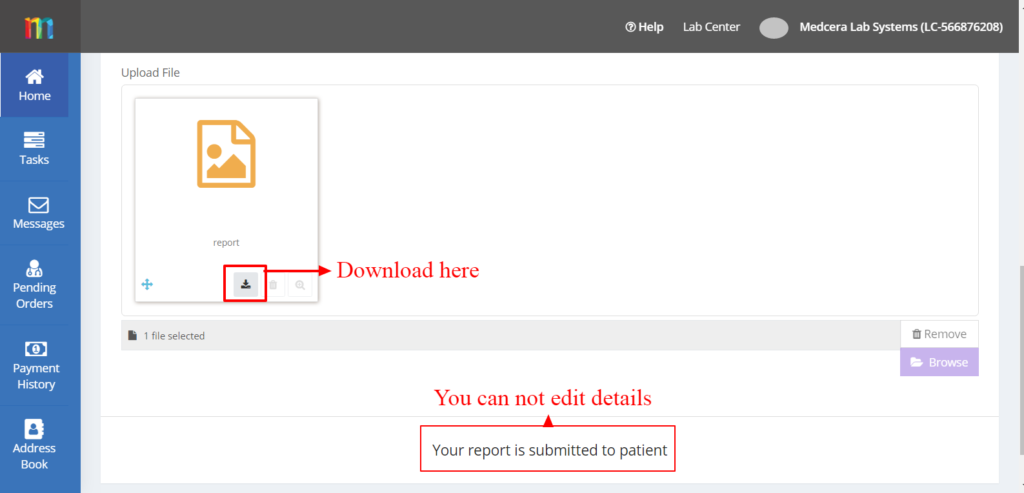
- Click on “Browse” button and upload report.
- Click on “Save” to save the details but this will not be sent to the patient.
- After saving, click on “Send to Patient” button to send it to patient.
- A click on “Send it to patient” displays a pop up for confirmation. Click on “Yes” to confirm.

- After sending report to the patient a message will display at the bottom of the screen “Your report is submitted to patient”.
- When Patient accepts the order, it will leave “Pending Patient Order” card.
- If patient rejects the order, it will remain in “Pending Order” card.
- Click on ( ) button to view reason for rejection by Patient and upload updated details again.
- Click on “Completed Orders” card on d the dashboard to view Fusion/Patient list of completed orders.
- Total number of completed orders display in “Completed Order” card as shown below.
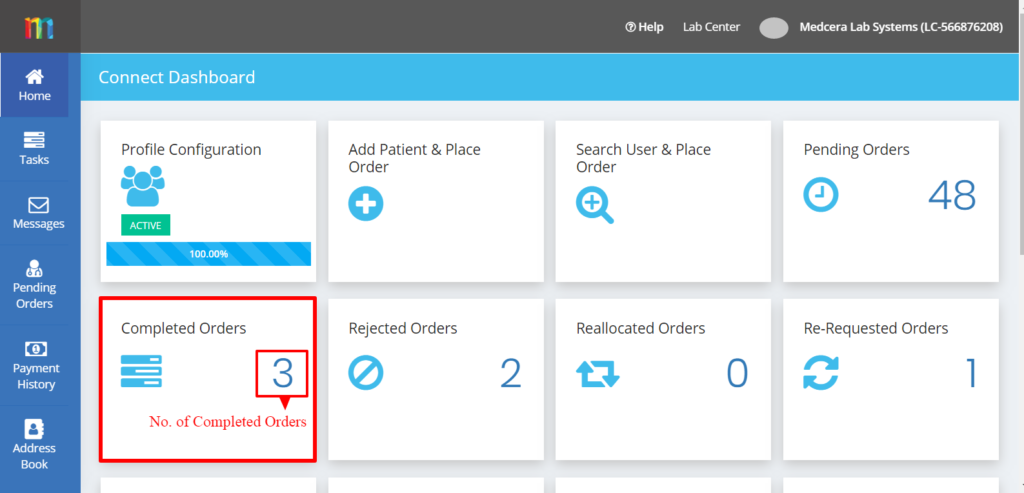
- There are two categories of Completed Orders: orders placed either by patient or Fusion as seen below.
9.1 Completed Fusion Orders:
- A click on “Fusion Orders” displays the screen below.
- Fusion completed orders are those completed orders placed by Fusion to Lab Center.
- Click on “View” button to view the report details.
- Click on “Print” button to print out report copy.

- A click on “View” displays Report status:
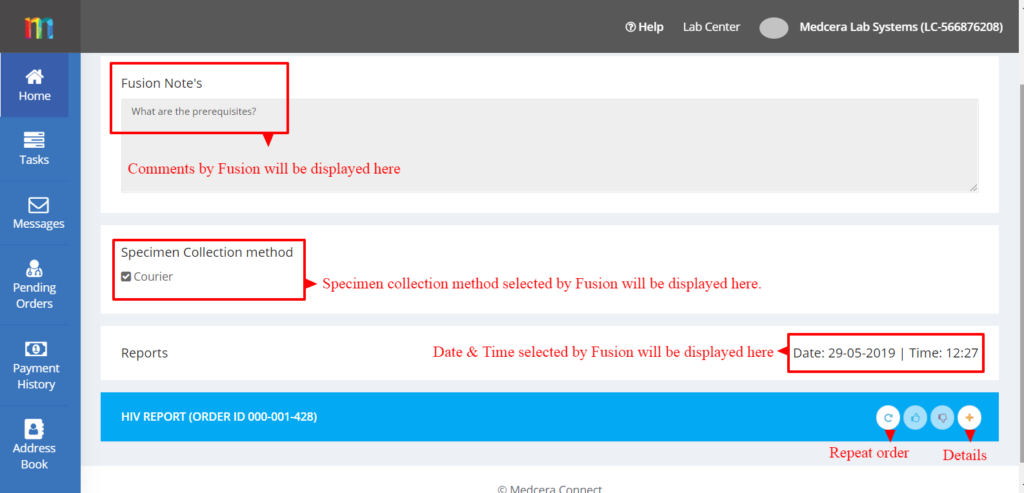
- Click on ( ) to view the details relating to the Report.
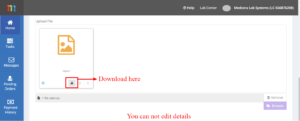
- Verify details of the report and download report if required but details are not editable for completed reports.
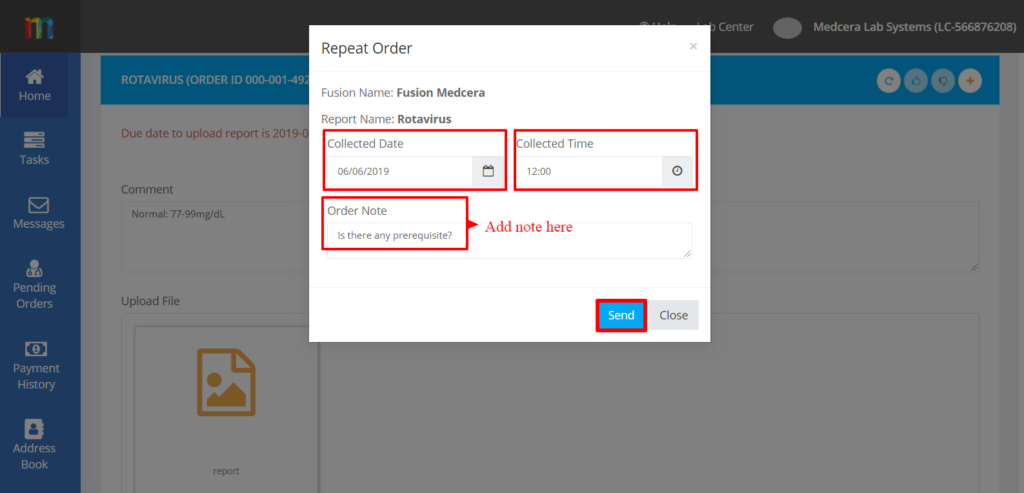
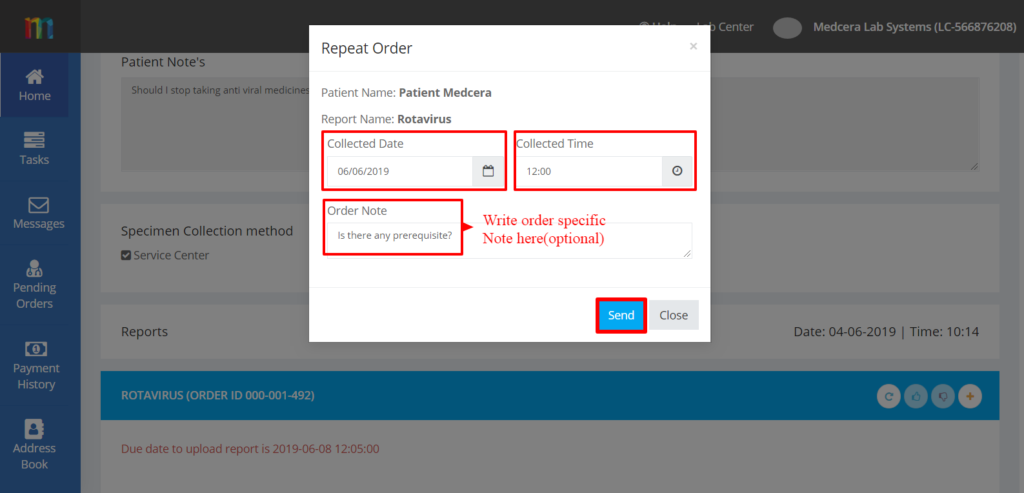
- Same order can be repeated.
- “Repeat” ( ) button is enabled for completed orders only.
- A click on “Repeat” button displays popup
- Select specific Date & Time and add order Note.
- Click “Send” button to place the repeated order.
9.2 Completed Patient Order
- By clicking on “Patients Orders” below screen will be displayed:
- Patient orders contain the list of the orders placed by Patient to your Lab Center.
- Click on “View” button to view the report summary and report status.
- Click on “Print” button to print out report copy.
A click on “View” displays Report status.

- Tap on ( ) to view the details relating to the Report.
- Verify details of report and download report if required but details are not editable for completed reports.
- Same order can be repeated.
- “Repeat” ( ) button is enabled for completed orders only.
- A click on Repeat displays a popup as seen below.
- Select specific Date & Time and add order Note.
- Click “Send” button to place the repeated order.
- Click on “Rejected Order” on the dashboard to view orders rejected by Lab Center as shown below.
- In the “Rejected Order,” card on the dashboard, total number of Rejected orders displays as shown in the screen below.
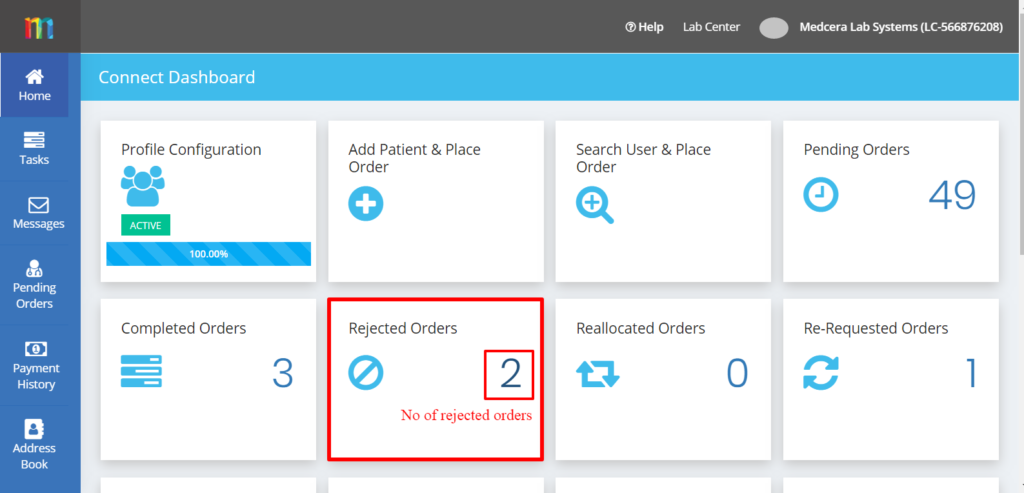
- The “Rejected Orders” card shows two categories: orders rejected either by Fusion or Patient as seen below.
10.1 Rejected Fusion Orders:
- A click on “Fusion Orders” displays the screen below.
- Fusion rejected orders are those orders placed by Fusion to Lab Center.
- Click on “View” button to view the report details.
- Click on “Print” button to print out report copy.

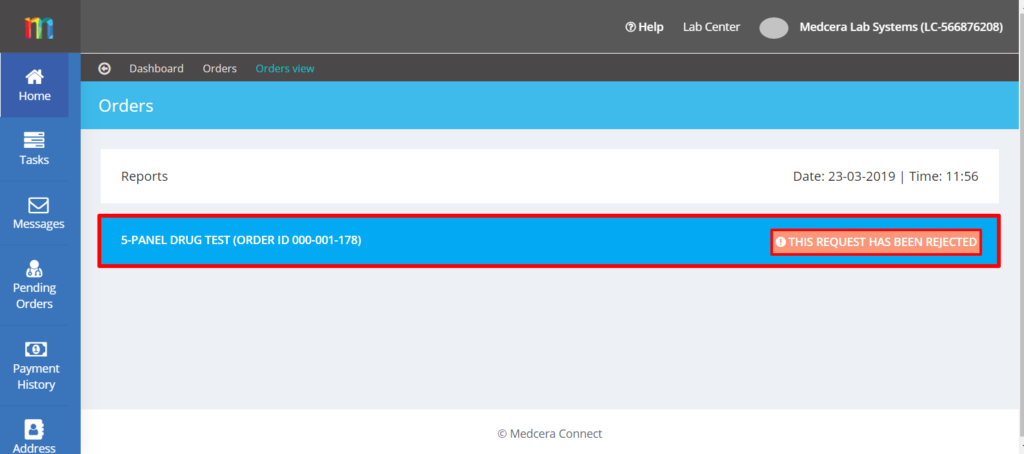
- A click on “Views” button displays the screen below.
- Rejected order is shown in red notice label as seen below.
- You cannot modify the order that is rejected once.

10.2 Rejected Patient Orders:
- A click on “Patient Orders” displays the screen below.
- Patient rejected orders are those orders placed by Patient to Lab Center.
- Click on “View” button to view the report details.
- Click on “Print” button to print out report copy.
- A click on “Views” button shows the screen below.
- Rejected order is shown in red notice label as seen below.
- You cannot modify the order that is rejected once.
- Click on “Re-Requested Orders” card on the dashboard to view Re-Requested Orders as shown below.
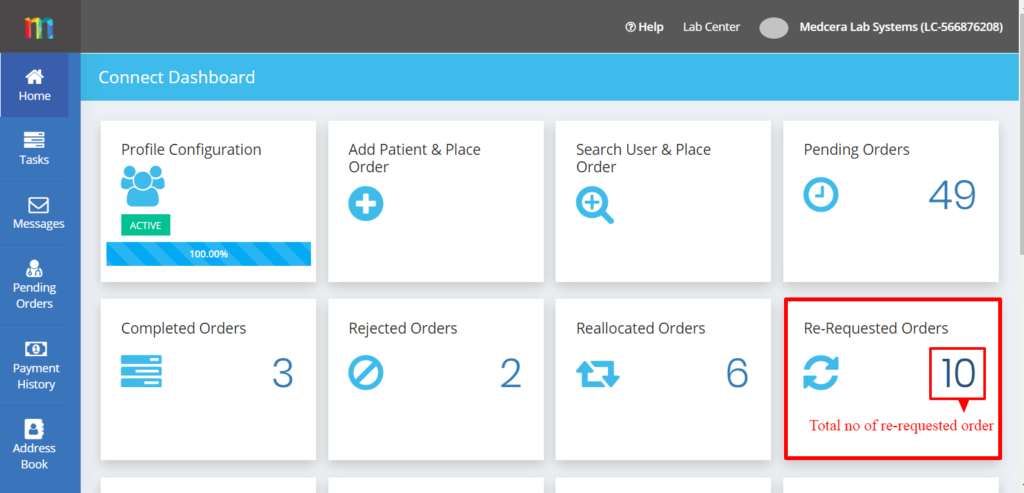
- A click on “Re-requested” card displays orders placed by either Fusion or Patient.

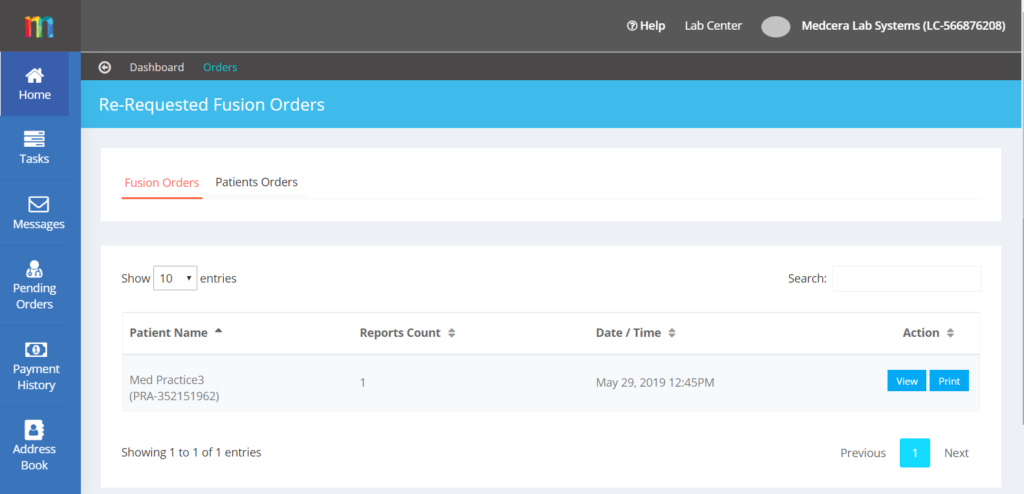
11.1 Fusion Re-Requested Orders:
- A click on “Fusion Orders” shows the screen below.
- Fusion re-requested orders are those order placed by Fusion to Lab Center.
- Click on “View” button to view the report summary and reason for re-requested order by Fusion.
- Click on “Print” button to print out report copy.
- A click on “View” shows a Report that is re-requested by Fusion as shown below.

- A click on the plus sign ( ) drop down displays report details as shown below.
- In the screen below, due date will be shown at the top to send re-requested report to Fusion.
- Fusion decline note will be shown including why Fusion re-requested the report.
- Lab can view, download, delete or add new updated report.
- Click on “save” button to complete the process.
11.2 Patient Re-Requested Orders:
- A click on “Patients Orders” displays the screen below.
- Patient re-requested orders are those orders placed by Patient to Lab Center.
- Click on “View” button to view the report summary and reason for re-requested order by patient.
- Click on “Print” button to print out report copy.
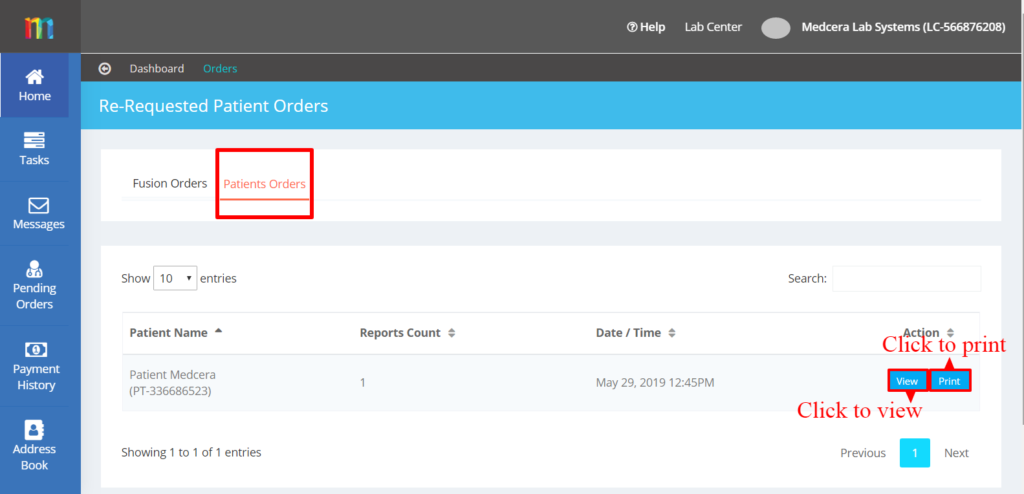
- A click on “View” button displays a report that is re-requested by patient as seen below.

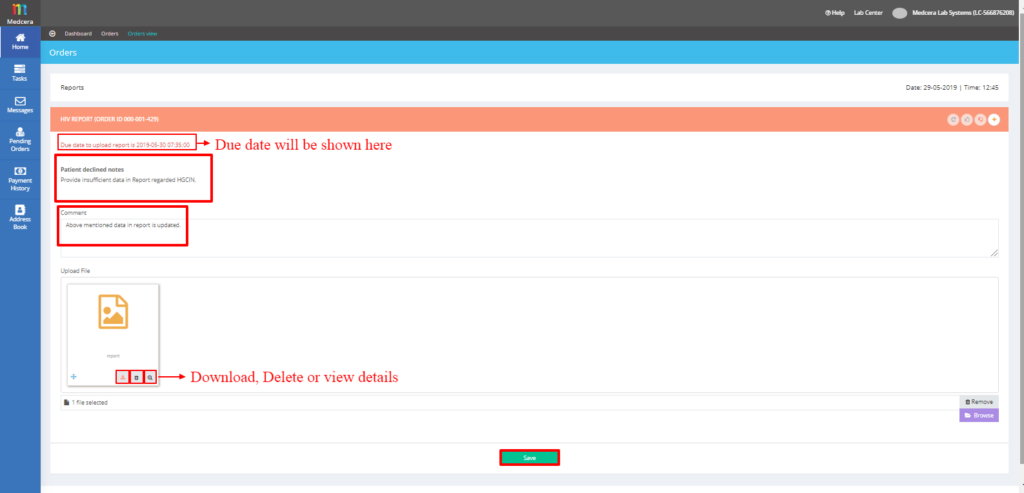
- A click on the plus sign ( ) drop down displays details related to the report as shown below.
- In the screen below, due date will be shown at the top to send re-requested report to patient.
- Patient declined note will be shown, which includes why patient re-requested the report.
- Lab Center can view, download, delete or add new updated report.
- Click on “save” button to complete the process.
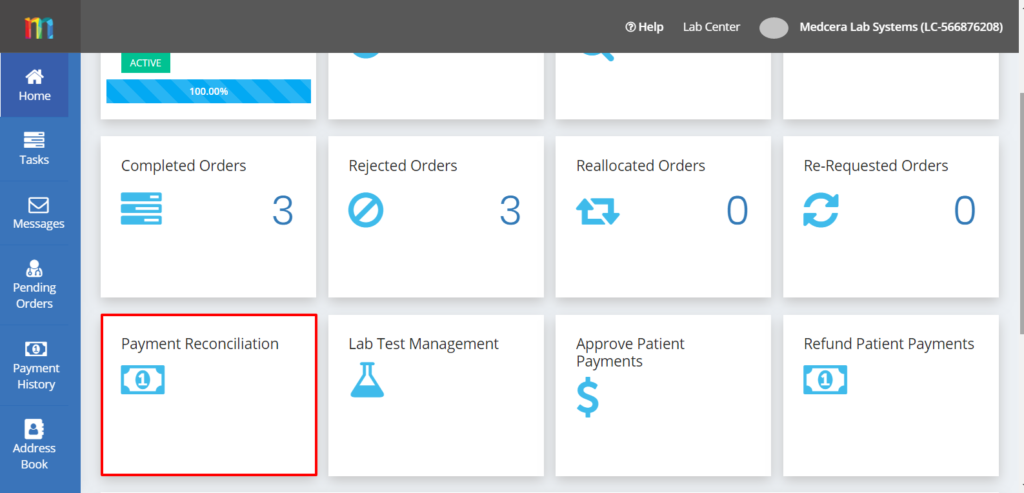
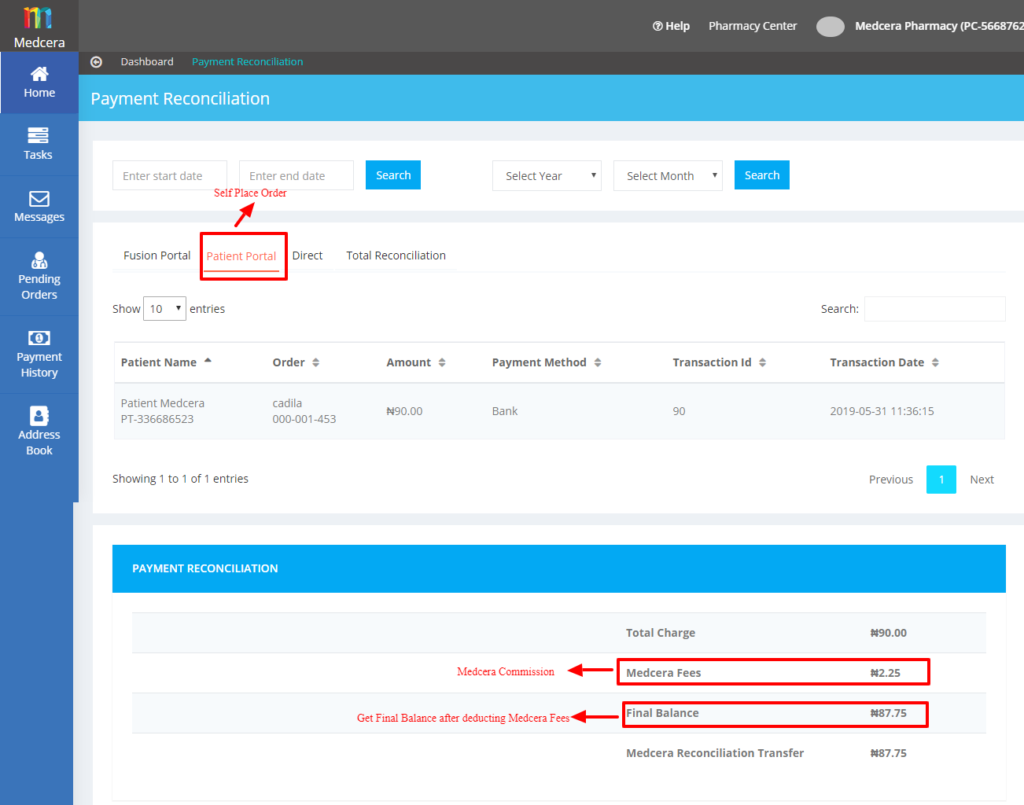
- Click on “Payment Reconciliation” on the dashboard which is divided into three parts as shown below.
- Fusion portal: This portal contains the orders placed by Fusion.
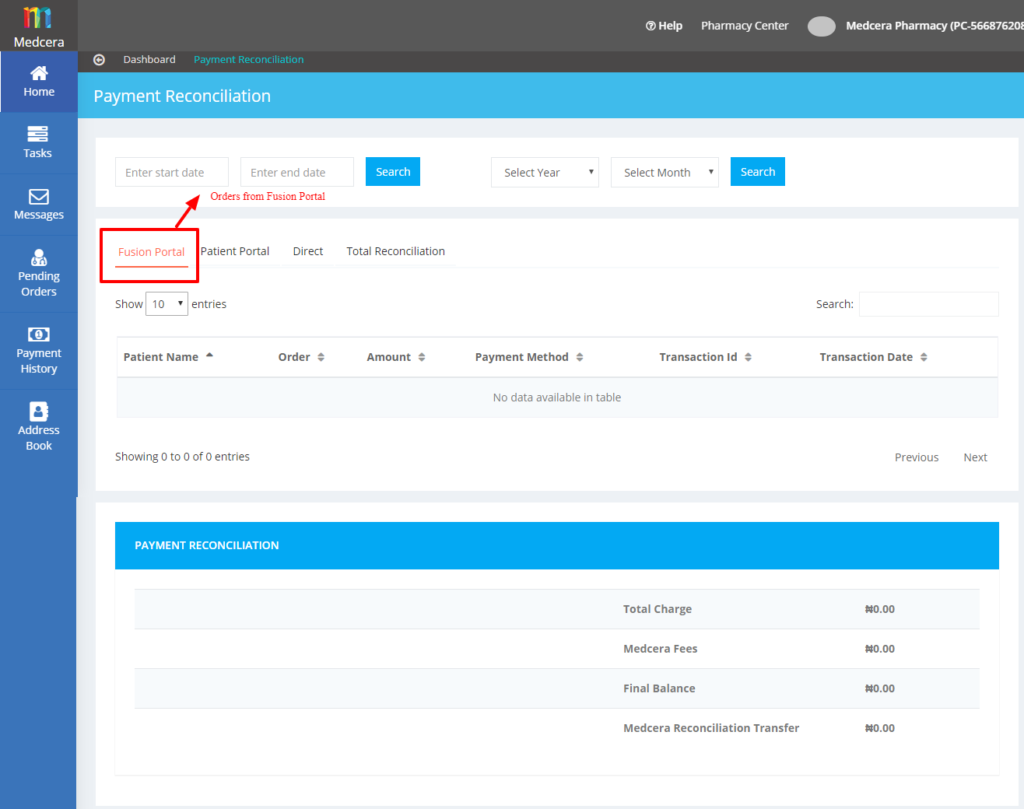
- Patient Portal: This portal contains the orders placed by patient.
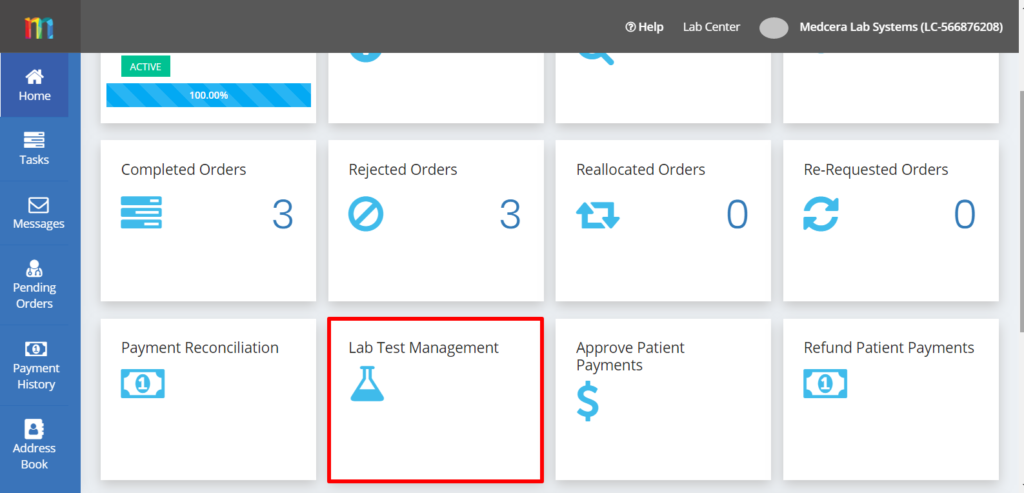
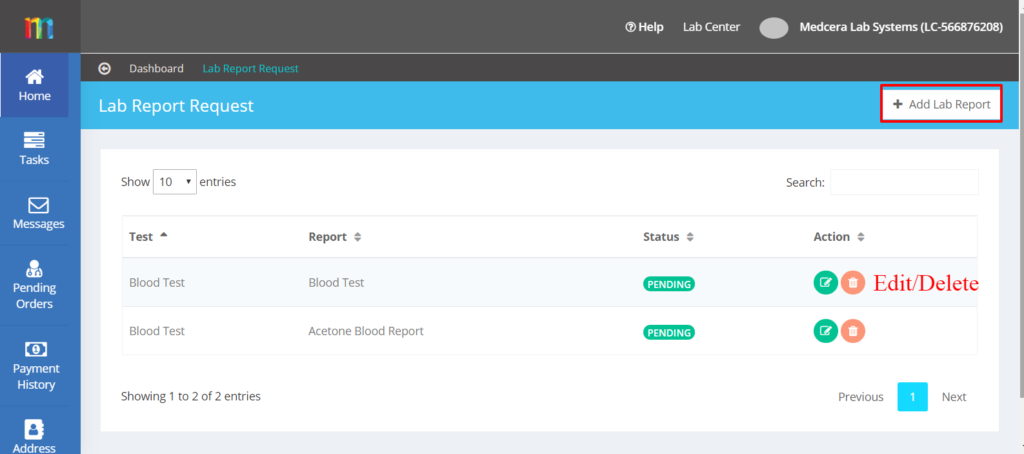
- Aclick on “Lab Test Management” card on the Dashboard displays the screen below.
- Click on “+Add Lab Report” button to Add new lab report as shown below.
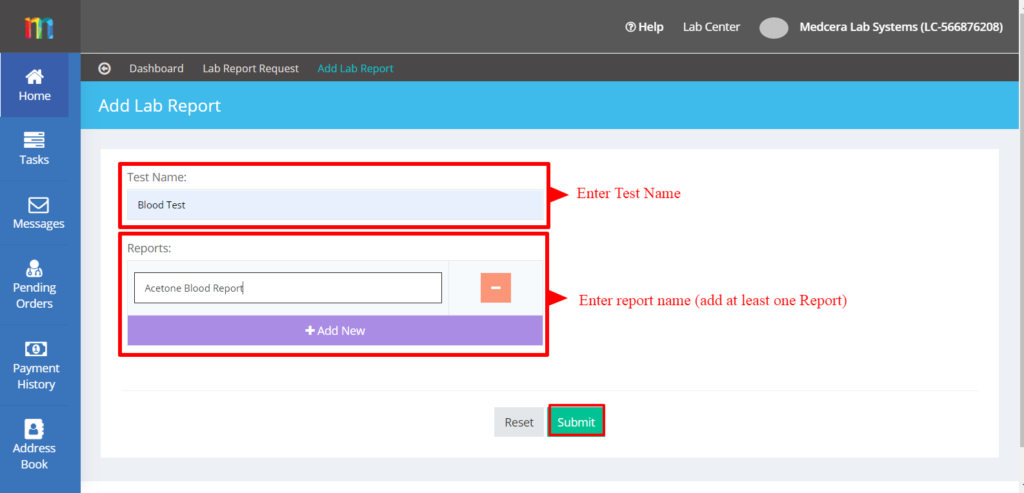
- Add test name in the “Test Name” tab.
- Add report according to your Test name as shown below.
- Click on “Submit” button to submit your Report.
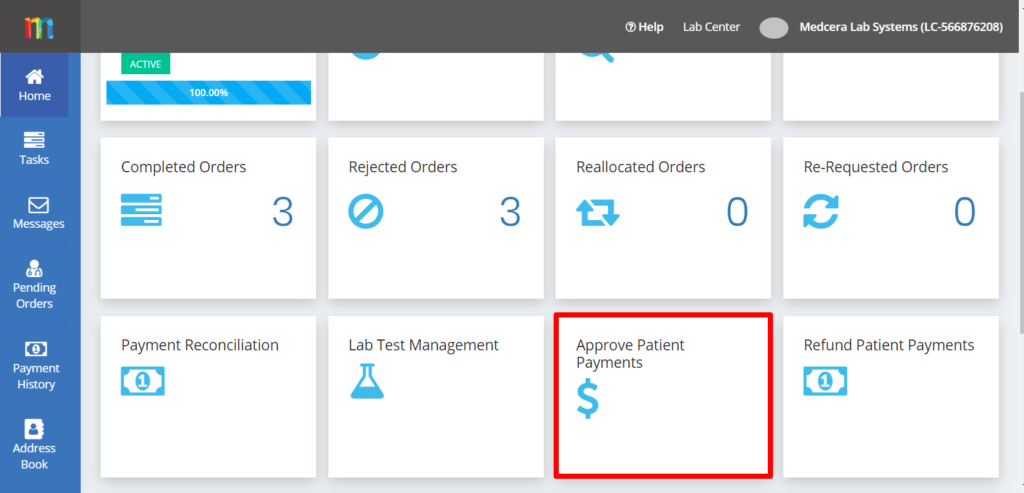
- Click on “Approve Patient Payment” card on the dashboard to Approve payment made by patient as seen below.
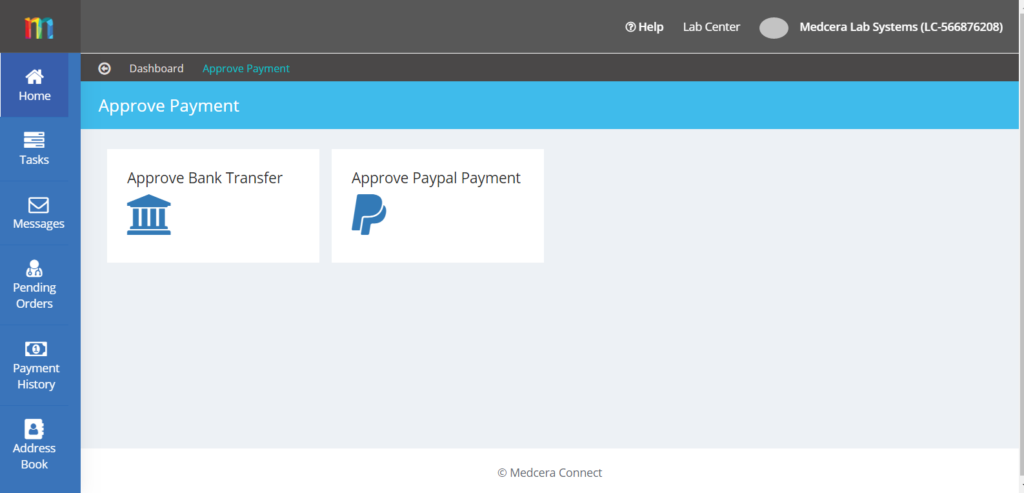
- A click on “Approve Patient Payment” card on the dashboard displays available payment options as shown below.
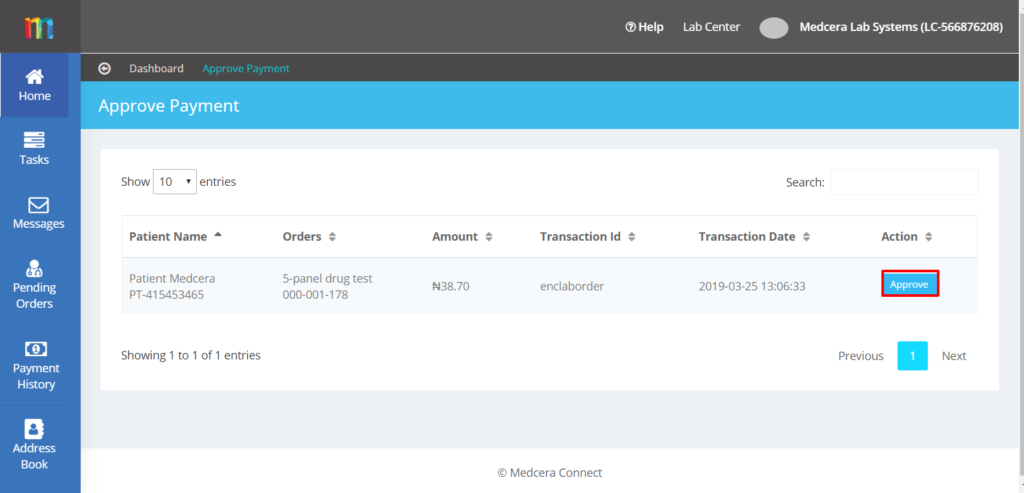
- A click on any of the options displays list of payment made for orders that have not been approved.
- Click on “Approve” button to approve payment made by patient.
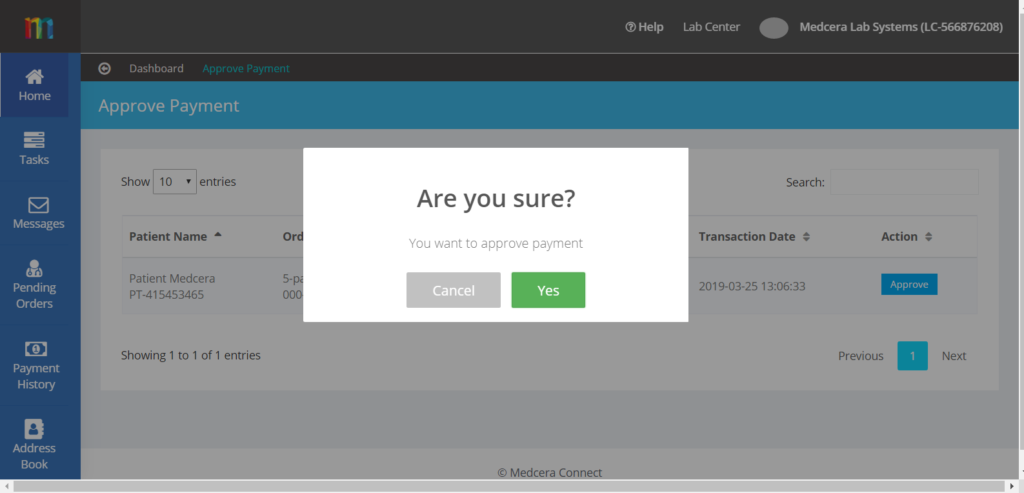
- A click on “Approve” button displays a Pop Up. Click “yes” to approve payment.
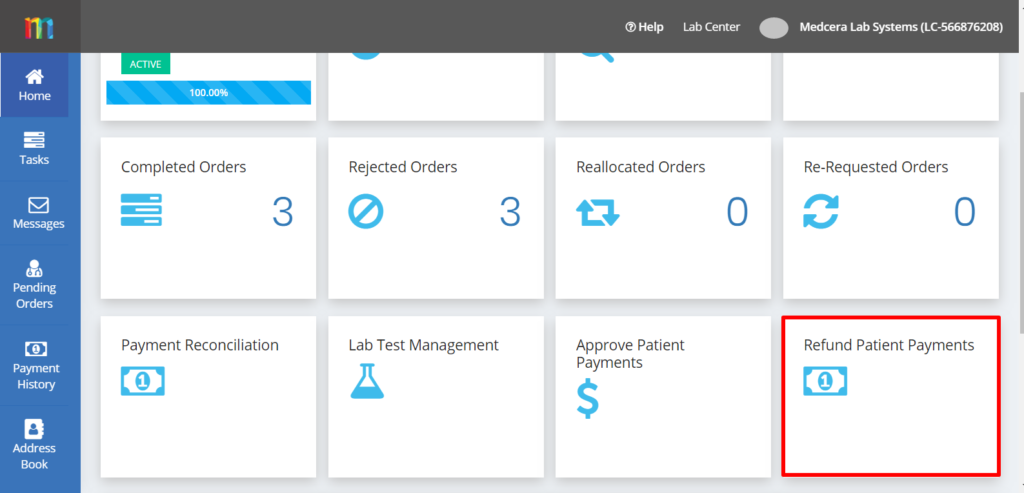
- Click on “Refund Patient Payments” card on the dashboard to refund payment to patient as shown below.
- A click on “Refund Payment” displays the screen below.

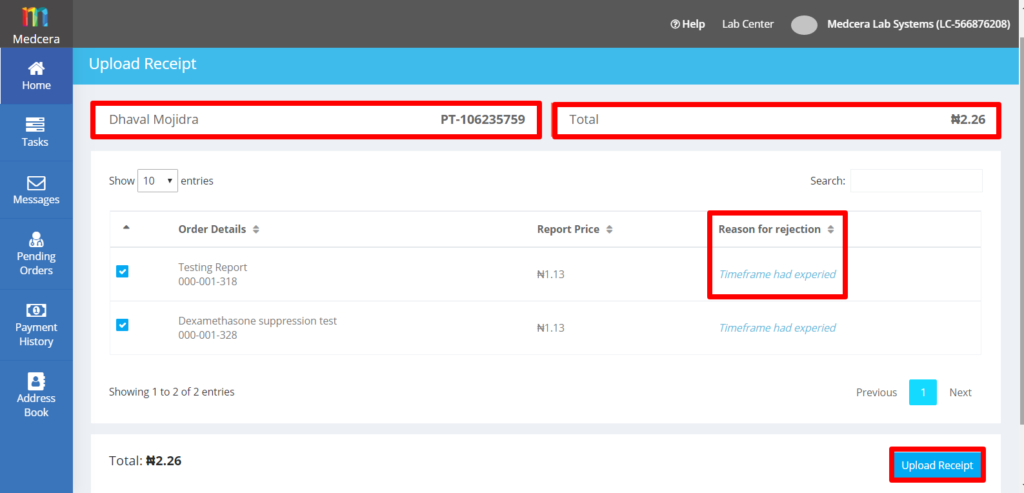
- Click on “View Bills” to upload the receipt of proceeded data as seen below.
- It displays patient Name and Total amount.
- Reason for rejection will be displayed as shown below.
- Click on “Upload Receipt” button to upload the receipt to upload the receipt for refunded amount.
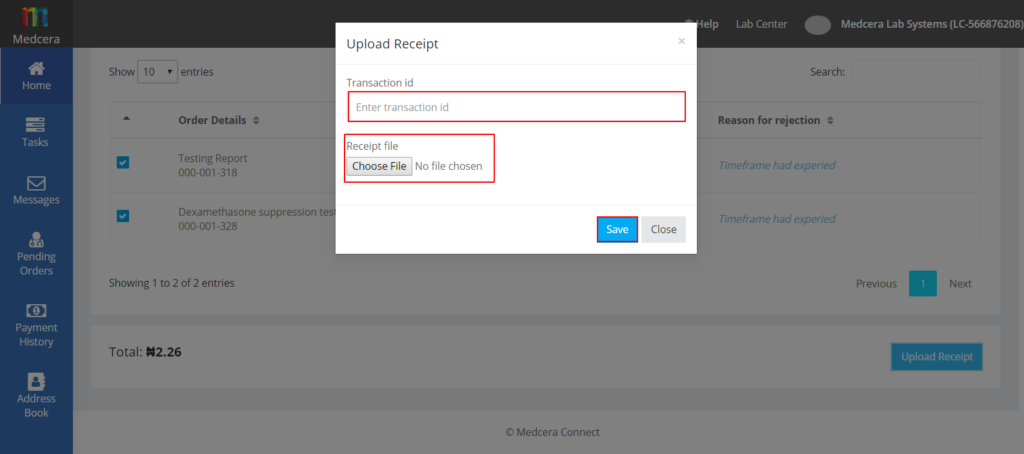
- A click on “Upload Receipt” displays a pop up as shown below.
- Enter Transaction ID and Upload receipt file for refunded amount.
- Click on “save” to save the details.
- A click on “View Order” shows Refund order as seen below.
- It will display patient name and Total amount of the report.
- It will display the reason for rejection and Payment options such as PayPal or Bank Transfer.
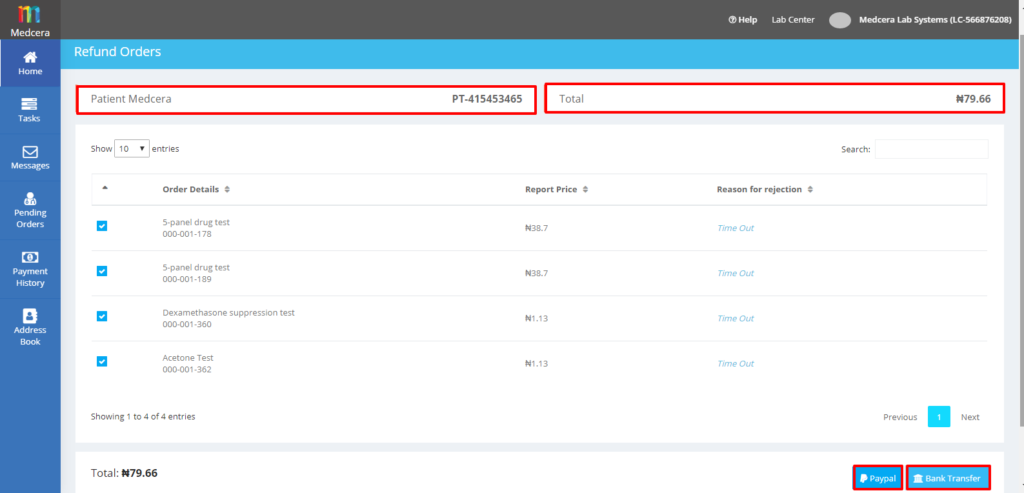
- Click on an option and take note of the Details. Click on “Details Noted”.

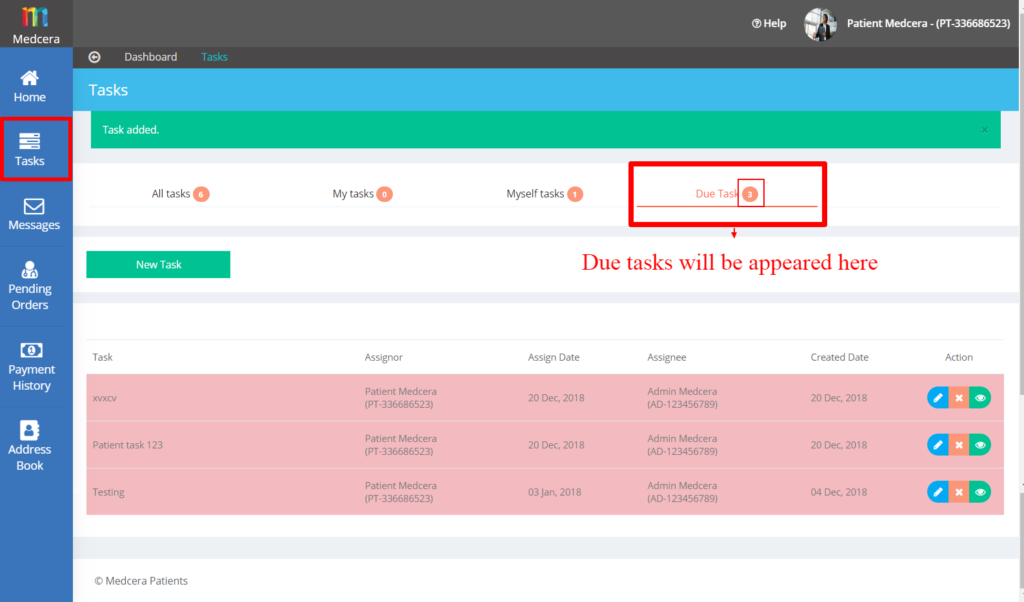
- Click on “Task” from Dashboard sidebar to view the status of the Refunded Amount, or the Amount that is in pending to be refunded.
16.1 View Task Record:
- A click on “Task” Card in the vertical side bar menu of the Dashboard displays the screen below.
- Click on “New Task” to add new task.
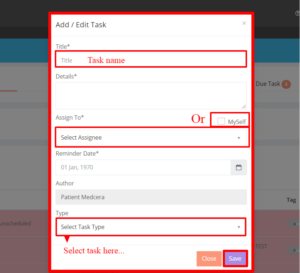
16.2 Add new Task:
- A click on “New Task” displays a pop up as shown below.
- Add “Title” of the Task that is to be assigned.
- Add description in “Details” session to add task related additional information.
- Select a recipient from the “Select Assignee” drop down or check “Myself” to assign Task for personal note.
- Select suitable Date for reminder and Select the type of the Reminder from the “Select Type” Drop down menu.
- Click on “Save” to set the Reminder or “Cancel” it.
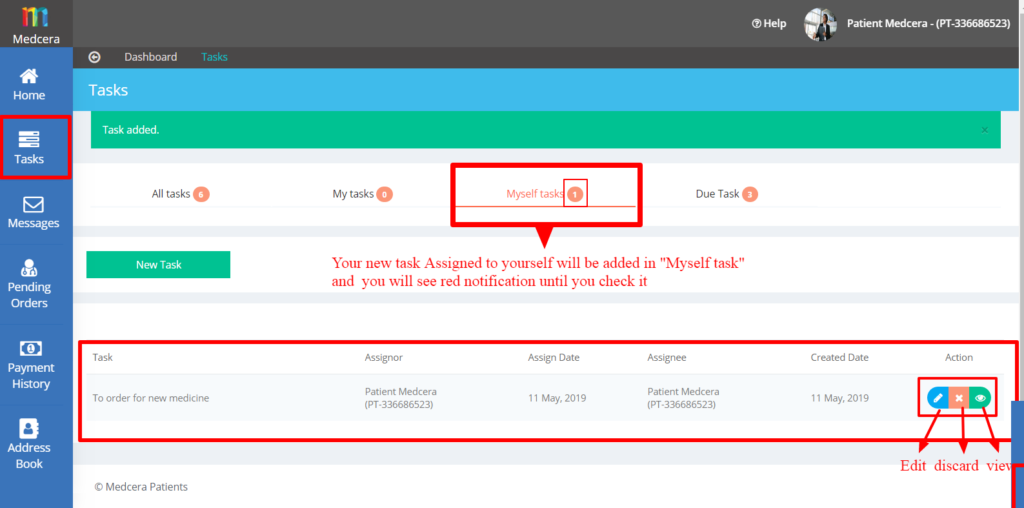
- Newly assigned task to yourself will be displayed under “Myself tasks” tab. A red Notification mark shows on Tab.
- Modify task by clicking “Edit”, “Discard”, “View” buttons relevant to the task.
- Due tasks will be displayed under “Due tasks” tab. A red Notification mark shows on Tab.
- Modify task by clicking “Edit”, “Discard”, “View” buttons relevant to the task.

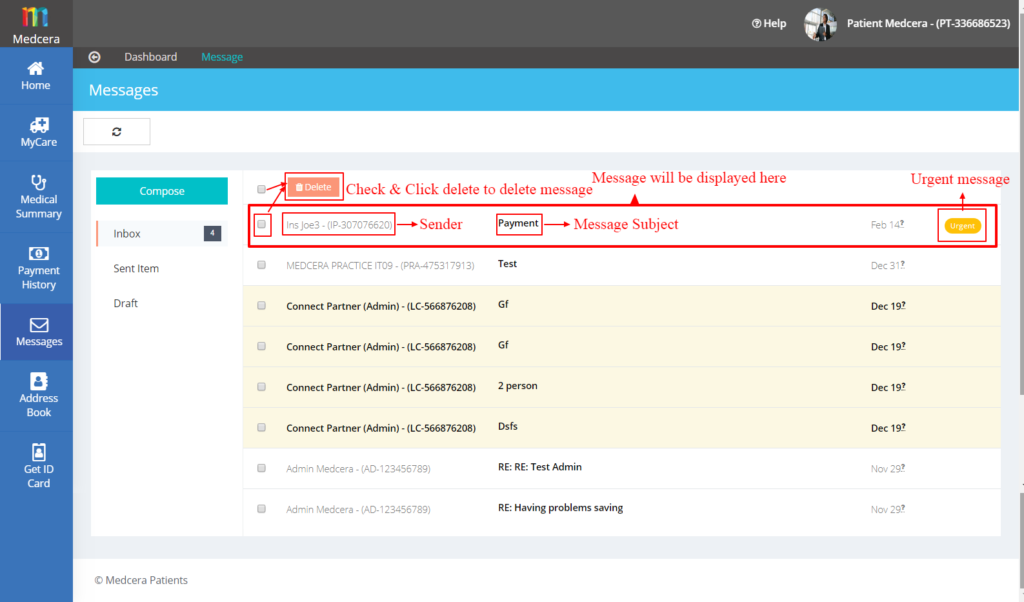
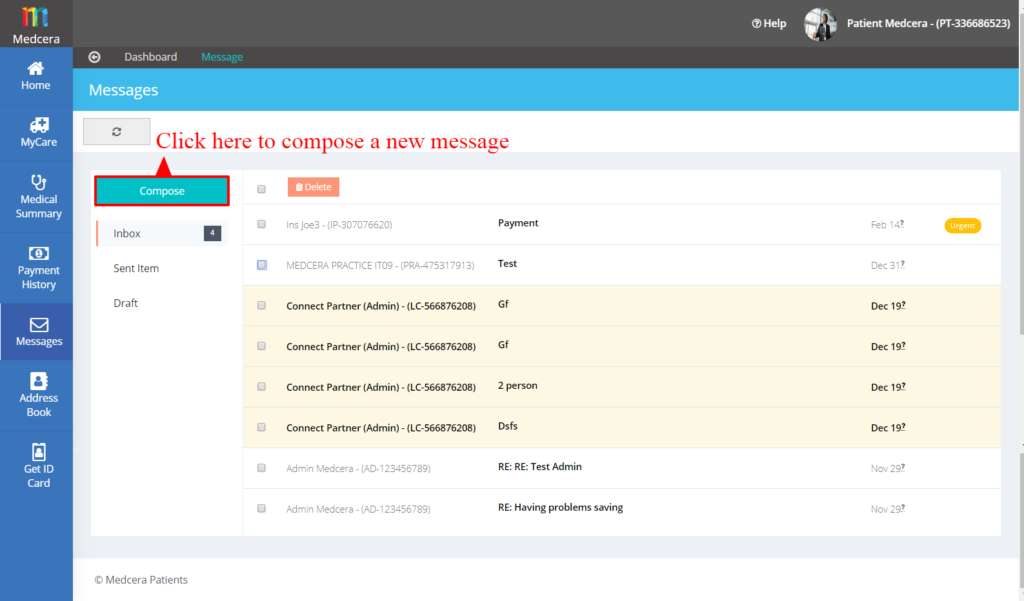
- A click on “Messages” in the vertical Menu Bar on the dashboard as shown below.
- Click on “Message” to check received messages, sent messages, or to send a new message.
17.1 Read Messages:
- A click on Messages displays the screen below..
- “()” label suggests that the received message is important to take.
- Message format includes Sender name and Subject.
17.2 Compose a new Messages:
- Click on “Compose” button to compose a new Message.
- A pop-up window displays as shown below.
- From the drop-down “Select User” Select a recipient and enter an appropriate subject for the Message.
- Compose a Message and Attach files if required.
- Check “urgent” if Message is Urgent and click on send button to send the Message to the Recipient.
- Click on “Send” Button to send the message.

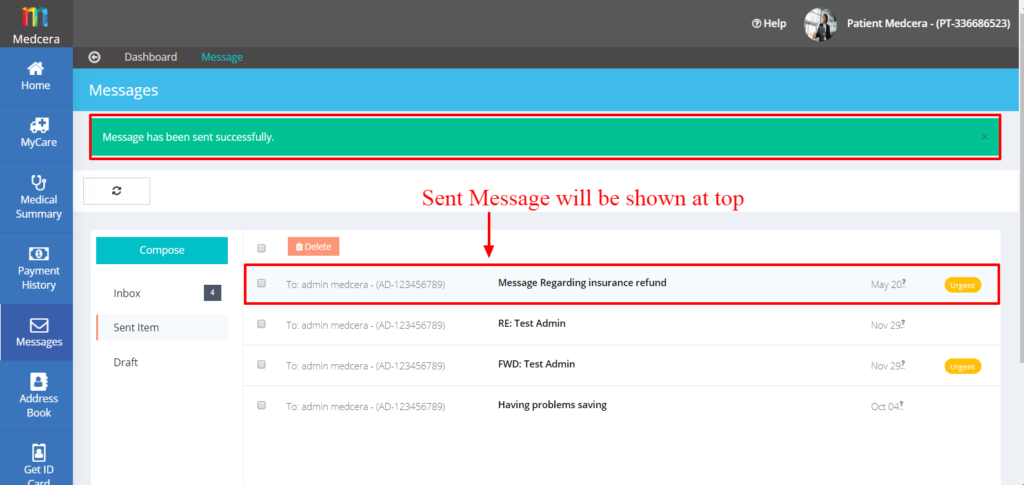
17.3 Sent Messages:
- Click on “Sent Item” to view sent Messages.
- “Message has been sent successfully” will be displayed at the top of the screen.
- A click on “Pending Order” tab in the sidebar menu redirects user to pending orders card as seen below.
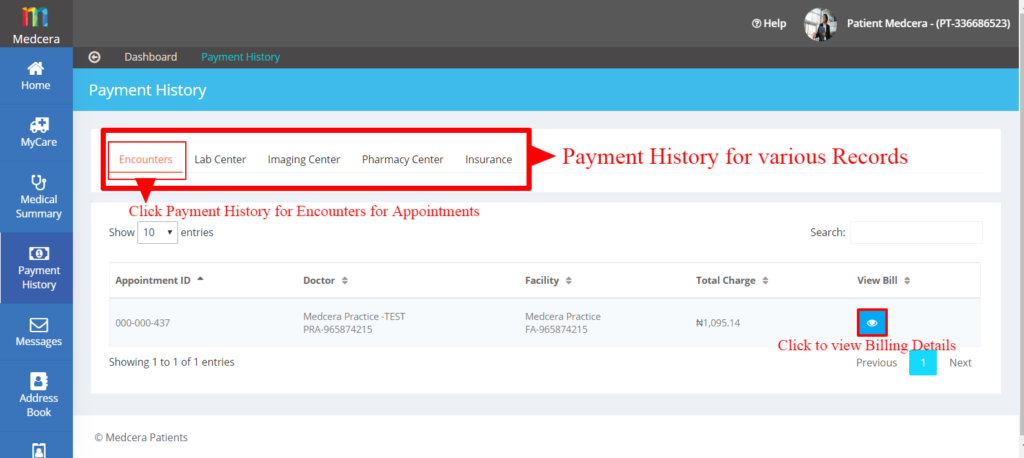
- Click on “Payment History” in the vertical Menu bar on the dashboard to open Payment History of Appointment and Connect partners.
- Click on specific tab to View payment history of that category.
19.1 Encounter:
- A click on “Encounters” displays the page below. Click on “View” button to view detailed history of record.
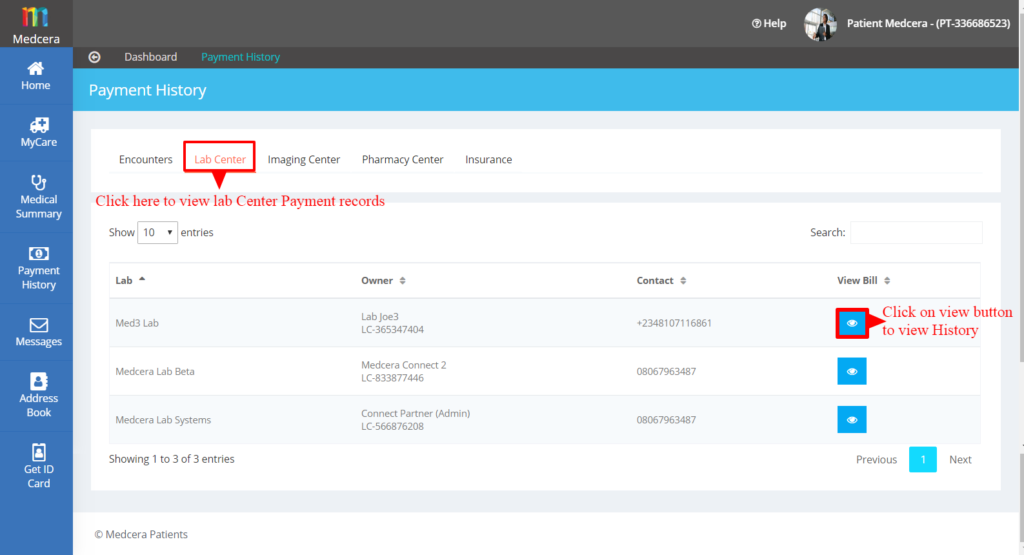
19.2 Lab Center:
- A click on “Lab Center” displays the page as shown below. Click on “View” button to view detailed history of record.
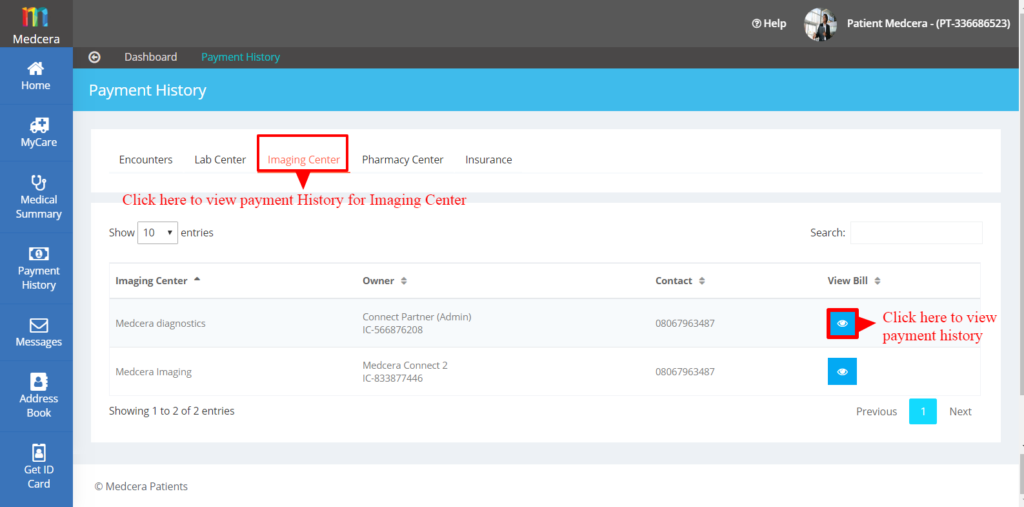
19.3 Imaging Center:
- Click on “Imaging Center” to see the page below. Click on “View” button to view detailed history of specific record.
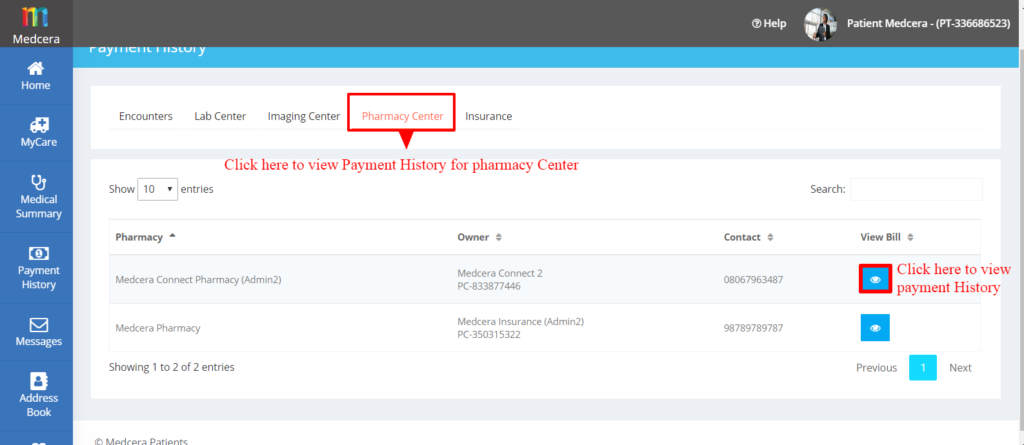
19.4 Pharmacy Center:
- A click on “Pharmacy Center” shows the page as seen below. click on “View” button to view detailed history of specific record.
19.5 Insurance:
- Click on “Insurance” redirects user to view various status of Insurance policy. See for more details 12.1.
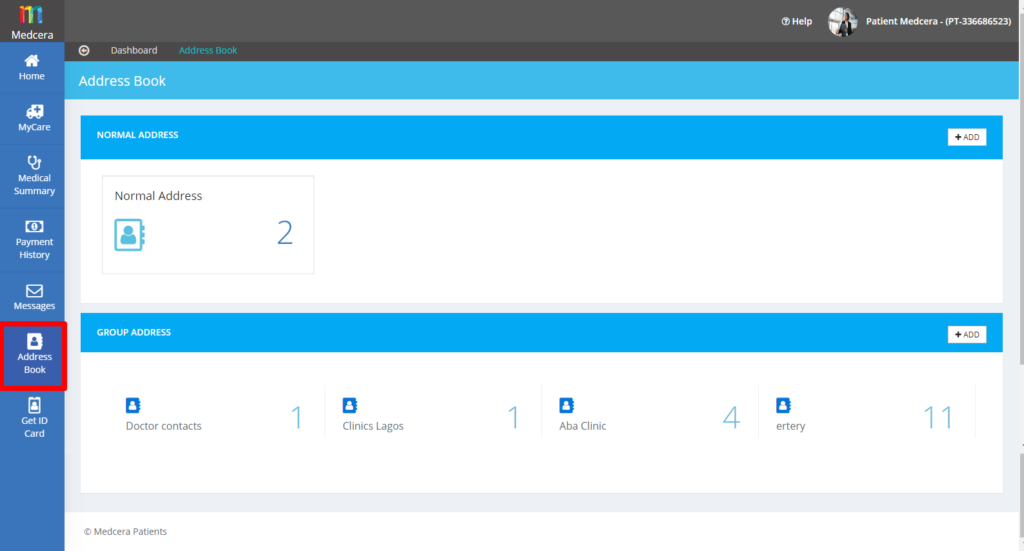
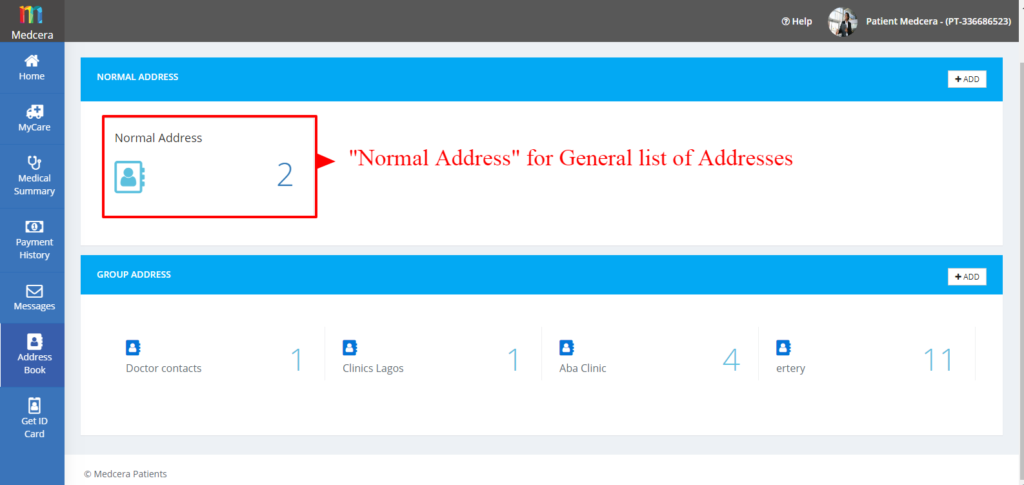
- To Create an Address book click on “Address Book” in the side bar on the dashboard.
- A click on “address book” displays the screen below.
- There are two types of Address Book: Norma Address Book and Group Address Book.
20.1 Normal Address:
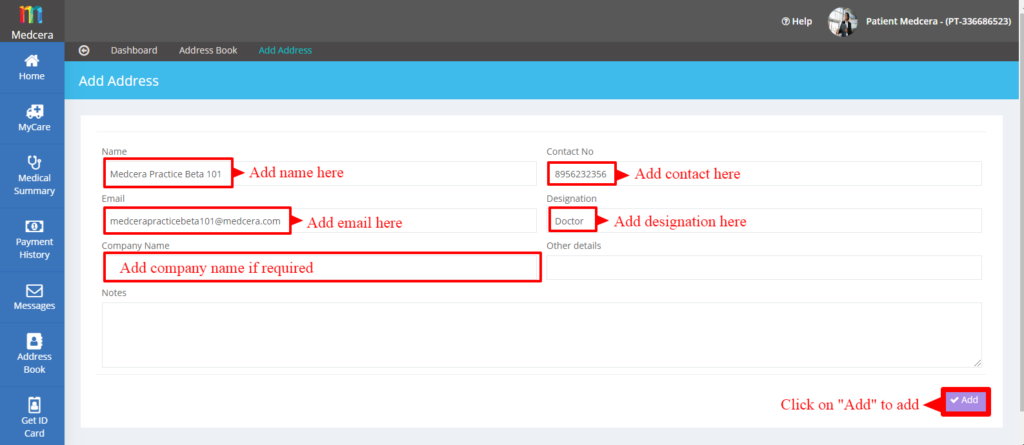
- Click on “Add” Button to add an address to Normal List that you want to save for reference.
- A click on “Add” button displays the screen below. Add relevant details and click on “Add” button.
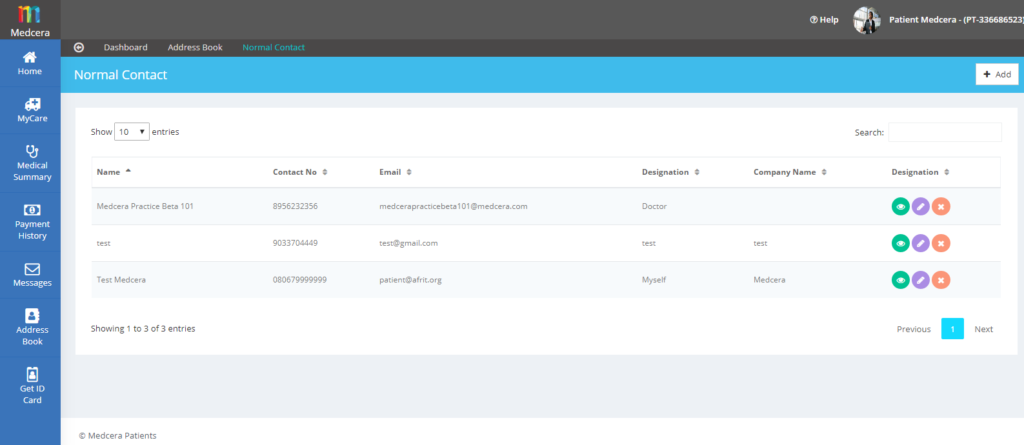
- When an address is added to the Normal Address list, a list will be generated as shown below.
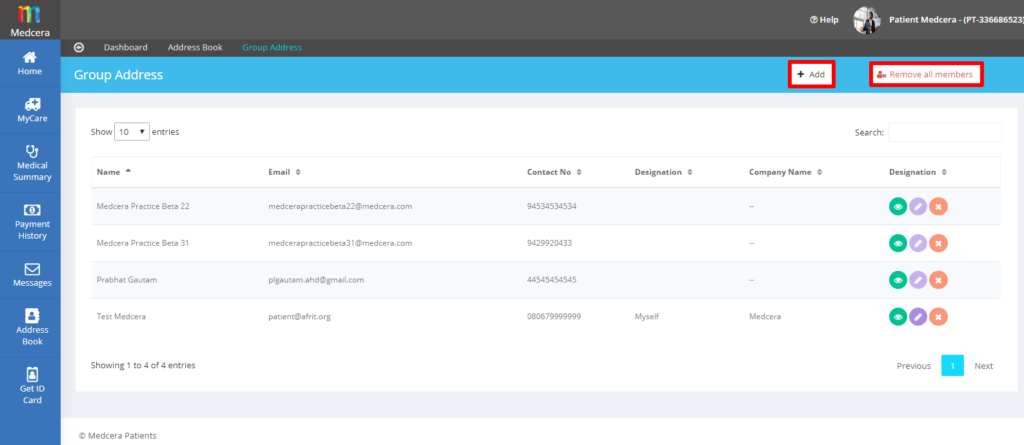
20.1.1 Group Address:
- Lab Center can categorize various Addresses in a Group in order to allocate a specific category to specific classifications especially when the list includes multiple records.
- Group of different categories will be shown. Each category includes a list of specific Addresses.
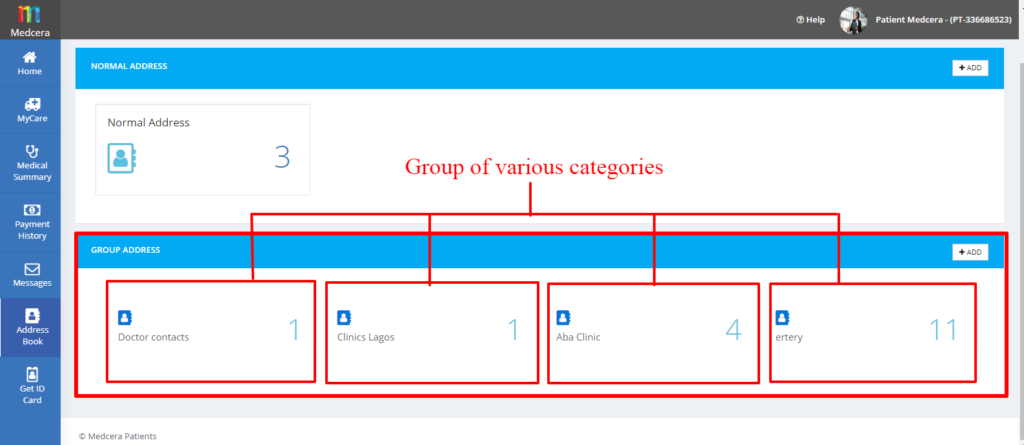
- A click on any category displays a list as shown below.
- Click on “Add” button to add another address in the list or “Remove All Members” to delete the records.
- The address can be viewed, Edited, or deleted as per requirements.